How to check implant stability (whether the implant has “taken root”)
How well the osseointegration has been completed, and whether a crown or a bridge can be placed, are difficult questions to answer definitively. It is not enough to consider the healing time alone. In this article, we will discuss several methods to verify secondary stability and touch on the biological processes of osseointegration.
How long to wait after an implant is placed?
Secondary stability is achieved when the living bone at the cellular level attaches to the implant surface. Usually 6-8 weeks is enough for this process, but in practice it often happens that the implant cannot be loaded after this time. Let’s see if more time is needed:
- If we are dealing with a smooth (milled) implant: In the early days of Branemark, only such implants were used. Now they have been almost superseded by root implants with rough surfaces, but smooth implants are still actively used. In the case of a milled surface implant, it is worth following Branemark’s recommendations that it takes 16 weeks to fully integrate into the mandible, and up to 24 weeks on the maxilla.
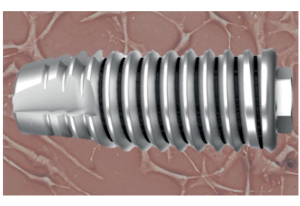
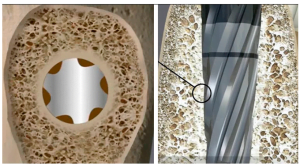
- If the patient has D1 bone, very dense bone with a density index over 850HU: In this case most of the implant is immersed in a strong cortical plate. Such bone provides good primary stability, and it would seem quite possible to load the implant after 6 weeks and even more so after 8 weeks. However, practice shows that the high bone density is more of a disadvantage for the full integration of the implant. It has few capillaries and less bone marrow, which are responsible for changing the bone structure and the formation of new cells bonded to the implant surface. Integration into D1 bone occurs with significant resorption. After all, as you know, you need space to form new bone; which will be filled with a blood clot, then with granulation tissue from which new bone tissue is formed in contact with the implant body. See the illustration below.
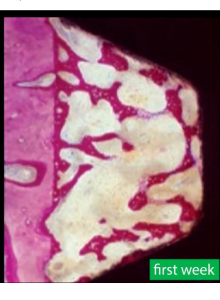 Therefore, in such cases, it is recommended to wait 12-14 weeks before placing the abutment and crown.
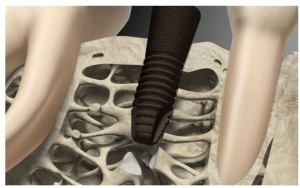
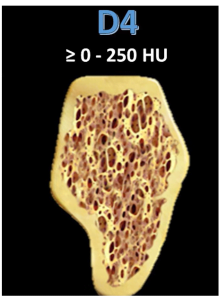
 - The other extreme is, for example, placing an implant in the cusp of the maxilla. Where the bone density is at best D3 and often D4 with a density of less than 250 HU. The torque with these implants is very low and often does not exceed 15 Ncm. If we try to insert an abutment with a torque of 35 Ncm after 8 weeks, it is very likely that the implant will turn over. This is a serious problem because the D4 bone type has a very thin cortical plate and very coarse-meshed trabeculae. See the illustration below.
Therefore, it takes more time to integrate, in practice it is between 12 and 24 weeks.
To improve the prognosis of osseointegration, a bone training technique is used. It is based on Wolff’s law, where the internal bone pattern changes under load. Under load, the structure of the trabeculae changes and the counterforces arise to compensate for the load. Conversely, a bone that does not carry any load eventually becomes loose and porous.
In the practical plane, a sufficiently high gingiva former is inserted in the implant to strengthen the bone. The movement of the tongue, cheeks and food clods will exert enough force on the implant for the bone structure around it to begin to change.
There is also the technique of gradually introducing the crown into the bite in the bone training concept. First, a crown is placed that is not in contact with the opposing tooth, and the restoration is gradually brought into full dentition in several steps.
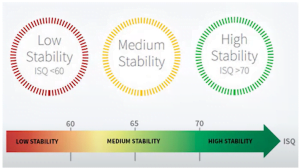
IMPORTANT: early and immediate restoration with the placement of a temporary crown is allowed when the torque at insertion was 35 Ncm or more, or if the ISQ stability coefficient is between 60 -65.
High torque implant placement – pros and cons
Let’s see what happens when an implant is implanted with ultra-high torques of 50 Ncm and higher. This concept has its supporters, discussing techniques where the torque setting exceeds 100 Ncm.
Let’s start with the arguments against it:
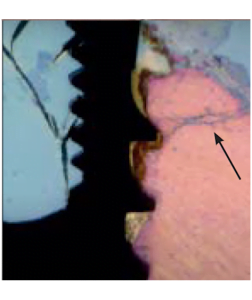
- There are quite a few studies, including histological data that osteocyte death occurs in places of stress, and cracks occur including in the compact part of the cortical bone. See the image below.
- Bioengineers are also against ultra-high torques. They are engaged in the development of design, thread pitch, selection of angles and the degree of aggressiveness of the thread.
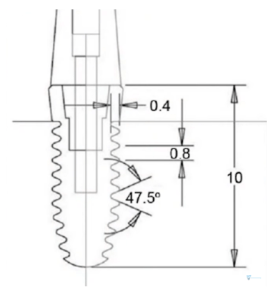 Among these specialists there are also quite a lot of research groups, and at one of the recent consensus conferences the following results were published: At torques above 80 Ncm, in a significant proportion of cases, irreversible deformation of the internal interface of the implants occurs. It doesn’t matter if it’s a hexagon or a cone. Because of this, some manufacturers began to produce implant drivers with a brittle point of exactly 80 Ncm. The implant driver acts as a kind of mechanical fuse. If you apply a force of more than 80 Ncm, it will simply break.
Now let’s move on to the advantages of high torques of 50, 60, 70 Ncm and higher
- High installation torque (35 Ncm) and above allows for immediate restoration of the crown, which is especially important for anterior teeth. This is important because during the healing process, the overall stability drops for a while, in some cases by up to 50%. The decrease is observed between the 2nd and 5th weeks and is due to the restructuring of the bone tissue. See the graph below.
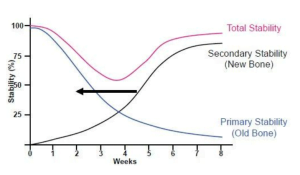 The body resorbs the compressed and injured bone fragments that were in contact with the implant coils and the stability temporarily decreases. Then the implant finally grows into new bone tissue and stability increases again.
It makes sense that if the primary stability was initially high, a temporary decrease in stability will not result in loosening or rotation of the implant. - As a rule, the body of the root implant is narrower than the hole made during the osteotomy. Most implants are designed with a high thread profile and the implant insertion protocol is such that only the tips of the threads cut into the old bone. See the illustration below with the two implant seating options.
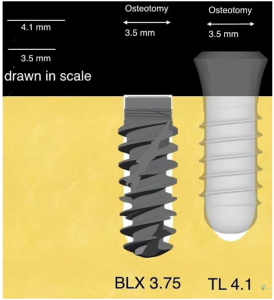 Between the coils there remains a free space, which is filled with a blood clot, in which granulation tissue is formed and then new bone begins to form. This approach speeds up the process of bone integration. Yes, with high torque on the coils, we can get cracks and bone damage, and the damaged bone will be resorbed. However, due to the gaps, we get intensive new bone growth, and the overall stability is not affected. Moreover, we get a reduction in the overall period of osseointegration.
 - Another argument for high torque is the physical and biological properties of bone. It is not concrete or brick. Living bone is elastic and malleable within certain limits. This means that after some mechanical action, the bone deforms and then returns to its original position. So when the dentist drills a hole, the drill deforms and compresses the bone, but after the implant is placed, the bone straightens and compresses the implant.
These bone properties are particularly utilized in osteocompaction systems. Osteodensitization techniques are also gaining popularity, where special drills are used that work in reverse and do not remove bone fragments from the hole, but compress and squeeze the bone. Only a partial removal of bone tissue is obtained, and the full size of the hole is formed by squeezing (deformation) in the bone mass of the desired size.
Nelson Pinta, a prominent proponent of osteodensification, published the materials of an interesting experience where he and his team were placing implants in beef bone.
One group of holes was drilled with standard mills and the other group was drilled with special osteodensitization drills, which are not drills in the usual sense. They do not remove bone fragments from the hole, but make the hole by plastic deformation of the bone itself.
During the experiment, it was found that specimens left for some time, in which the holes were made by deforming the bone, shrank. That is, the diameter of the hole decreased in only ten minutes after the procedure.
This means that even if the osteotomy was performed in the standard way, the thread coils would not necessarily traumatize the bone and cause fractures. It is very likely that the implant coils will anchor into the bone through plastic deformation giving good primary stability even in bone type D3 and sometimes D4. It would be unrealistic to achieve such a result with low torques.
What are the prerequisites for placing a high torque implant?
Let’s sum up the intermediate results. To get all the benefits of high torque with minimal risk of complications, you need to consider:
- The bone type must not be D1. The bone must be elastic, otherwise, at high torques, the risk of cracks, inflammation, and even bone necrosis increases.
- There must be at least 2 mm of living bone around the implant in all directions. Otherwise, you can lose the implant if resorption begins as a result of bone trauma.
How to clinically determine whether an implant has “taken root” or not
There are several ways to check the secondary stability of an implant.
- Percussion or tapping with an instrument on the gingiva former: The handle of a mirror or the back of a pair of tweezers is good for percussion. A well-integrated implant makes a ringing sound and a poorly integrated implant makes a muffled sound. It is difficult to convey sound within the limits of the article, understanding comes with experience and practice. The percussion method is not very popular among young specialists because new diagnostic methods are much more accurate. After all, the integration may be partial or incomplete, and the sound on percussion may be good.
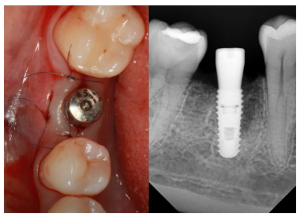
- Take an x-ray and try to detect flaws in the structure between the bone and the implant. Unfortunately, it is not 100% reliable either. The picture below is an example where the implant looks good from the scans. However, when the abutment was screwed into it and a force of 30 Ncm was applied, the implant turned.
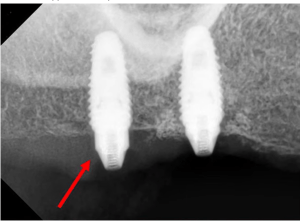 This despite the fact that 12 weeks have passed since the installation and the bone type was D2. There was no apparent reason for this.
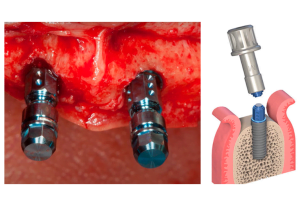
 - It is impossible not to mention the false and malicious way to check the stability. This is an attempt to screw on the Healing Abutment with a force of 35 Ncm. Even if you do this several times, and nothing bad happens, it’s still wrong. Healing caps are not designed for such a load; they must be screwed on with your fingers. If you really want to check the stability in the forehead, it is better to try to apply force directly with the implant driver, but not through the gum shaper. In any case, trying to test the stability of the implant with high force is not the best method.
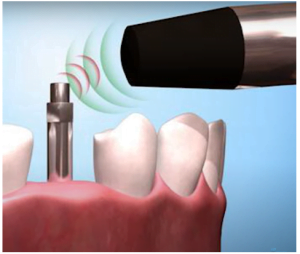
- The last of the recommended ones is the magnetic resonance method for checking the stability of the implant.
The ISQ allows you to determine the stability of the implant quite accurately, see diagram below.
This is one of the most accurate methods, although even it is not 100% reliable, but the other methods give a significantly lower probability of accurate verification.
So, let’s sum up. Particular attention should be paid to cases when one has to deal with extremes – D1 and D4. In these cases, it is recommended to wait an additional time of 12-16 weeks, and to apply magnetic resonance stability diagnostics before installing the abutment.
If there is a desire to work with high torques, we recommend that there be at least 2 mm of bone around the implant on all sides, especially from the vestibular part. As far as bone type is concerned, bone type D2 is ideal for implantation with high torques.
We hope the material in this article will be useful for your practice. Until future publications!


