A screw retained restoration of the bridge on the upper jaw. Temporary bridge for their daily use
Hi, and welcome back to Uniqa Dental Show, where we discuss interesting cases and new procedures in the field of dentistry. Don’t forget to leave a like, share, subscribe, follow us, and send us your interesting cases. With us today, as always, Doctor Yaniv.
The clinical situation with which the patient came
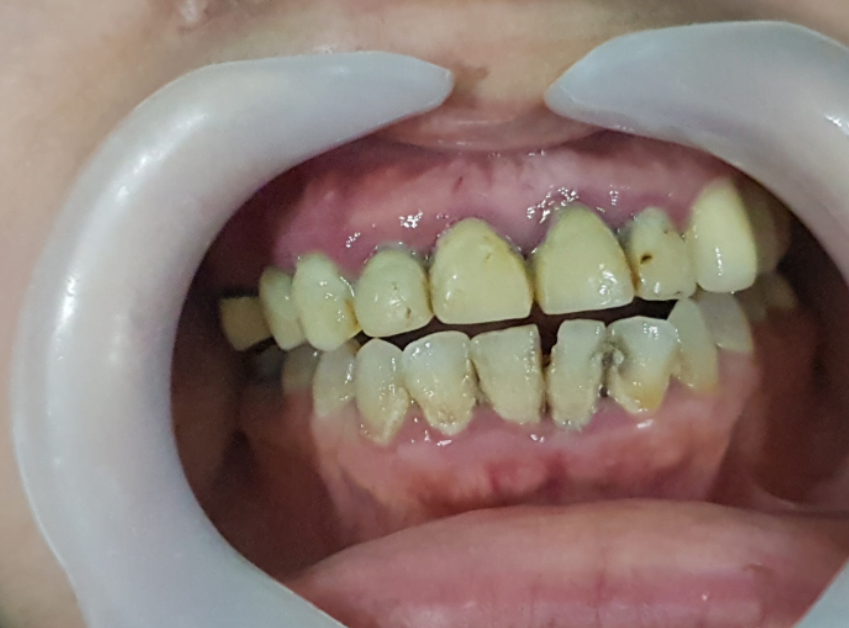
Today, we have a case where we’ll make a screw-retained restoration bridge on the upper jaw. We’ll extract some of the teeth. Then we’ll have a temporary bridge on the teeth we left, and later on, we’ll change the temporary bridge, the provisional bridge to a zirconia bridge on top of those implants. You can see the pigmentation. You can see that the periodontal health of those teeth is not the best.
We did some x-rays. We’ll check the implant and check the teeth. The teeth need to be extracted and they’re hopeless. You can’t do anything really good for these teeth. And what we’re going to show is how we did all the procedures while leaving the patient with a temporary bridge that they can have some function with and not just the denture or something like this.
Also in the picture you can see that the lower jaw is no better. It’s probably the same. But first of all, sometimes it’s easier to make one jaw to replace the teeth for implants on one jaw, and later on, do the other jaw, because you maintain the same relations. You don’t need to look for these relations again. In here, you can see that from the canine and going backwards, it’s a bridge. The patient has an occlusion. If you extract all the lower teeth and these upper teeth, you need to find again the right occlusion of this patient. So, in this case, it’s much easier to change the upper teeth to a bridge on implants. And later on, the lower teeth also.
Doing it step-by-step. In some cases, it’s even easier for the patient, because first of all, psychologically, you change some of these teeth and he is still left with some other teeth and it doesn’t have a bleeding pain all over his mouth. It’s sometimes much easier. It depends on every case. Sometimes you want to change everything at once. Sometimes you want to do it periodically. You want to change one jaw, and later on the other jaw.
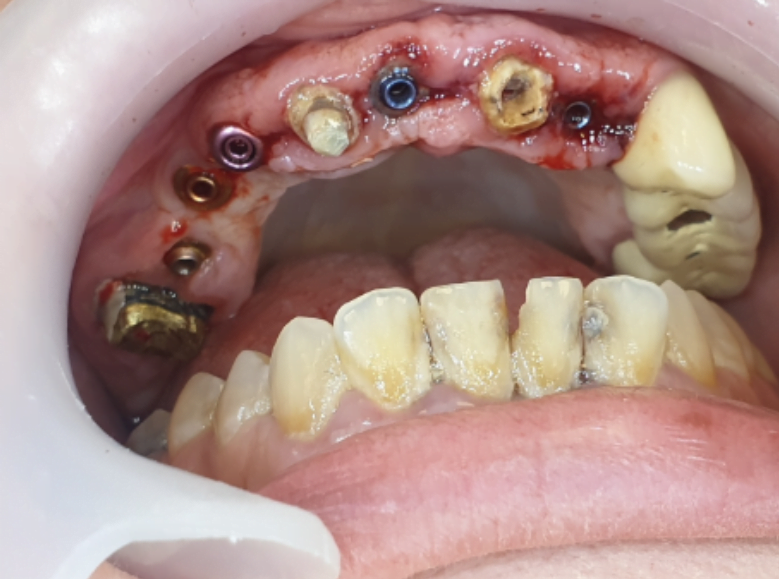
On the next slide, we see the remains of the teeth after the removal of the bridge.
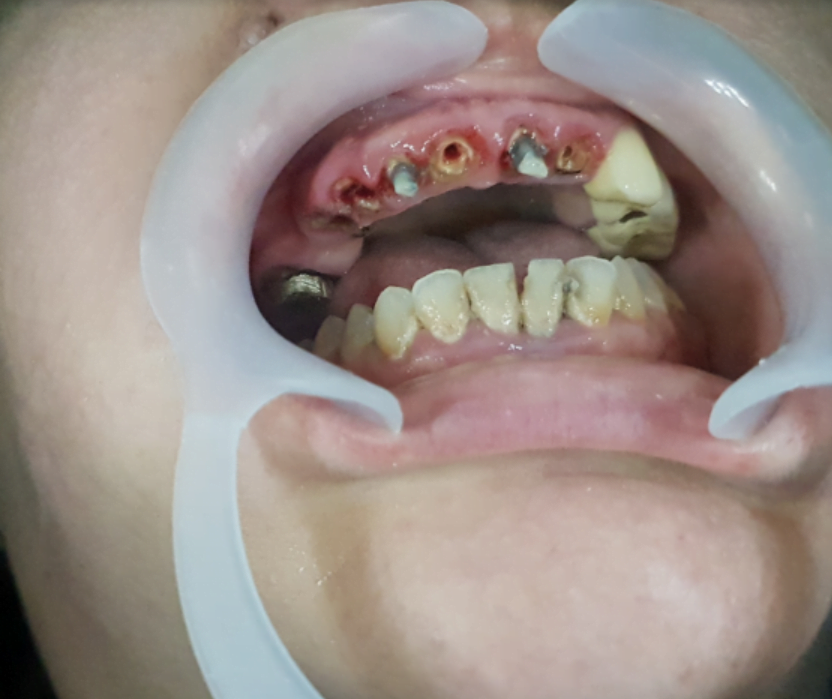
You can see that three feet remained. Those teeth were extracted. The teeth that remained we made root canal treatment. And post and core were cemented to these teeth for the temporary bridge to have a better retention on those teeth. Everything is temporary. Later on, we’ll extract those teeth also. But we wanted for those teeth to last this amount of time. We wanted it to last at least five, six months until the implants will Osseointegrate and we’ll have a better, for example, temporary bridge. And later on, a permanent zirconia bridge.
You can also see a black area on the right upper jaw near the molar area.
This is a PFM bridge, porcelain-metal alloy. Probably when the bridge was made, the height of the porcelain wasn’t small enough. And when the doctor checked the occlusion, he needed to be removed from this spot. So, they moved, they moved, they moved, until he got to the metal. Probably some part in the occlusion taking was wrong. That’s why it happened. This black dot is not a hole, it’s just metal.
You need to really look for it. If it was in the buccal parts, the bridge was probably remade. But in here, probably in here maybe it broke. Maybe something happened. Maybe they removed the porcelain after the cementation of the bridge. You can have many different reasons why you should leave it. Maybe there is not enough space between the prepared upper tooth and the lower tooth. So, there wasn’t even a cement porcelain placed in this area.
On the next slide you see a temporary bridge.
You can see it’s not the best temporary bridge. Because it’s a temporary bridge that is cemented on only three teeth, you need to have a massive temporary bridge. You can’t have a temporary bridge where all the embrasures and the gingiva, everything looks good because every loophole you make can weaken the structure of the bridge.
Yeah. When you weaken the bridge, in this case, there can be fractures. There’ll be a lot of problems. You want this bridge to hold at least for three months until you can load those implants. And to be honest, maybe it’s even better than what was before. There are some considerations. When you’re performing a temporary bridge, you need to think about all this stuff. So, in this case, probably the temporary bridge was made a little bit thicker for it not to break down. And it was a little bit on the aesthetic part.
Then the gum will heal, the implant will osseointegrate. We’ll see how the gingiva healed. So, we’ll know in the future parts, what type of multi-units we should use, how we would design the crowns around the gingiva. So, we will have a nice continuity between the gingiva and the teeth themselves.
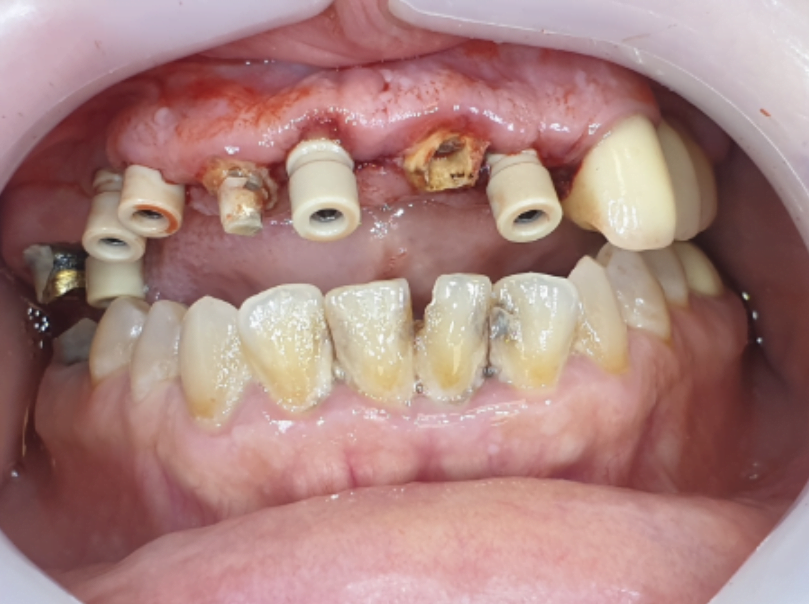
It’s after the removal of the cover screws.
We chose the right multi-units for every implant, by the height of the multi-unit. You can see by the colors of the multi-units that there are different types of multi-units and how many there are. You can see that this tooth has so many caries that even the core that we used was removed with the bridge. The bridge that was cemented on with cement. So, these teeth are in a really bad situation. In this case, we made an impression on those multi-units.
When you know the height, it’s all multi- unit level. Later on, after the healing of this swallowing of the gingiva, you can maybe change one or two of the multi-units, but it’s much easier to take impressions on multi-unit level. We took on multi-unit level impressions on all of the multi-unit. But we didn’t extract the teeth because in this case, you put back the bridge that we took off before, and the patient waits for the new bridge to be constructed.
There is no need to wait for healing here. You just need to wait for the manufacture of a permanent bridge. The new bridge will go on top of this multi-units and to put the bridge on top of this multi-unit, we need to extract those teeth. So, we’ll have two operations in one day. We’ll have the extraction of the teeth and the assembly of the bridge. But we already chose the multi-units. We made impressions. The patient waits, depending how long it takes to make the bridge. If you have a CAT/CAM Machine or you send it elsewhere, it’s from one to a week, one day to a week, probably would take.
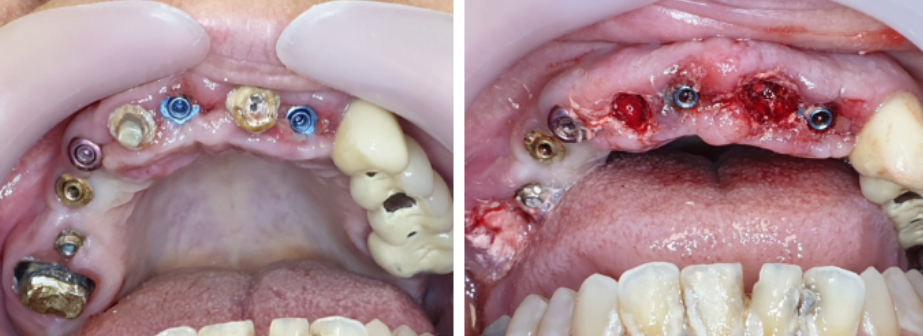
On the next slide you see the bridge. Milled PMMA temporary bridge. We see five sleeves.
And you can see the screw channels here. Some go very buccally. Later on, you can maybe change the multi-units to angulated ones, because you didn’t have the design of the bridge before. So, you don’t know what type of multi-unit you can use, and if you have any problem with angulation. But even though it goes to the buccal part, you see it in the distal part of the canine. So, maybe if you close it up, you won’t see the screw channel. You can see the extraction of the teeth, the multi-units, it looks a little bit messy. We have five multi-units, and here you can see the teeth, and here you can see the sockets of those teeth.
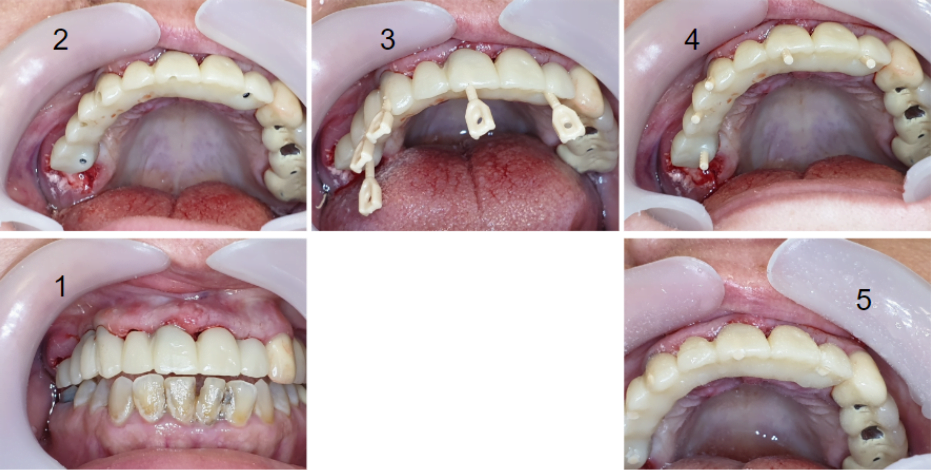
On the next slides we see the step by step sequence.
Нere you can see the PMMA bridge. We’re closing the holes with the plastic pins. We put in all of the holes, plastic pins. You can see angulation of all of the implants. You can see that the implants are practically parallel. So, you don’t have any buccal inclination. Just on these two implants, you have slightly inclined implants. It’s fine. It’s the upper jaw. Sometimes it’s very hard to place implants parallel, or it goes a little bit palatal. So, it was a job really, really well done.
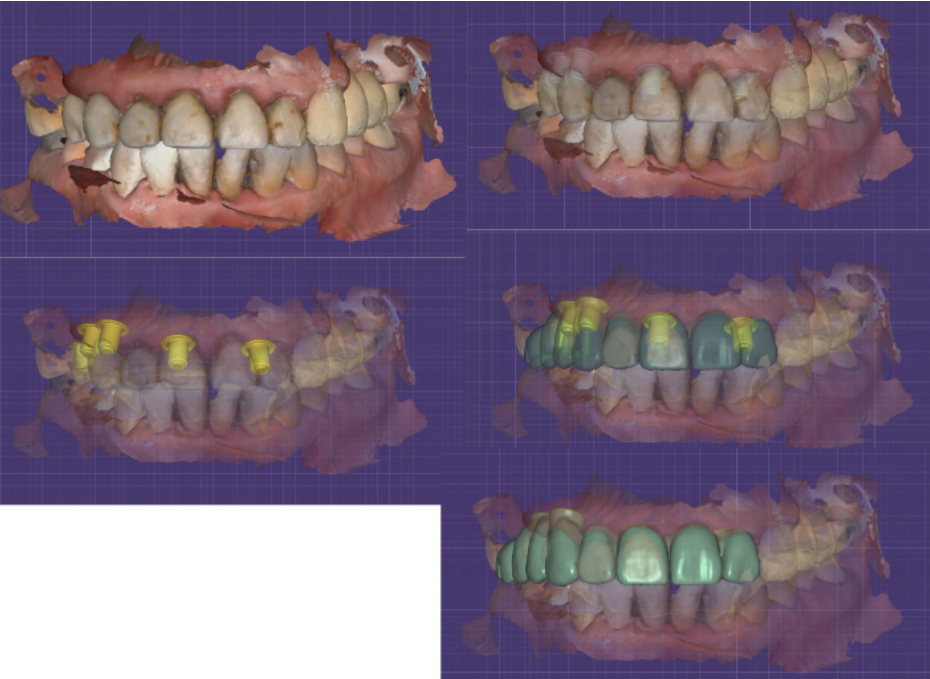
Next you can see the scans and you can see the design. You can see the final design of the crowns.
You can see that there are no significant changes between the original teeth and the end result that you get.
Some patients don’t want to have any noticeable changes in the final crowns and the original teeth that they had. They don’t want people to know that they have implants. They want people to think that it’s all natural. So, we keep the original design. We take this design and we design the new teeth by the original design. You can also see that even though we extracted the teeth, you would think that there will be a little bit of a gingival recession. But in this case, instead of having a gingival recession, the gingiva healed and you have even more gingiva than before.
Аnd because we extracted the problematic teeth, there is much less inflammation and the implants are maintained correctly, as they should be. And the gingiva is not inflamed as before. So, the gingiva healed a little bit and returned to its original position.
On the next slides you can see the screw channel, the angulation of the scan abutments on the multi-unit level.
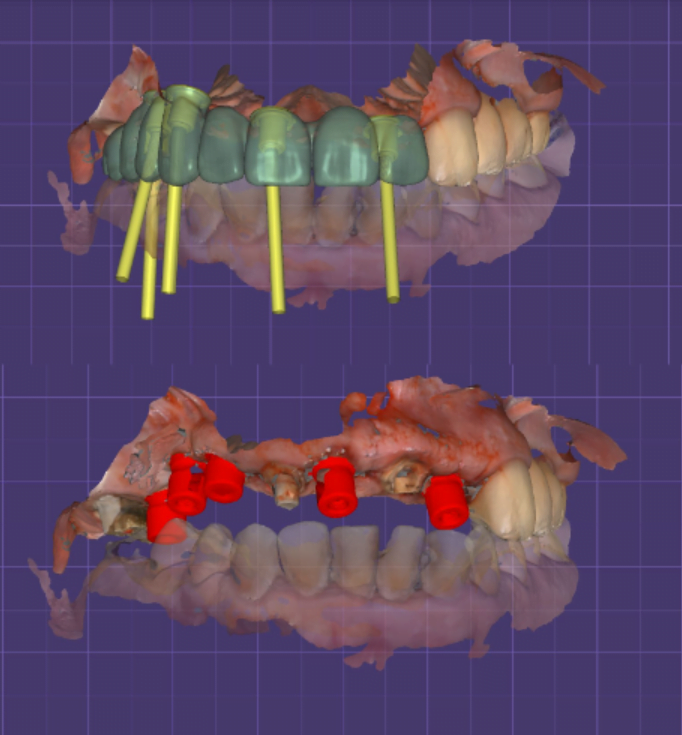
Digital photograph of the prosthesis indicating the direction of the screw channels and a photograph showing the scanned abutments
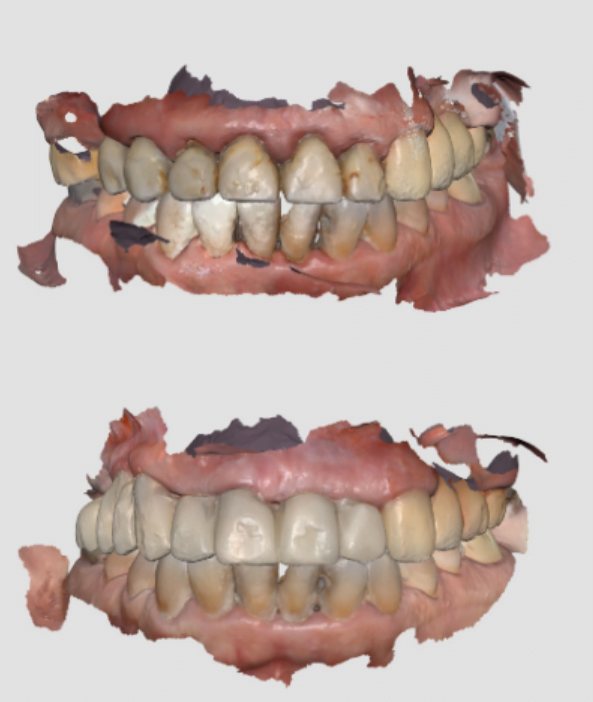
You can see the scan of the provisional bridge and you can see the scan of the original. What I wanted to show here is not the final work, but you can see the gingival line.
You can see that the gingival line in here is very high, much higher than here. When you have an inflamed gingiva, even though you have teeth, not always you’ll have gingival recession. If the procedure is done correctly. If the patient has good hygiene in all of these procedures. When you place the implants if you maintain these areas, you clean it well, you might even get a little bit more gingiva than it was before. Without any surgical interference with the gingiva.
There are different types of programs for designing. Most of the programs are probably, in this case, the same. I don’t see any advantages for any program. Everything was made in exocad, in a latest version with the libraries for these multi-units and just the design of the teeth with libraries, adjusting a little bit the screw channels and that’s all. These libraries in exocad, even if you had gingival recession, for example, after you placed the multi-units, you can still change the height of the multi-unit without taking impressions again.
This does not require the presence of the patient and the removal of the bridge. Change the multi-units, take impressions, and send it to the lab. The biggest advantage in these types of works, that you take one time the impression, and later on, if you want to change anything, you can change it according to the last work that you designed. So, if in here you wanted this multi-unit to be a little bit smaller or a little bit higher, you could just switch to a different multi-unit and the design would still be the same. You’ll need to correct it a little bit because you changed the height of the multi-unit, but everything is made really easy. So, you have one provisional bridge. Going into the second provisional bridge, it’s very easy because you can just replace the upper jaw scan. You have the occlusion because we made only the upper jaw. And later on, just change the height of the multi-unit. You can see how the gingiva changed according to the original scan. You make these small adjustments and you have everything.
On the next slide, you see a permanent bridge.
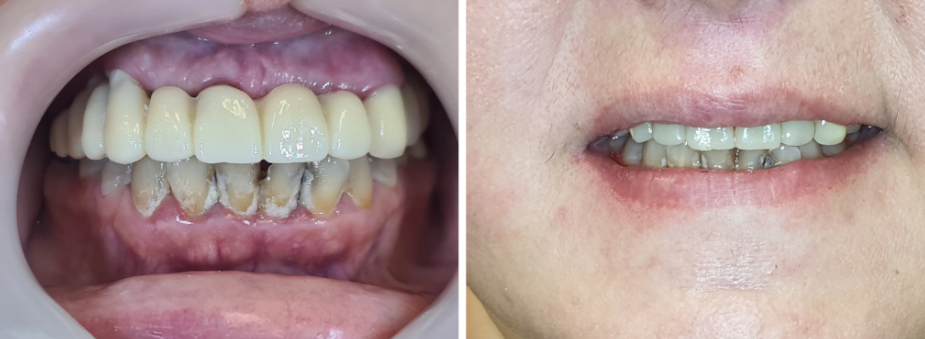
You can see how the bridge and the gingiva, the relations between the gingiva and the bridge, you can see that the teeth are almost touching the gingiva. This is the best way it can be because you won’t have any pockets between the gingiva and the bridge. And the aesthetics look great. To the original teeth and compared to the lower teeth, you’ll see she still doesn’t brush it. She still doesn’t brush her teeth. The color looks fine. The most important thing is the design. The design looks very close to the original teeth with the color looking exactly as the porcelain fused the metal teeth. You don’t see any changes in the color. And you see the relations between the bridge and the gingiva. You see a very healthy, maintained gingiva, which is great for implants.
The smile line is very good. In the next step, you need to change the lower teeth, probably extractions and implants.
Don’t forget to like, share, subscribe, follow us, and send us your interesting cases so we can review them. Have a great day.




![Drilling procedure for UNIQA Dental Pure & Porous Implant UH8 UV11 [ 3.3 mm | D4 bone density ]](https://img.youtube.com/vi/8GjQyxWRx64/maxresdefault.jpg)

![Drilling procedure for UNIQA Dental Pure & Porous Implant UH8 UV11 [ 4.2 mm | D4 bone density ]](https://img.youtube.com/vi/ncnwOoxrAO0/maxresdefault.jpg)


