Implants buccally inclined Unique multi unit solution for work on bar. Digital impression
Hello everyone – welcome to Uniqa Dental. We are here again to discuss new procedures in the field of dentistry. Of course, let’s look at a new interesting case to show how doctors use our products to solve complex dental problems. Today, Doctor of Dental Medicine Yaniv, who teaches at Gerber University, helps us. Don’t forget to subscribe and follow us to stay updated! So let’s get started.
What is the problem with implants in this clinical case
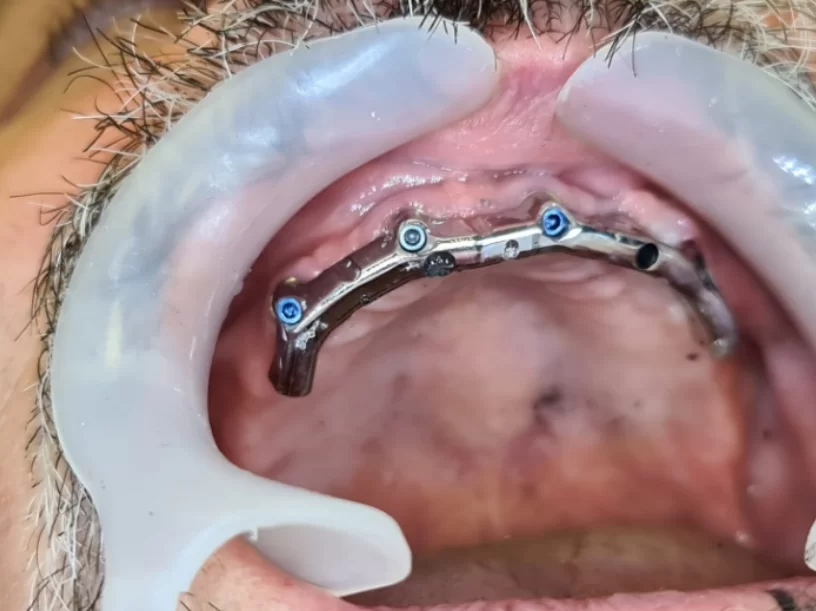
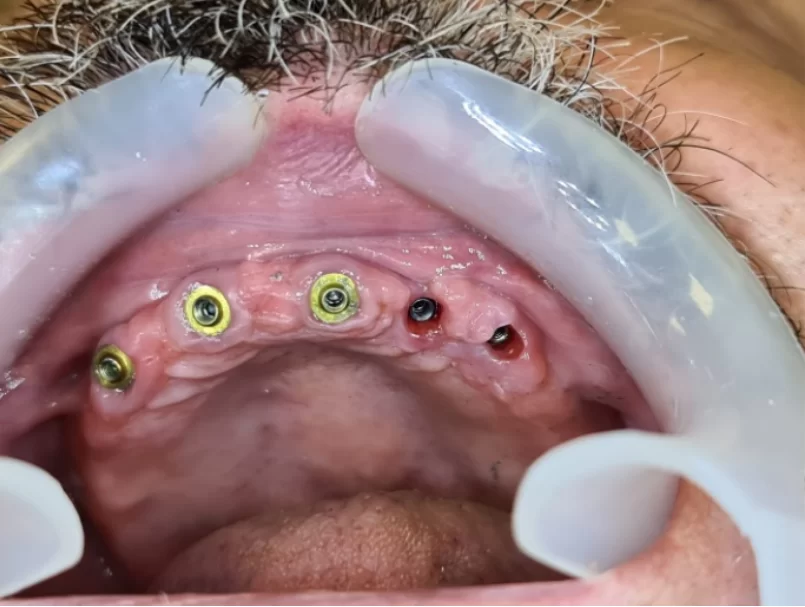
What we’re going to be looking at & discussing today is an overdenture on a bar. Now that bar is based on 5 implants that are in the anterior region. And on the implants, you can see multi-units and then on the multi-units will be the metal structure.
As you can see, all the implants are buccally inclined. That is one of the major problems in this case. Because they are buccally inclined, we want the bar to shift into the palatal region in order to get better aesthetics.
You can see in this picture that the pillars of the bar are buccally inclined because they have to be in line with the implant. But the bar itself goes to the palatal area. So, the smaller the multi-unit, the smaller the cone of the multi-unit, the smaller the pillar will be, and you’ll be able to move the connectors of the bar more palatally. Therefore, we’ll get better aesthetics and have more space for the overdenture, for the plastic and for the opaque to mask the metallic color. And the end result will be beautiful.
The multi-unit, the part that takes all the pressure, is the horizontal part. So, you can make the cone a little bit smaller and still, you’ll have enough surface for the multi-unit to hold. It won’t be a problem with forces. If you don’t have two large bars or two high bars, the movement on the screw will stay the same. Everything will be fine.
What type of MUA will be used to get more space
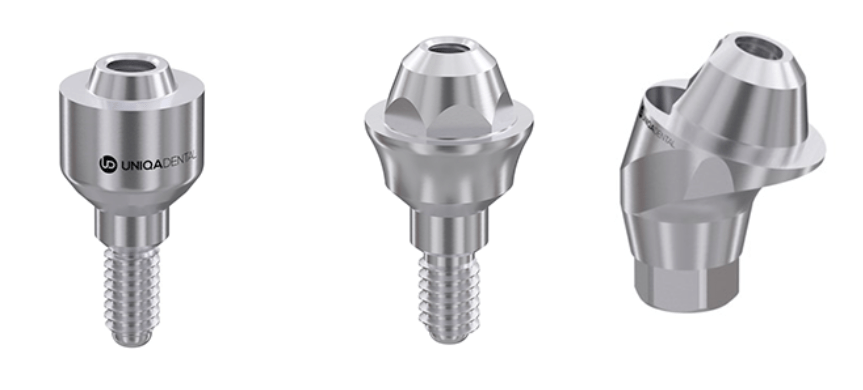
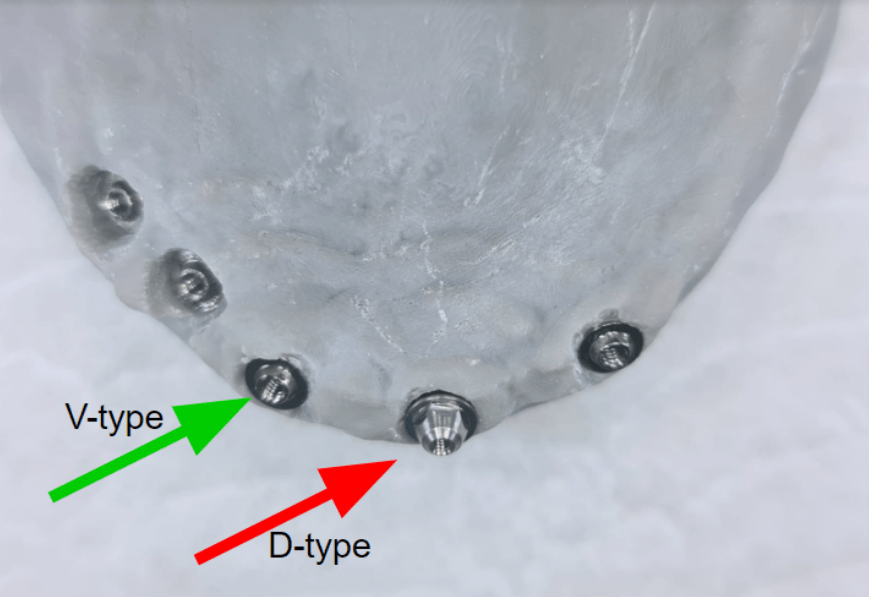
Now why use smaller multi units? Well, in the smaller ones that we used for this case; the overall diameter of the multi-unit is smaller – about 0.5 millimeter smaller. The standard multi-units that we have on the market are about five millimeters in diameter. The multi-unit that we use here are about 4.5. The diameter of the body of the multi-unit is 4.5. The pillar that we’ll have, will be smaller in its base, but not only that, the cone of the multi-unit is also smaller. In here you can see the cone is about two and a half millimeters high. In here you have 0.8 millimeters, which also allows for more surface area.
You have much more area for the screw and you can make the pillar of the bar much thinner. The thinner the pillar of the bar, the less problems you have in the aesthetical regions. The screw will be much closer to the horizontal part of the multi-unit and the height of the pillar also doesn’t have to be that high. You can see a demonstration between the two multi-units. The first one is in the mouth and the second one is on the model. In the mouth, you can see the small cone of the multi-unit, and in the model, you’ll see it’s the model of this patient. You can see the height of the cone that could have been if we used regular ones.
You’re probably wondering if you were to use a regular multi-unit – will there be a space between the bar and the gingiva. Probably not, because the horizontal part of the multi-unit is still at the same height of the gingiva. You might even want it a little bit higher than the gingiva. You want some space between the gingiva and the bar, because this way, when the patient takes off the bar, he can clean these areas. You won’t have inflammation, the lifespan of the implants will be much higher if you have less inflammation, and you have more options to clean the bar. It’s much easier for the patient, because if the bar is right on the gingiva, it’s hard for the patient to clean it. It won’t clean itself. So, the patient needs to have more options to clean these areas efficiently.
You can use this type of multi-unit in other metal-based restorations because the base of the restoration would still be metal. If the implant is buccally inclined and you have a problem in the buccal area, and you don’t have enough space for the ceramics, then you want to have a good aesthetic because you don’t have enough for the opaque layer. You don’t have enough for the translucent layer. You want the PFM to be as real as possible.
In this case, when you don’t have enough space and you want to make a PFM, for example, it would still be better if you would use smaller types of multi-units because you can save space in the areas where you don’t really need it. And you can use the space for the aesthetical parts. If you have enough, then it doesn’t matter, but if you don’t have enough space, it would fit great in different types of works, also. You can use it on every type of metal-based work.
So, why use the regular ones? Well, the regular ones, you’ll probably use when you have a lot of space and you need to use it, and when you have multi-units. You have only one sleeve. You have only one screw. You have angled multi-units. You have straight multi-units. Everything is much simpler. With the smaller types of multi-units, you have different sleeves, you have different heights. The angled multi-unit doesn’t fit with the screws and the sleeves to the straight one. You can have a little bit of confusion. And because of that, if you do have enough space, you should use the standard one, so the technician won’t make any mistakes. If you don’t have enough space and you want to have a better aesthetic, you can use this one if you don’t need angulation. Choose the right one for each case, but know why you’re choosing this. What are the pros and cons of every type of multi-unit?
We took the model from the previous slide, and we changed one of the multi-units from the small cone to the bigger cone. We did it to show the difference of when you have to close multi-units. You can see in these types of multi-units, that the cone is very small.
The horizontal part of the multi-unit is still at the height of the gingiva. Here, the horizontal part is also at the height of the gingiva, but the cone is much bigger. So, the base of the screw will be much higher. And the diameter of the pillar will have to be as the base of the cone. You can’t make it smaller. So, the pillar itself will be much bigger in diameter and in height. And as we talked before, these implants are buccally inclined. So, with this inclination, when you have the higher height of the pillar, you’ll have much bigger buccal inclination in the aesthetical parts of the overdenture.
We can use angulated multi-units, but first of all, we don’t need it for the screw channel because you have an overdenture that fits on the bar. So, you mask the screw channel. It doesn’t matter where it goes. With angulated multi-units, in this case, you’ll have different problems because first of all, angled multi-units are much bigger. So, in the buccal area, you’ll have the buccal bulge of the angulated multi-unit. Then you’ll have the same problem with the cone of the big multi-unit. The pros of using these types of multi-units, the standard ones that you have, are angulated multi units with the same shape.
So, you can use the same sleeves. You have the same libraries; you have the same screws. This is the biggest advantage of using those types of multi units.
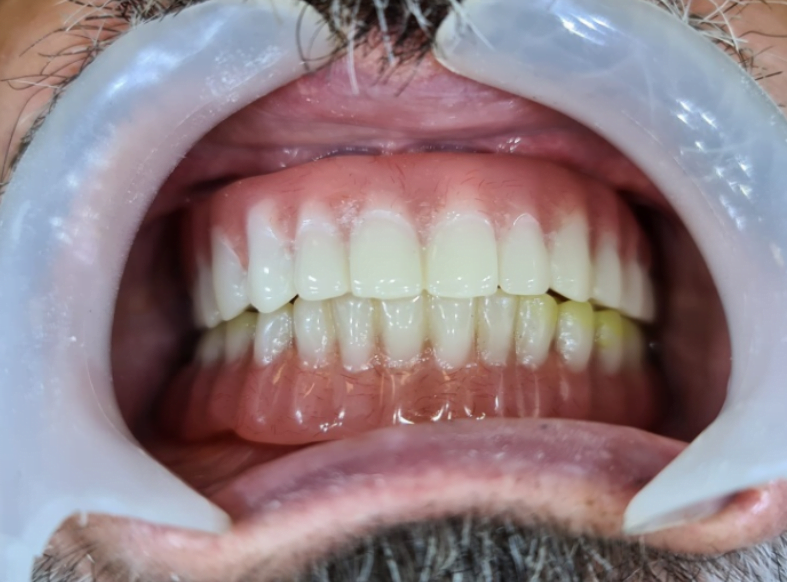
The best part is to know what types of parts to use for every scenario. Because in this case, we would use the small ones, the small multi-units. The bar that we’ll be able to make, the pillars will be very small, the height of the pillars will allow us to be able to shift the main part of the bar more palatally. So, we have more space for the aesthetic part of the denture. Here, you can see the end result. You see the two dentures, the upper and lower one. You see that you don’t see any metal at all. You don’t see the reflection of metal because you have enough space for the plastic, for the opaque that closes and masks the metal part for the teeth for the gingiva.
Many people would ask – Why make a bar in the first place? Like why not to make a denture on the gingiva like they used to do and end it there?
Now, we’re still making dentures without implants. But the quality of life with regular dentures without implants is much worse because for the upper jaw, it can be satisfying. It obviously can be done but the results won’t be nearly as great without implants. You always want to have at least two implants. For the lower jaw it’s almost impossible to make a good denture without any implants. So, you always want at least two implants.
You can always find a place for at least two implants almost always in the anterior part between the mental nerves. This is what you want to have, at least a few implants to hold the denture so it won’t fall off. If you want to do it on a bar or want to use both attachments or different types of attachments, it doesn’t matter.
You can use anything you want. With a bar, you have less problems with the dentures breaking. When you use both attachments or different types of attachments that are not connected, the pressure on the bar goes in one spot. So, this spot can be the breaking point of the denture. If you use it on implants, for example, you have four spots. The forces on these spots are a little smaller because it goes on four implants. If you have only two implants, it would be twice the height. In these cases, many times you don’t make a metal substructure for the denture. So, you have only four small dots that all the pressure is applied on. And the denture itself is made from PMA plastic, from acrylic. So, the denture has a high chance of breaking. When you do the work on the bar, you have metal over the bases of the overdenture. It has much less of a chance to break down because it’s based on a metal carcass. And on the metal, you have all the plastic, all the acrylic. So the force is spread around.
Thank you everyone that joined in to learn some new & interesting information – make sure to stay tuned for more and of course don’t forget to subscribe, like and follow! Thank you & see you next time




![Drilling procedure for UNIQA Dental Pure & Porous Implant UH8 UV11 [ 3.3 mm | D2-D3 bone density ]](https://img.youtube.com/vi/mlw4vHRaPvc/maxresdefault.jpg)


