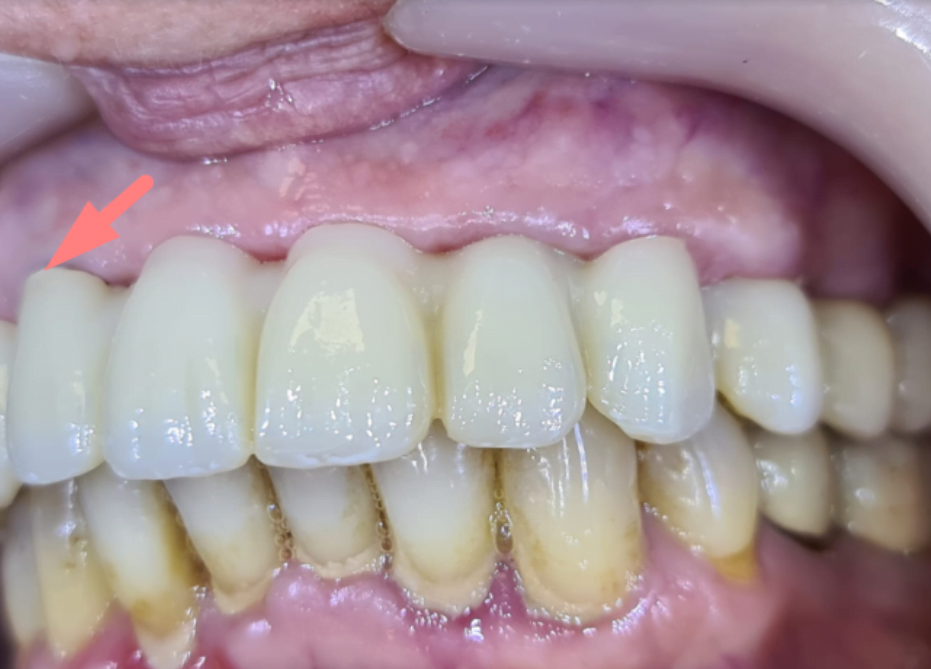
We made a temporary bridge right on top of the implant. Screw retained restoration with planning
Hello everyone – welcome to Uniqa Dental. We are here to discuss interesting cases and new technologies in the field of dentistry. Each time we analyze a new clinical case to show how doctors use Uniqa Dental products to solve complex dental problems. Don’t forget to subscribe and follow us to stay updated! So let’s get started.
The initial state of the patient with which she went to the doctor
Let’s get right into things. Here, we see a very old bridge that was probably made from zirconia with a gingiva foam composite material. You can see all the pigmentation. You can see all the colors that it absorbed during those years.
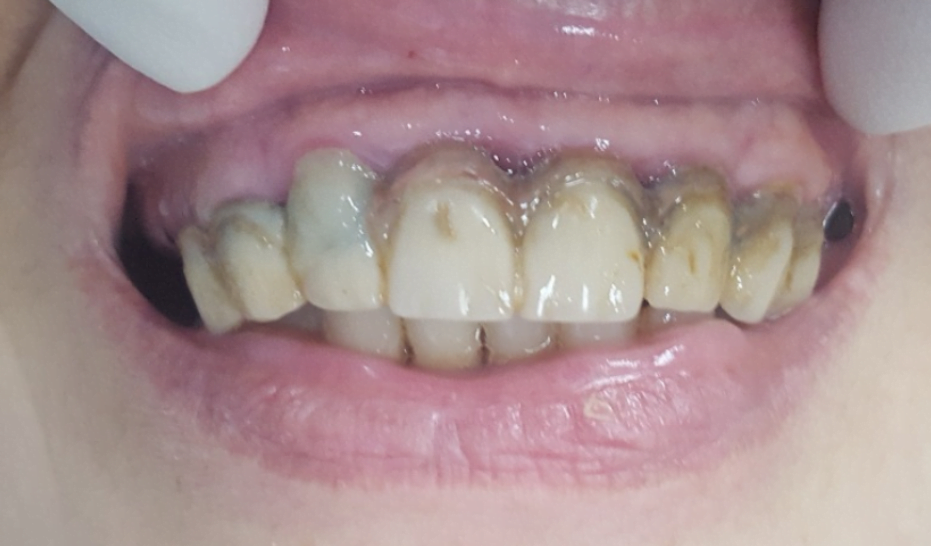
An old bridge made of zirconia with an artificial gum, the photo shows defects and pigmentation disorders
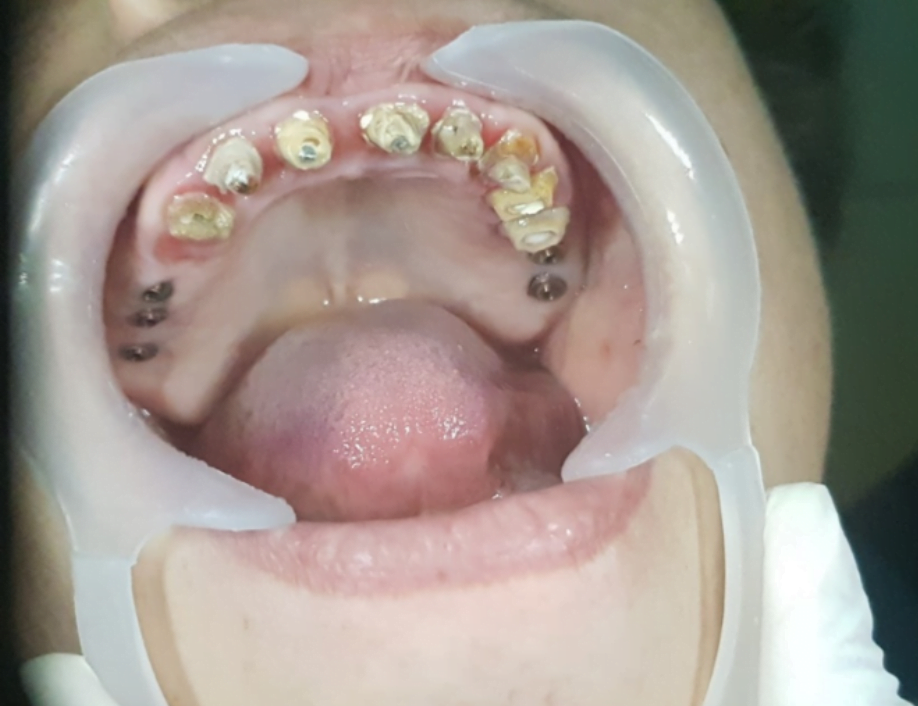
And when we removed the bridge, we saw from the teeth it was based on, that there was not much left. So, these teeth are hopeless and you need to extract them all and make implants. In here, you see the teeth after the removal of the bridge, you can also see that she had a couple of short bridges in the posterior areas on multi-units here on two implants and there on three.
And you can see the teeth after some preparation and cleaning. The metal parts on the incisors are the teeth that had the root canal treatment a long time before the previous bridge was made. And they had a post and core installed in the root canal treatment for better fixation of the bridge.
Why make a temporary bridge based on two front incisors
So, why make a bridge and not just to remove all the teeth and make a denture? Well, first of all, you have posterior implants. You always want to have an implant-based denture. A bridge is also a denture, but infant based. To make a full denture, for this case, it wouldn’t hold. She wouldn’t have a satisfying function with dentures. So we would never do that. If you can’t have some implants, it’s always best to make even dentures on some implants. Here, you have a lot of bone, so you can just replace the old bridge with a new one, based on enough implants. You have posterior implants, you just need to add three or four implants in the anterior area and you have enough implants to hold it.
On multi-units, they’re screw-retained for all the bridges that were made a long time ago probably. You can see that what we chose to do is to extract those teeth, and leave for now the two central incisors. Because for the provisional bridge, for the temporary restoration you want to make the restoration on those implants.
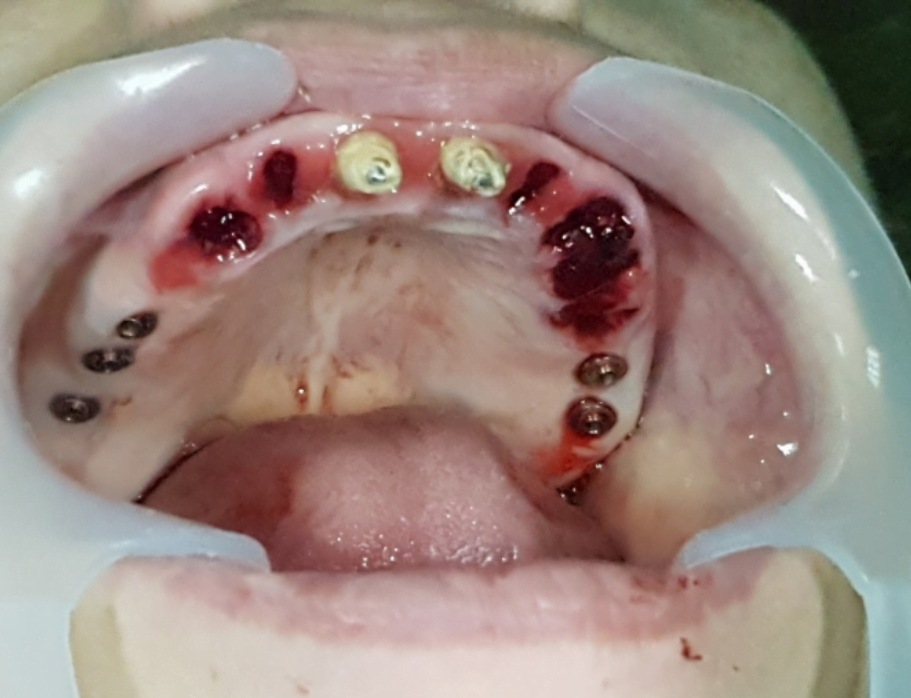
Preparation for the installation of a temporary bridge based on the remains of the anterior incisors
But you can make a horseshoe like this without any anterior support. You will just press on the gingiva on the implants and it can harm the implants that are installed above this bridge. So, we have those two teeth remaining. We made a bridge that was made with two implants on one side, three on the other side, and frontal area on two teeth.
You’re probably wondering if the two front teeth will hold the bridge, well for temporary restoration, for three, four months to wait for the implants to go through the osseointegration through all this process, yeah, it, it will hold.
You need to assess if the teeth are good enough to hold and maintain this period of time, because if the teeth are in caries, you can’t do anything. But if these teeth are not re-constructible, you can make a permanent restoration that can guarantee success. You still can have a temporary restoration for three, four months. It doesn’t mean that it will fail.
You can see here the two teeth. You can see three implants, two implants, and this was made on a gypsum model.
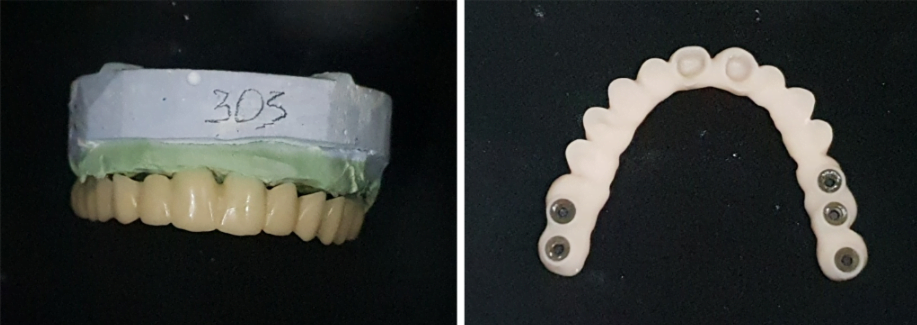
Temporary restoration with fixation on multi-unit abutments and support on the remains of the anterior incisors
Which was made with CAD/CAM. All the designing the D in the cut then M in the com was done in the computer. We had a computer based design. We had manufacturing computer aids, but the scanning, the impression part was traditional. You don’t need to have an intraoral scanner to make this type of work. Sometimes it’s even easier for some cases because you don’t need to maintain all the liquids and blood and saliva that you have in the mouth while you scan with an intraoral scanner. You just have your silicone, your transfers, and you just take impressions and it works perfectly. Then you have a gypsum model and you scan it, or you can scan the tray with silicone or the impression. You can even scan the gypsum model afterwards, but you don’t need to have an intraoral scanner to make complicated procedures. Today almost every laboratory has a technical scanner, like a desktop scanner. And it’s good enough for everything you need.
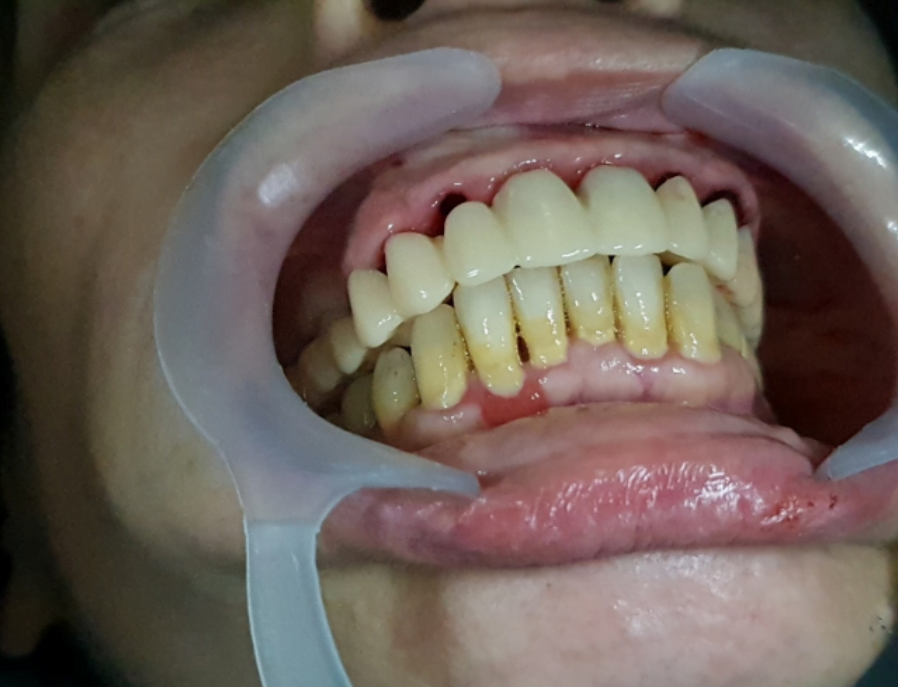
Here you can see the temporary bridge. Now you have some space between the gingiva and the bridge, because you want to have it heal properly and for the patient to have the ability to maintain and clean the bridge.
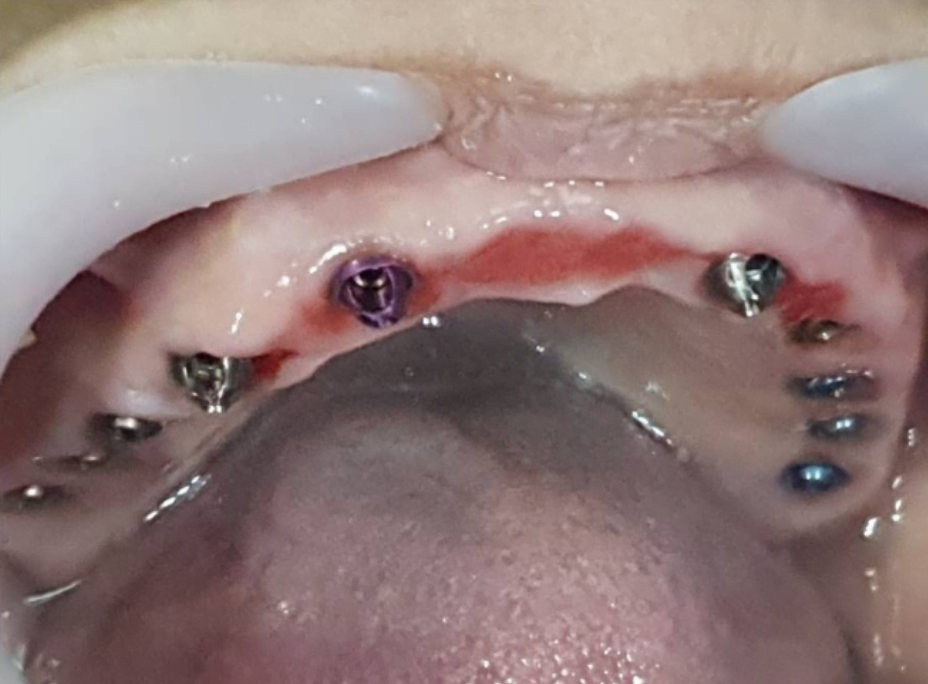
In this case, after the extraction, the implants were made. You need to wait three to four months for the osseointegration and the healing process to complete. Now, the hole is from the old implants which you see here. We made a temporary bridge, right on top of the implant that she had with the multi-unit that she had. The front teeth we made exactly as they were before.
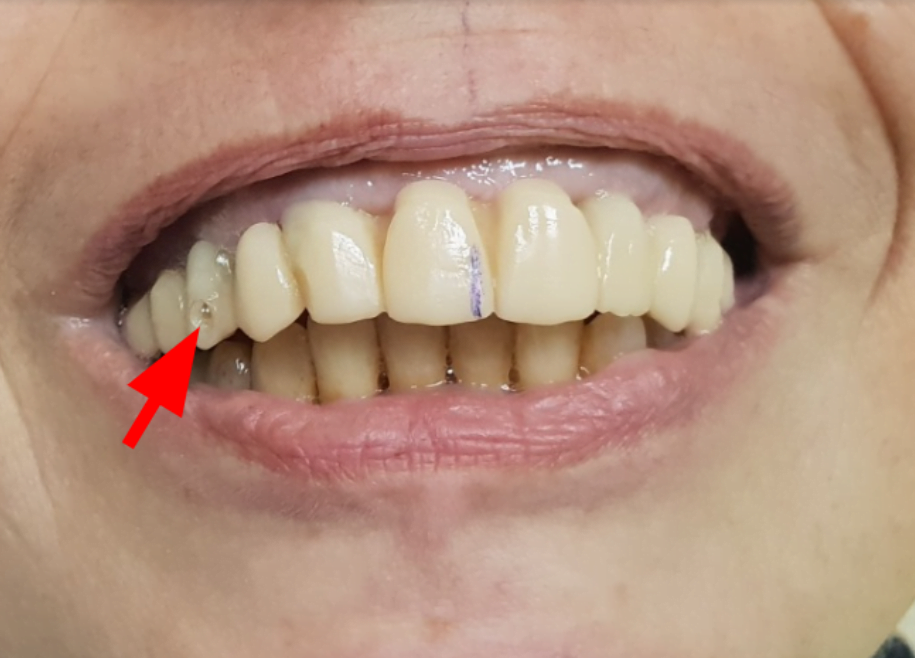
Temporary restoration which shows the hole from the old implants, as well as the displacement of the center line of the prosthesis
They were offset before. Here, we mark the offset. Now to correct the offset before this provisional bridge is very hard. First of all, because you have to remove from two teeth, because you want the width of the teeth to be exactly the same. You want them to be symmetrical. So, you need to remove a lot of material from the teeth. It will interfere with the cementation process which means it won’t hold. You don’t want to involve the teeth too much. You want to keep the old teeth, and make new ones. Eventually it looks so much better now. So, there is a slight shift. Later on, we’ll fix it, of course. Here, you can see the multi-unit in the implant that was placed. This is after the osseointegration.
You can see the gingiva had a little bit of recession. You didn’t see it earlier because of the inflammation, because the gingiva was very big. Now, you can see the gingiva in a good color, it’s quite healthy.
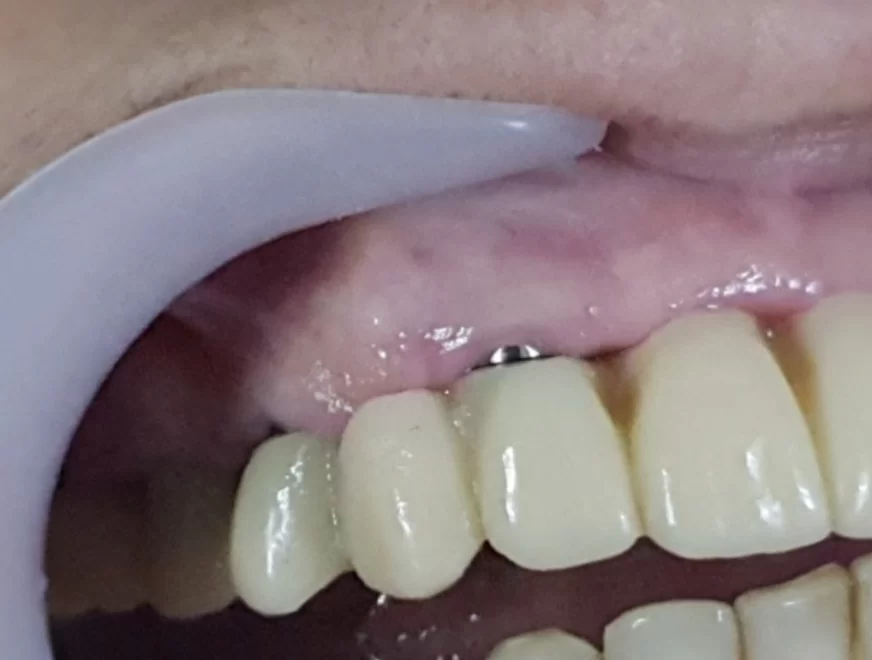
So, you have little recessions. You can see healthy tissues and you can see the minimal height of multi-unit or angulated multi-units that is available. Because in this case, the inclination of the implant probably was a buckley inclined in it’s interior area. In most cases implants are buckley inclined. They used an angulated multi-unit and you can see that after the healing process, you have some recession and you can see the metal of the angulated multi-unit. So, you have a very good bridge, it looks very nice, but you can see the metal part of the multi-unit.
How to solve a cosmetic defect – soft tissues expose the titanium part
We chose to analyze the multi unit in a pink color or in a tissue color. So, even though you have recessions, even though the metal is visible, it will mask a little bit the reflection of the metal through the gingiva. If you have a thin gingiva, it will reflect much less, you’ll see different colors. You won’t see the gray color that you see in many cases, when you have a titanium implant or titanium abutment. And if you have a recession, a pink color is much less visible than a metal or grey color.
So, you can see that for this one, you can see the recession. You can see the height of the list. You can see the height of the horizontal part of the multi-unit. You can see that there is about half a millimeter recession, for example. And when it’s red, you can see in the next slide that you almost don’t see it at all.
You need to stretch the lip to see it.cIn this case, she has a very high line. In other cases, we probably wouldn’t take this much effort to mask it because you don’t see it at all. You need to raise the lips. Making it the same color as the gingiva solves a lot of the issues.
Thank you everyone that joined in to learn some new & interesting information – make sure to stay tuned for more and of course don’t forget to subscribe, like and follow! Thank you & see you next time!

