How to choose the right multi-unit abutments
Contents
Clinical case with complex oral pathology
In this publication, we will analyze an interesting clinical case that was successfully solved using multi-unit abutments of various types and digital technologies in dentistry. Until now, these methods and technologies were considered innovative, although the first full-fledged CAD / CAM system for dentistry appeared in 2003, and the first screw-retained abutments with the MUA designation appeared in 2000. Doctor of Dental Medicine Yaniv, who teaches at Gerber University, will help you understand all the stages.

Multi-unit V-type, D-type abutments and scanning cap


What is the complexity of the clinical case that we are analyzing?
Before discussing the benefits and reasons for the rise in popularity of multi-unit screw-retained prosthesis systems, it is necessary to understand why the patient’s clinical picture is complex, and why it would be extremely problematic to make the restoration in a different way. The prosthesis with which the patient came is a zirconium bridge, which was installed on the processed remains of his own teeth. In the illustration below, we see plaque and darkening at the base of the crowns.

Condition of the old prosthesis at the first visit of the patient
Already from this picture, the experts determined that most likely there would be nothing to work with in the area of the front teeth. You will have to remove the remains of the teeth and install implants. When the bridge was removed, their fears were confirmed, see the following picture.

Rotten tooth remnants after removal of a bridge restoration
The anterior teeth were removed; the posterior teeth were left as they could be worked on and restored without extraction. The installation of implants was also not easy. In the upper jaw, it is often necessary to install abutments at an angle. This case was no exception. Six implants were placed and the patient was prepared for taking a digital image of the jaws, taking into account the position of the remaining teeth of the implants, including the angles of deviation of the implants relative to the occlusal plane. Recall that in CAD / CAM systems, instead of a classic impression, an electronic 3D file is created using an intraoral scanner. To indicate the exact location and angles of deviation of the implants, special caps called scan markers are used.
Why were several types of scanning markers used?
Please note that in this case I had to use different types of scan markers.


Installed scan markers for taking a digital impression of the patient’s jaw. Continue
Five scan markers are fixed at the level of already installed multi-unit abutments, and the sixth scan marker is fixed at the level of the implant. This is due to the difficulties of choosing an abutment with such an extreme angle of deviation with which the implant is installed.

Samples of scan markers, on the left for installation at the level of the multi-unit abutment, on the right for installation at the level of the implant

At the scanning stage, we were not sure which type of abutment to choose. If you choose a D-type angled abutment, you will get a buccal bulge. If there is such a significant buccal bulge, then food debris will accumulate there, plaque will be deposited and there is a high probability of inflammation of the soft tissues around this place.
The second option was to take a straight abutment and fabricate a bridge, but due to the extreme deviation, it was not certain that it could be fabricated properly because the machine that mills zirconia prostheses has a maximum deviation of 30° and this may not be enough to produce a one-piece part.
Another option was to use a 3D printer that prints PFM metal parts. Perhaps this would help, but since we decided to make a zirconia prosthesis, we need to know exactly what type of abutment we will choose before we send the part for fabrication.
Therefore, it was decided to install one scanning marker at the level of the implant, and transfer the obtained data to the dental technician’s laboratory where the prosthesis can be modelled by selecting different types and abutments from the electronic library and the software immediately signals whether it is possible to manufacture the prosthesis with the selected abutment. The dental technician can move the angled abutment a little to and fro and see its position and whether it will fit the bridge.
Then the question arises why not install all the scan markers at the level of the implant and select abutments based on the results?
Each angled abutment can have six positions in the implant. If you have two abutments, then getting the perfect relative position is difficult. In this case, we have only one straight abutment and four angled abutments, and it’s almost impossible to choose the best option. It’s like choosing a code for a combination lock. After all, if at least one abutment is installed incorrectly, the bridge that the laboratory made will not work, and you don’t know which abutment is installed incorrectly.
Criteria for selecting multi-unit abutment types
In the image below we see the sleeves of the multi-unit abutments that have been selected. Pay attention to the area on the left, where the 14th tooth should be. There is not enough space so the V-type multi-unit was chosen which has a much smaller taper and shorter sleeve than the D-type.

Computer model with the location of implants and abutments with sleeves
The doctor immediately placed the correct MUA and took an electronic impression at the multi-unit level, and you can see that a straight multi-unit abutment was selected for this point.
A straight multi-unit with a small taper is best here, because there will be no buccal bulge, and the screw shaft channel will not protrude into the anterior plane of the denture. In addition, everything is fine aesthetically because the base of the abutment at the border of soft tissues and the prosthesis will not be visible.
The image below shows a computer model of the future prosthesis. We see how the shafts of the screws come out to fix the prosthesis, and this is an excellent result.

Computer model of the patient’s jaw with the prosthesis
Now we see the correctness of the decision to take a digital impression with a scan abutment installed at the level of the implant, where the implant has an extreme angle of deviation. There was no need to make two prints with different options. There is enough data for a dental technician to choose the best option possible. The doctor often does not need to delve into the details and solve complex problems.
The main thing is to provide the dental technician with enough information. This became possible only in the era of digital dentistry using CAD/CAM.
This clinical case is interesting because we used three types of multi-unit abutments here:
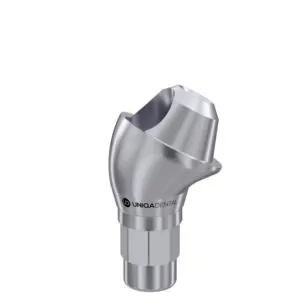
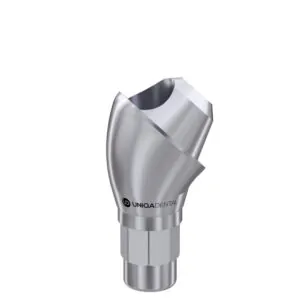
- Angular MUA, which allows you to compensate for the angle of deviation of the implant, which is quite often the case when implants are placed in the upper jaw. There are also straight multi-unit abutments with the same cone and a set of accessories. The same sleeves and fixing screws are suitable for them as for the corner ones. The same scanning abutments are used for digital impression taking. If you want to use one set of accessories for both straight and angled abutments, this is MUA D-type. In this case, four angled multi-unit abutments were placed.
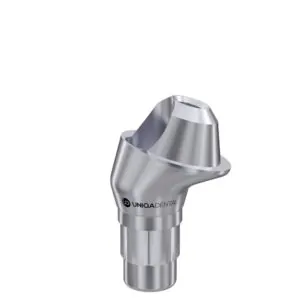
- Direct MUA D-type, which we mentioned above. For him, there are several varieties of sleeves. In this case, we used a shortened sleeve so as not to get a bulge on the side of the cheek in the place where the implant with the largest deviation is placed. In the picture below we see all types of sleeves that were used in this restoration.
.
Finished prosthesis view from attachment side to multi-unit abutments
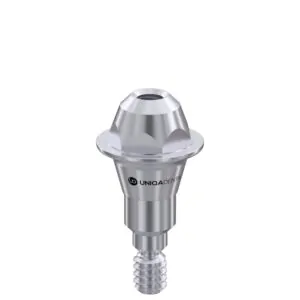
- A straight multi-unit V-type abutment that was placed in the 14 tooth region with a short taper. Such abutments are used when there is very little space and it allows the restoration to be performed more efficiently. A smaller taper does not mean that the crown will be tied directly to the abutment. Here, too, there is a sleeve and screw fixation, but the sleeve is much smaller in height, which means that there will be less void and more zirconium in the body of the prosthesis, while we have enough strength. That’s why the MUA V-type was chosen.

Finished prosthesis where you can see how the screw shafts come out

Prosthesis in the patient’s mouth
Thus, in one clinical case, we used all the multi-unit options that we had. We installed most of the abutments at once and took a digital impression once and left the choice of the last abutment to the dental technician. The dental technician can easily switch between D-type and V-type in the program. We will make a separate publication about the CAD/CAM system.
Important criteria for a quality restoration in difficult cases
To summarize, for high-quality restoration of the dentition, several conditions must be met:
- Absence of buccal bulges and other gaps, and sinuses where food debris will accumulate.
- Shafts of screws should not go to the outer surface of the prosthesis.
- Titanium elements should not be visible at the border of soft tissues and the lower part of the prosthesis. Especially at the bottom when smiling.
As we see in this particular case, impressive results were achieved.

The result of the treatment is a fully restored dentition
Thanks to everyone who joined our blog to learn new and interesting information. Stay tuned, do not forget to like and subscribe if you watch our videos. Until the next publication!