Errors and complications during prosthetics on implants. How to prevent and correct them. Part 2
Contents
In the previous part, we described the stages at which errors can occur and discussed the importance of planning and coordination between the surgeon and the prosthodontist. We also described several common and less common problems that can affect any specialist. Most importantly, our readers received recommendations on how to correct these complications if they arose or how to prevent them in their practice. In this article, we will continue to analyze problematic cases.
What to do if an implant is placed too close to the root of an adjacent tooth
In this situation, the recommended distance of 1.5-2 mm between the implant and the root of the adjacent tooth is not maintained. Such an implant is unlikely to integrate normally; on the contrary, voids and pockets often appear, or even bone necrosis can develop.
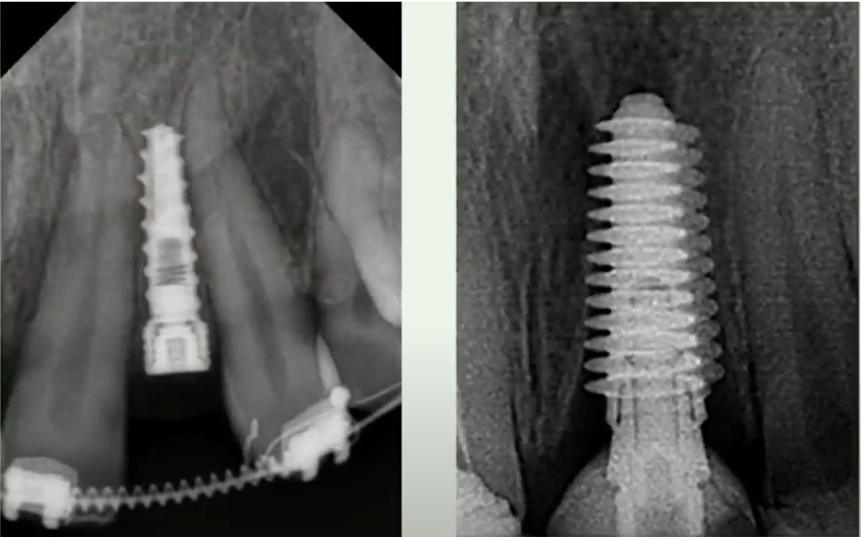
Incorrectly placed implant too close to the roots of adjacent teeth YouTube / Dr. Kamil Khabiev / Dental Guru Academy
In this case, it is generally impossible to install the implant correctly, as there simply isn’t enough room. This should have been considered during the treatment planning stage, as the lack of space in width is easily identified. In such cases, you should reconsider implant placement and explore alternative treatment options.
For example, in the case illustrated below, it would be preferable to create a composite restoration using the 5th and 7th teeth as abutments. The 6th tooth was lost a long time ago, and the 7th has shifted. Alternatively, you could leave the situation as it is if the patient has adapted to the problem and is comfortable, especially since the 6th tooth was lost a long time ago.
IMPORTANT! Implants should not be placed during the active phase of orthodontic treatment. This is because teeth move, but implants do not. Even if there is sufficient space initially, the roots of the teeth will eventually impinge on the implant. It is optimal to place implants 1-2 months after the active phase of orthodontic treatment is complete. The image below illustrates the consequences of such an error.
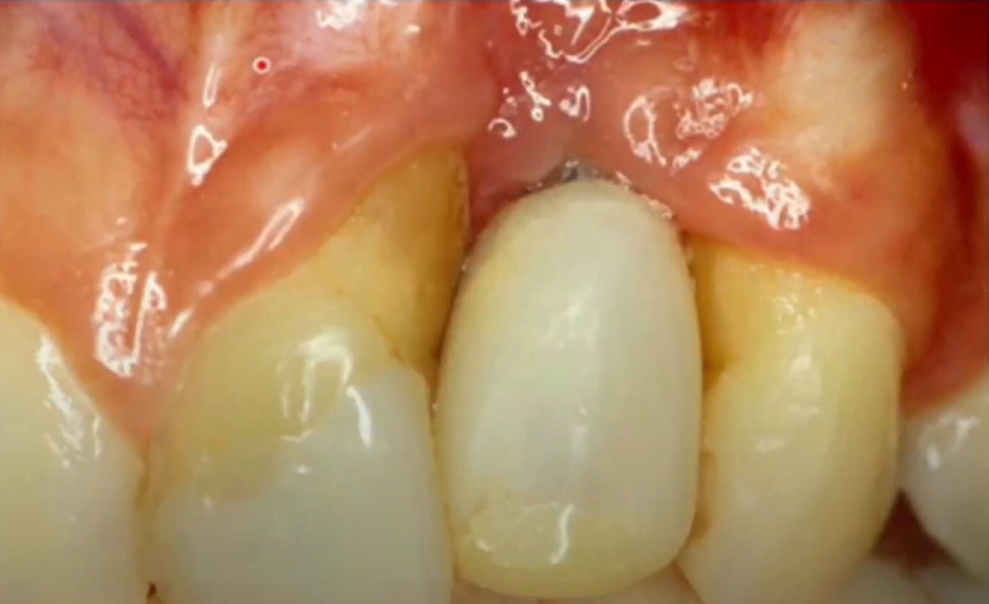
Consequences of installing an implant too close to the roots of adjacent teeth YouTube / Dr. Kamil Khabiev / Dental Guru Academy
If a patient presents with such complications, the crown and implant should be removed, and a structure supported by adjacent teeth should be installed. If orthodontic treatment is planned, the implant should only be placed after adequate space exists between the teeth or several months before starting treatment if the implant will be used as an anchor.
What to do if the implant is too far from the center of the crown
In such cases, excessive lateral force is applied to the abutment and implant, which will almost certainly lead to failure, especially in the posterior regions.
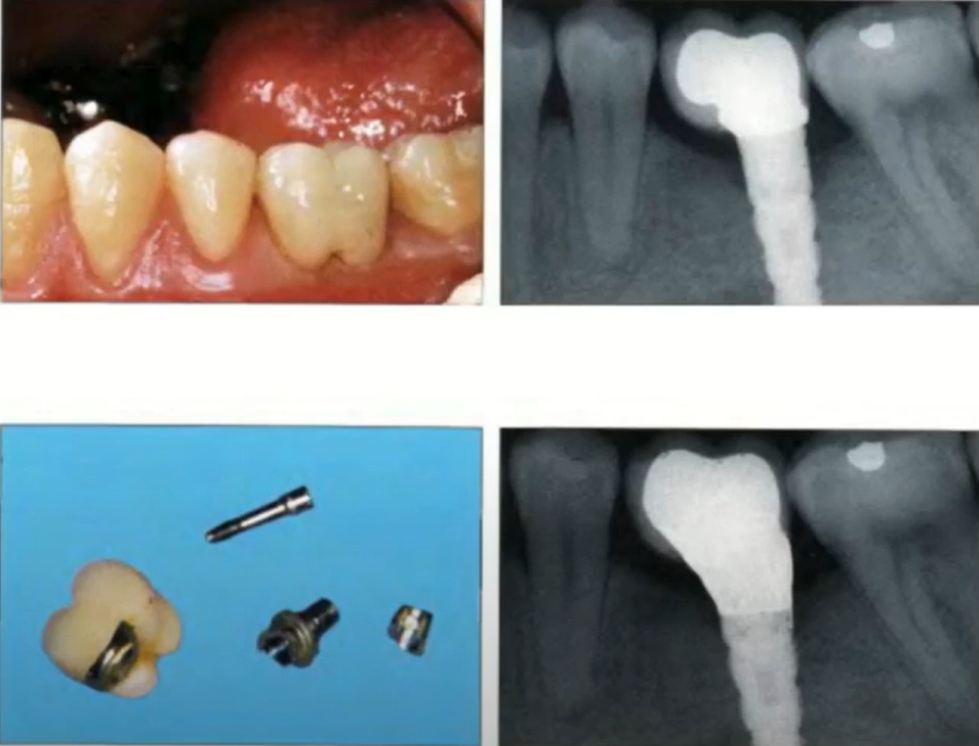
Abutment failure due to an implant displaced too far from the crown axis YouTube / Dr. Kamil Khabiev / Dental Guru Academy
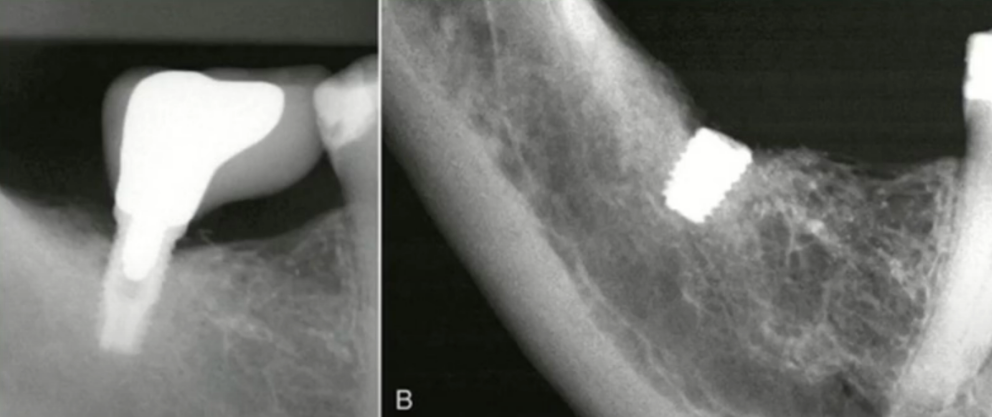
Implant failure due to strong displacement of the center of the crown relative to the central axis of the implant YouTube / Dr. Kamil Khabiev / Dental Guru Academy
To prevent such problems, it is crucial to determine the boundaries of the crown and draw a line through its central axis even at the stage of image analysis. To achieve this, you should create a rough model of the future tooth when taking impressions and use this model to fabricate a surgical template. This will prevent deviation from the axis, and even if the implant is placed at an angle, the screw access hole will still be close to the central axis of the crown.
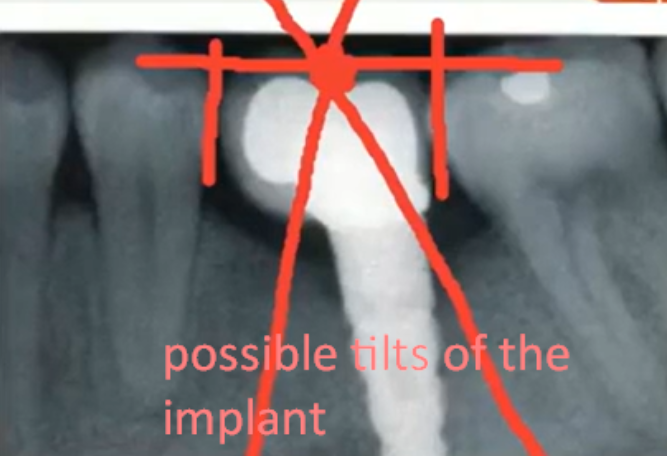
The point of intersection of the implant axis with the center of the crown YouTube / Dr. Kamil Khabiev / Dental Guru Academy
Ideally, the implant should be placed vertically and its axis should coincide with the center of the crown. However, this is not always achievable, for example, during immediate implantation when the implant needs to be placed into the septum. This often results in the apex of the implant being shifted relative to the vertical.
This is a serious mistake. Even if the prosthesis does not fracture, a crown with a poor emergence profile will deform the gingiva, and gaps and pockets will form between the crown and adjacent teeth. Food debris will accumulate, leading to inflammation and other complications.
Here is another example of incorrect implant positioning. They were placed this way because after the extraction of teeth with two roots, the interradicular septum was too thin, and the clinician decided to move the implants more distally.
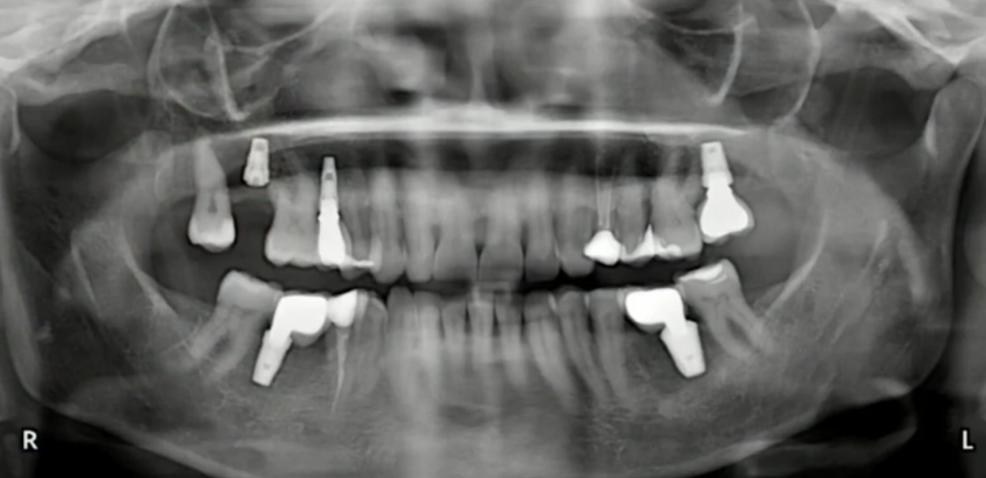
Unsuccessful positioning of implants with significant axis deviation from the center of the crown YouTube / Dr. Kamil Khabiev / Dental Guru Academy
It is extremely difficult to correct this problem, and the patient will most likely have to live with such a restoration for several years. Eventually, something will fail and need to be redone. If a failure occurs during the warranty period, it will negatively impact your income and reputation.
This type of positioning can be prevented by using implants with a thread design that extends significantly beyond the implant body, cutting deeply into the bone. These implants are designed to achieve good stability when inserted into loose cancellous bone. They also perform well during immediate implant placement and remain stable when placed in the center of the alveolar socket.
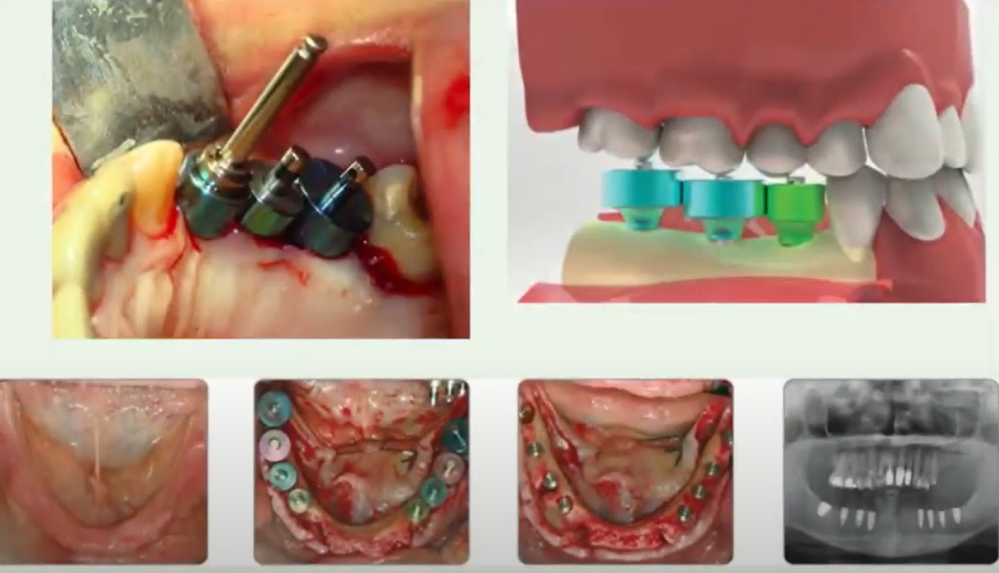
Placing implants by eye, without a surgical guide, is another reason why the central axis of the implant does not align with the crown. Many surgical templates are available, and some are made individually using 3D printers. This is an excellent solution, but there are also universal templates that provide excellent accuracy of implant placement. An example is shown below. The principle is simple: the drill passes through a restrictive ring. The template rings represent the future crown and ensure the drill path passes through its center.

The principle of operation for the universal surgical template YouTube / Dr. Kamil Khabiev / Dental Guru Academy
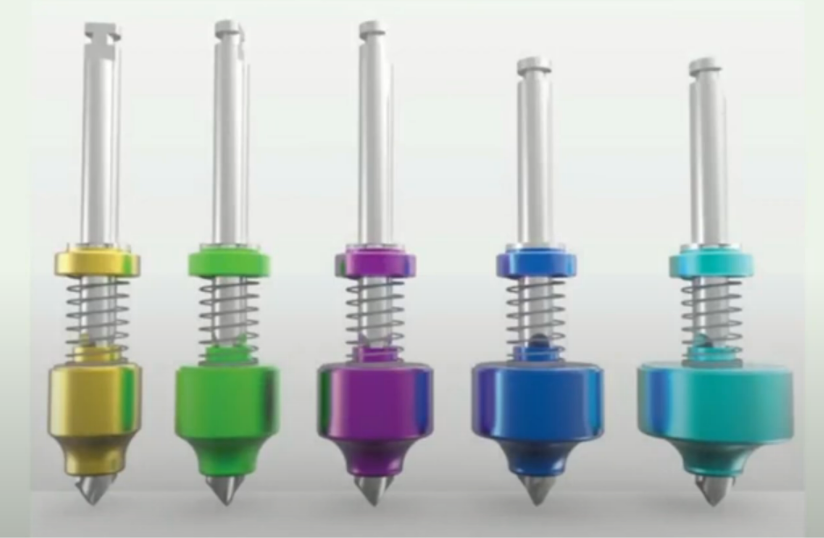
Universal surgical template set includes 5 drills of 2.8 mm with restrictive rings of 6, 7, 8, 9, and 10 mm diameters YouTube / Dr. Kamil Khabiev / Dental Guru Academy
The principle of operation for such a template is clear from the illustrations. The set includes five drills with a diameter of 2.8 mm with restrictive rings of different diameters: 6, 7, 8, 9, and 10 mm, as well as 5 pins for insertion into the implant’s screw access channel to maintain the correct distance between implants when placing multiple implants in proximity. The diameters of the pins match the diameters of the drills.
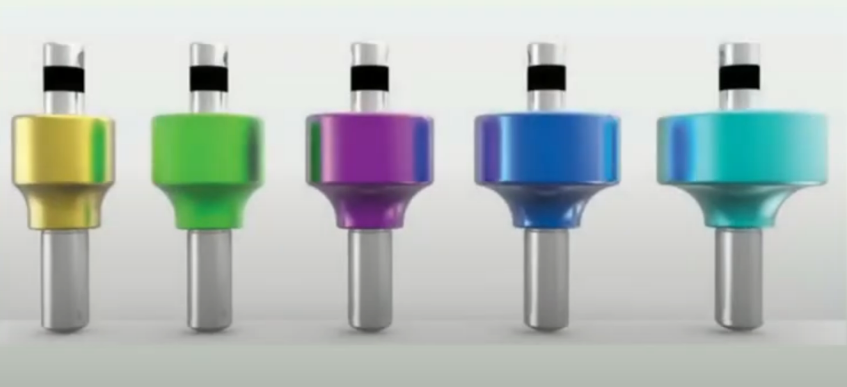
Complete universal surgical template set including 5 pins of 6, 7, 8, 9, and 10 mm diameters YouTube / Dr. Kamil Khabiev / Dental Guru Academy
Examples of implant site preparation using a surgical template set are shown in the images below.
The photographs show that the restrictive rings do not extend beyond the occlusal curve. You can immediately see that the implants are placed without significant buccal or lingual displacement.
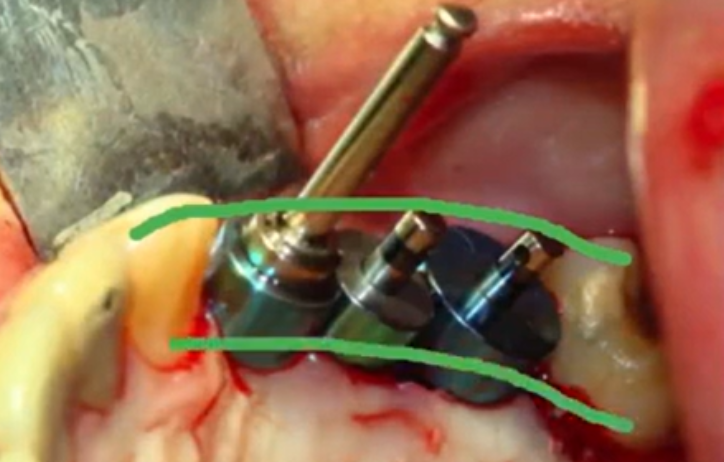
The surgical template follows the contour of the dentition and does not extend beyond it YouTube / Dr. Kamil Khabiev / Dental Guru Academy
Even with screw-retained prostheses, the screw access channels are in an optimal position, without extending onto the functional cusps.
Placing implants by eye, without a surgical template, often results in positions similar to those shown below.
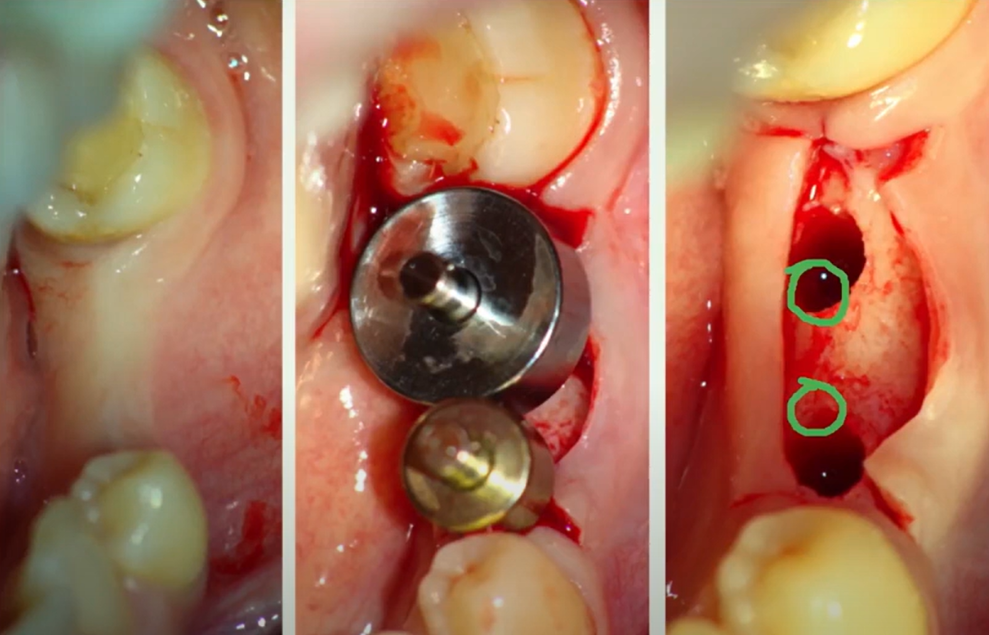
Possible positions of implants without using a surgical template YouTube / Dr. Kamil Khabiev / Dental Guru Academy
This results in a prosthesis with two cantilevers, which is not ideal, although not a critical issue.
Sometimes, you see restorations like the one in the picture below. Prosthodontists can often salvage situations and fabricate acceptable restorations, even with challenging implant positions, but there are limitations, and such a design will not function correctly.
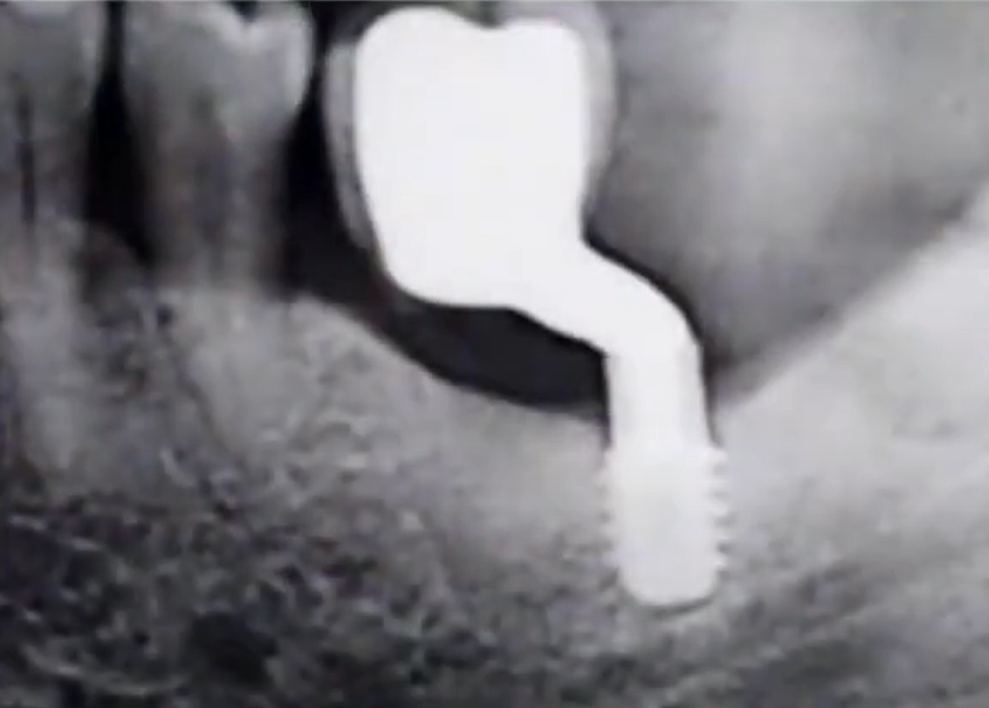
Extremely poor placement of the crown relative to the implant YouTube / Dr. Kamil Khabiev / Dental Guru Academy
What to do if the implant axis extends beyond the dentition
This indicates a significant displacement in the buccal, palatal, or lingual direction. If you encounter situations similar to those in the images below, the advice is clear: do not attempt to use implants placed in this manner. Only complete revision with removal of the implant and placement of a new one, potentially after guided bone regeneration (GBR), will resolve the issue.
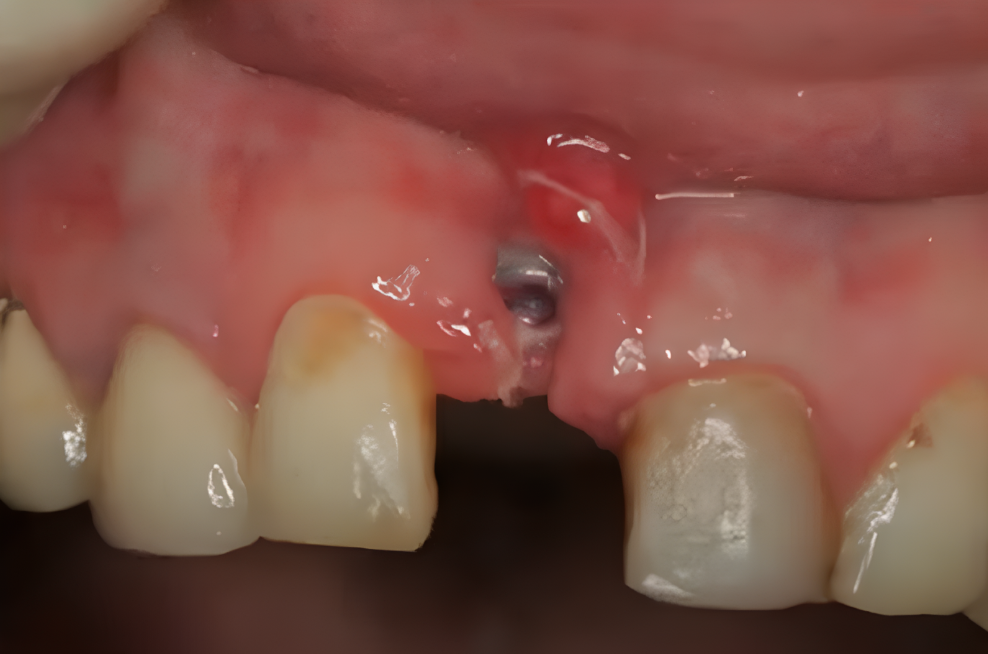
Hopelessly poor placement of implants – cannot be corrected YouTube / Dr. Kamil Khabiev / Dental Guru Academy
Here’s another example where the prosthodontist tried to salvage the situation with a less significant deviation. The crown looks unacceptable, and it will likely lead to various issues related to gingival health and biomechanical integrity.
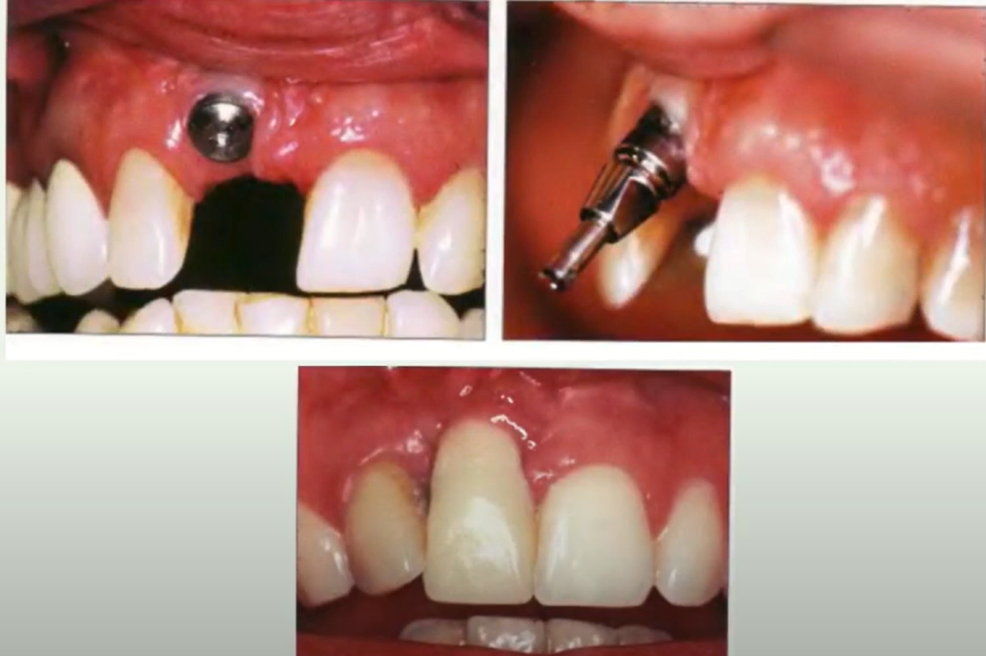
A crown on an implant with a strong buccal deviation – a case where a prosthodontist attempted to salvage the situation YouTube / Dr. Kamil Khabiev / Dental Guru Academy
It is equally problematic if the implants are displaced palatally or lingually. If you attempt to correct this, the prosthesis will be bulky, and it will likely require screw retention. However, this is only a conditionally workable solution, and such a design is not likely to last.
Let’s examine a few more cases where the prosthodontist tried to salvage a situation, and what the outcome was:
The image below shows two problems with the implant placement:
- Buccal deviation
- Too deep placement
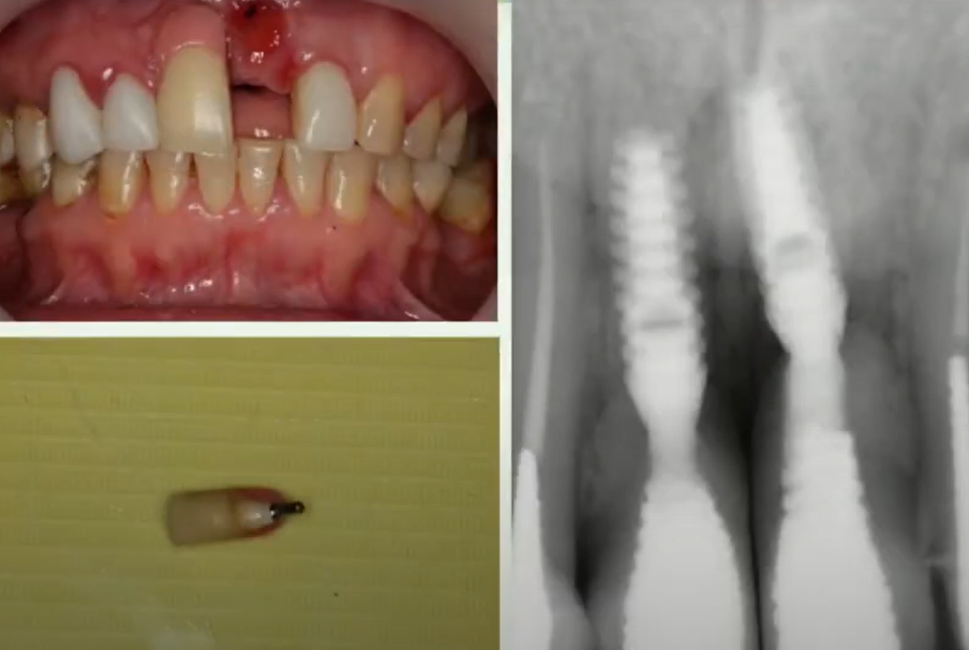
Abutment failure due to incorrect implant position – the abutment is too long, and the load from the crown acted like a lever, ultimately resulting in breakage YouTube / Dr. Kamil Khabiev / Dental Guru Academy
In this case, the implant has a relatively small diameter, and the total length of the abutment with the crown exceeded the length of the implant itself. Several factors contribute to the failure:
- Insufficient titanium thickness at the implant/abutment junction
- A long lever created by the crown and abutment
The inevitable result is failure, even if the patient does not overload the restoration.
IMPORTANT! There is one more rule regarding the depth of implant placement. It is not recommended to place implants deeper than 3 mm relative to the cervical margin of adjacent teeth. This is sufficient to form a healthy gingival cuff, while the total length of the abutment and crown will not exceed reasonable limits.
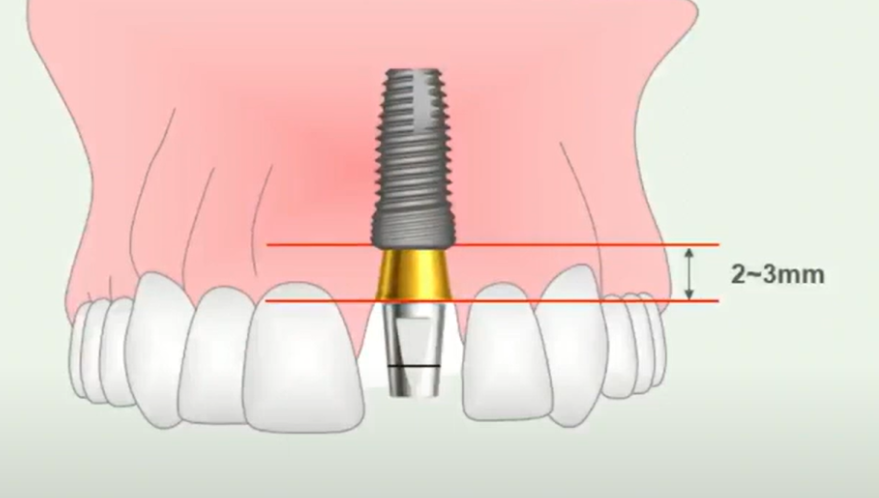
Recommended implant depth relative to adjacent teeth YouTube / Dr. Kamil Khabiev / Dental Guru Academy
If there is no significant angulation of the implant relative to the dentition, it is permissible to place the implant 4-5 mm deeper. However, the greater the angle of inclination, the higher the likelihood of screw or abutment fracture.
Here’s another example of excessively deep implant placement. The implants integrated well, but how can prosthetics be done? If access to the implant in the 7th region is acceptable, the 5th can also be reached provided that the overhanging edges are removed with a bone profiler. However, the 4th cannot be accessed.
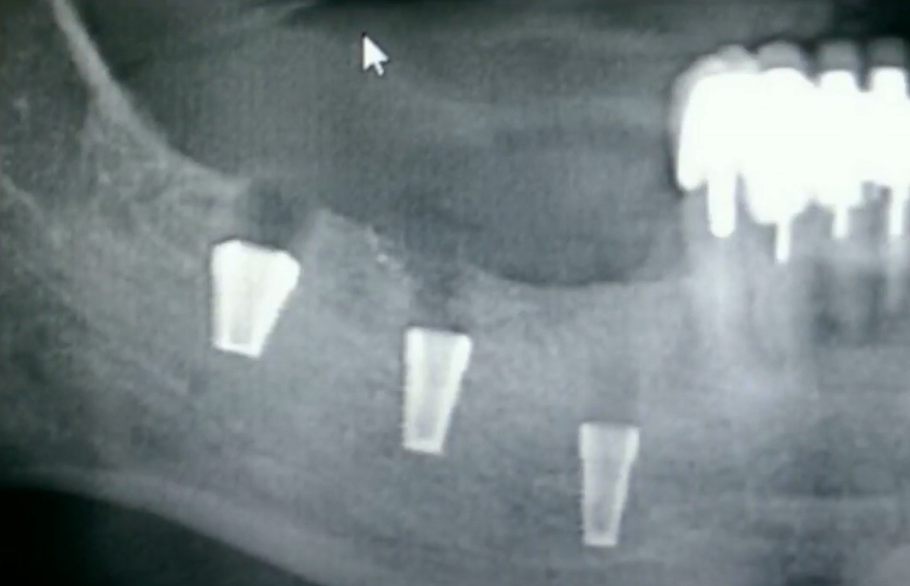
Too deep placement of implants, especially those closer to the anterior maxilla YouTube / Dr. Kamil Khabiev / Dental Guru Academy
In this case, another surgeon, who the patient then visited, placed another implant with a larger diameter and shorter length on top of the “recessed” 4th.
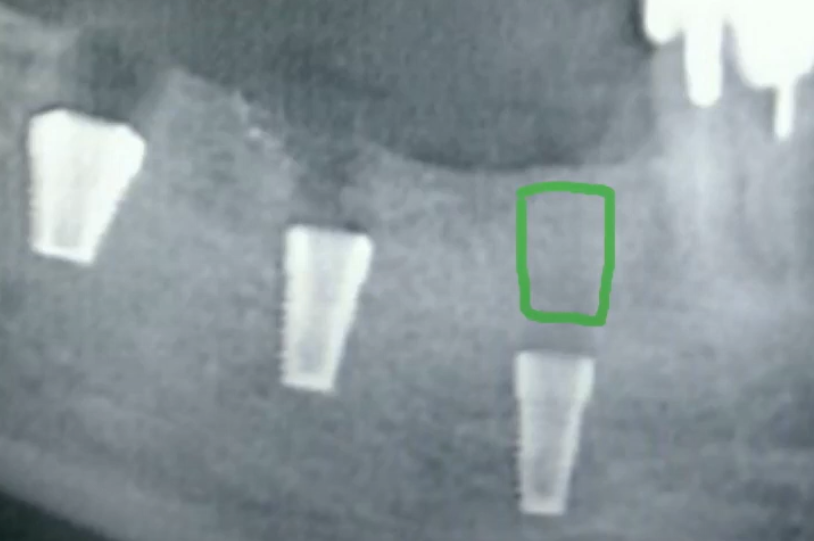
A solution is to place a new implant without removing the old one YouTube / Dr. Kamil Khabiev / Dental Guru Academy
What should be the ratio of the coronal part to the intraosseous part?
It should definitely not look like the example in the image below. The situation would be less critical if the length of the prosthetic crown were not more than twice the length of the adjacent teeth.
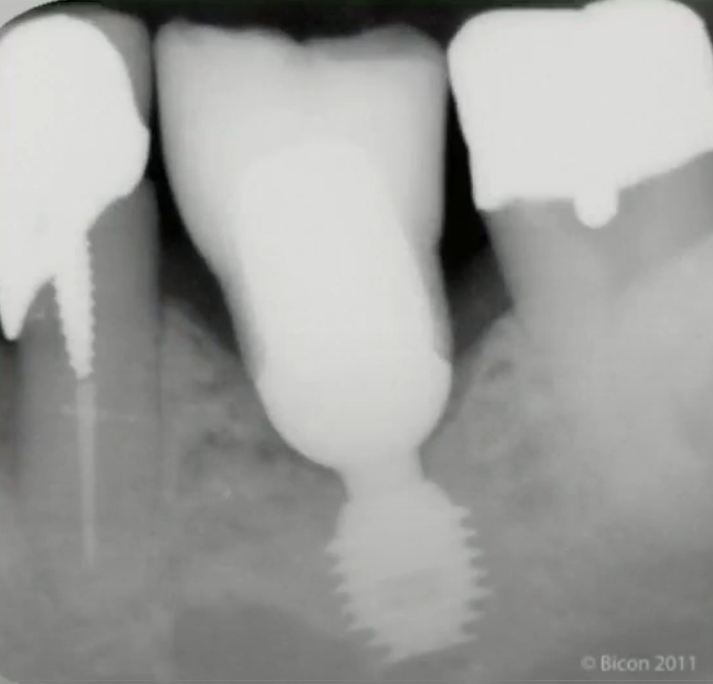
Extremely unfavorable ratio of the length of the coronal part of the restoration to the intraosseous part YouTube / Dr. Kamil Khabiev / Dental Guru Academy
The length of the implant is not the most important factor. Even the shortest implant can withstand the load. The critical factor is the connection between the implant and abutment. If a tapered connection is used with a ratio as shown in the image above, then the restoration will most likely function adequately, with a slightly increased chance of failure compared to a 50/50 ratio. However, if the implant has a flat interface with the abutment, then fracture is almost inevitable.
With a planar connection, there is always a gap. Under lateral load, rocking (a “pump effect”) occurs. Given the length of the lever, breakage is inevitable.
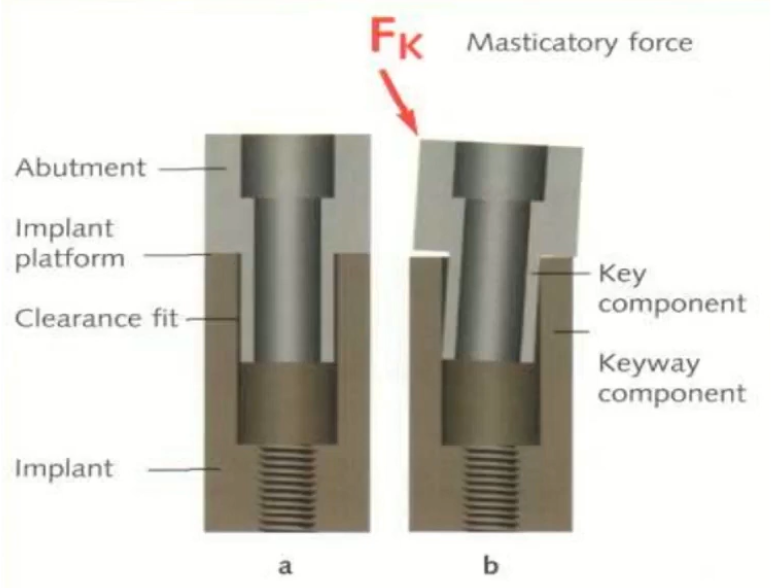
Effect of lateral load on the planar implant/abutment interface YouTube / Dr. Kamil Khabiev / Dental Guru Academy
Why Ante’s rule does not apply to implant-supported restorations
In the first part of this article, we mentioned that connecting an implant to natural teeth using bridge structures is unacceptable. However, some dentists still create such designs. Let’s examine why you should not do this.
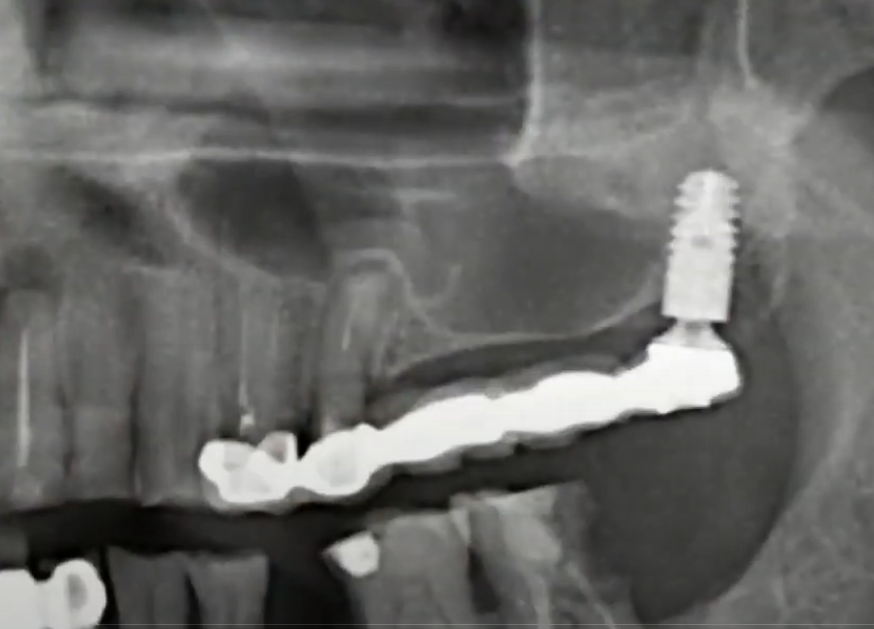
Bridge supported by an implant and a natural tooth YouTube / Dr. Kamil Khabiev / Dental Guru Academy
A natural tooth is mobile, whereas an implant is not. In this scenario, the bridge, which is supported by natural teeth on one side and an implant on the other, functions as a cantilever structure, transmitting tipping forces to the implant.
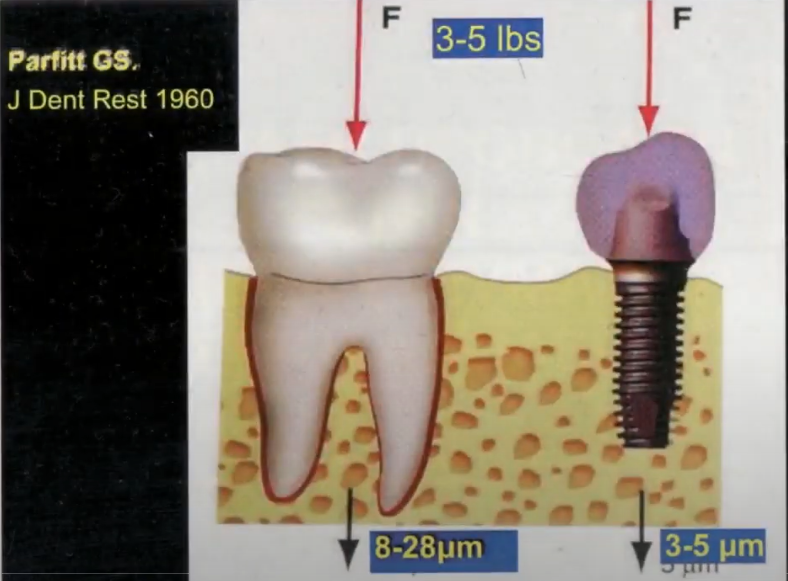
Different levels of mobility of a natural tooth and an implant under the same load YouTube / Dr. Kamil Khabiev / Dental Guru Academy
The connection with a fixed implant is also poor for the natural tooth. The tooth is unable to respond adequately to the load, which can lead to atrophy of the periodontium and periodontal disease. If this is not corrected, tooth loss is inevitable.
More often, such designs compromise the integration of the implant with the bone tissue. Instead of a strong connection between the bone and implant surface, a fibrous capsule forms, and the implant becomes mobile. While several years may pass before serious issues arise, such a design is not likely to function correctly long term.
Therefore, it is better to extract even a less-than-ideal tooth and make a restoration supported only by implants. As we mentioned earlier, a bridge restoration is always preferable to a cantilever restoration.
Excess cement in contact with soft tissues – what to do
Many publications and techniques focus on removing cement residues from under the crown. However, it is still not possible to completely eliminate this problem, especially in cases such as the one in the photo below. The remaining cement becomes trapped within the inner aspect of the bridge, making it almost impossible to remove.
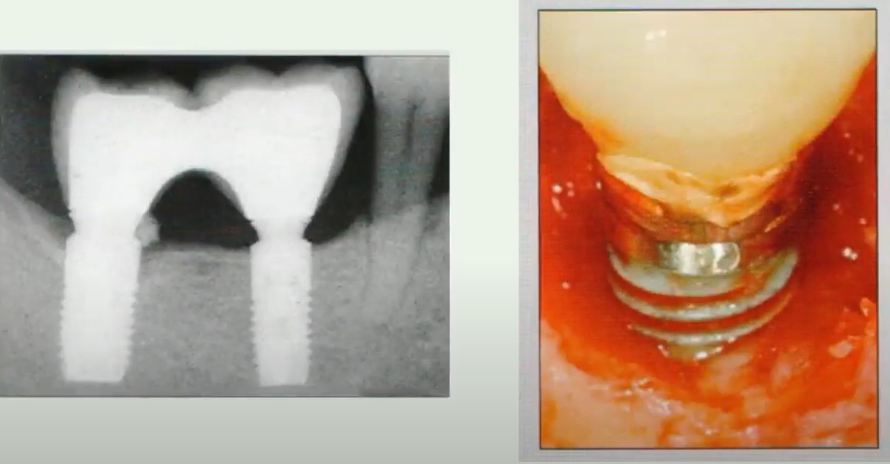
Unremoved cement residues led to soft tissue inflammation YouTube / Dr. Kamil Khabiev / Dental Guru Academy
Screw-retained restorations can often mitigate this issue. However, if implant angulation or other factors preclude this approach, then attempt to minimize the amount of cement that cannot be removed.
One of the most effective strategies is to fabricate individual abutments and crowns that fit together so precisely that they retain well even without cement. Additionally, crowns and abutments often have projections and recesses on their internal surfaces that act as anti-rotational elements and that are filled with cement. This reduces the risk of significant cement extrusion.
Some specialists use temporary cements, such as Temp-Bond, even for permanent prostheses, arguing that it is less aggressive when it comes into contact with soft tissues, as the remnants dissolve over time. It is also easier to remove excess cement and the restoration remains retrievable since the crowns can be removed relatively easily.
Other specialists are strongly against the use of such cements, as they have experienced decementation cases where patients presented with detached bridges and crowns in their hands.
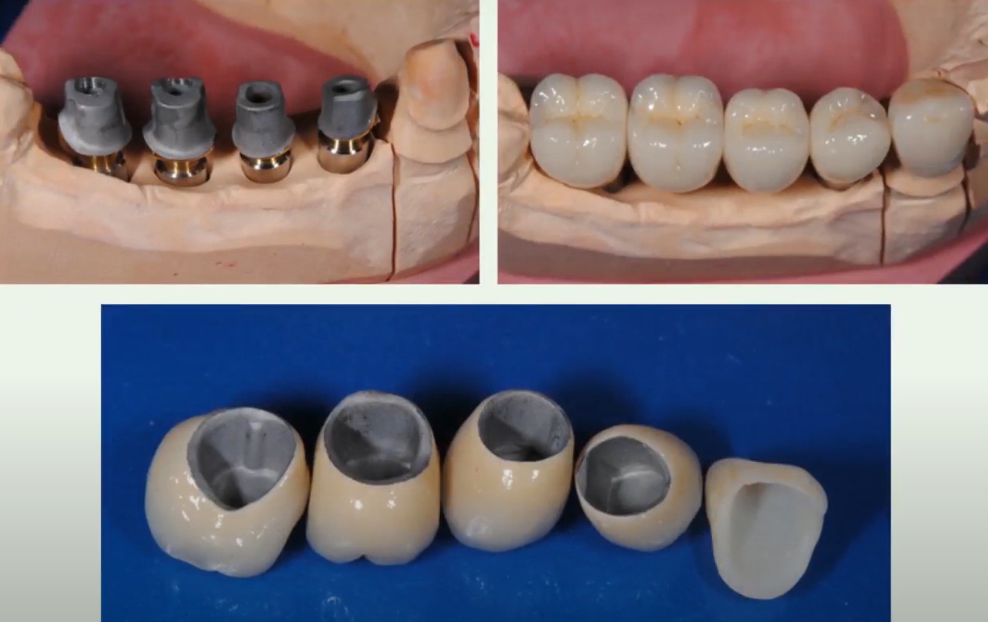
However, both groups agree that custom abutments and well-fitting crowns are the best solution for reducing cement residue. The photo below shows an example of how abutments and crowns should look to minimize cement-related problems.
Another method to reduce cement extrusion is by using silicone abutment models.
Accurate copies of the abutments on which the prosthesis will be placed are created using a quick-setting silicone. Then cement is quickly placed in the crown, and the crown is placed on the silicone model. Excess cement is then extruded onto the silicone model, rather than into the patient’s mouth, and is easily removed. The crowns must be removed quickly, leaving a thin layer of cement inside, which is sufficient for reliable retention but not enough to cause excess extrusion when installed on the actual abutment. All of these steps must be done quickly before the cement begins to set.
Short abutments and crowns due to insufficient space between the implant and the antagonist tooth
Recall the rule: if there is less than 7 mm of space from the top of the future crown to the neck of the implant, then only screw retention of the prosthesis is permissible. Unfortunately, this rule is not always followed, and some clinicians attempt to create extremely short, cement-retained restorations, where even a screw would not help, as seen in the image below.
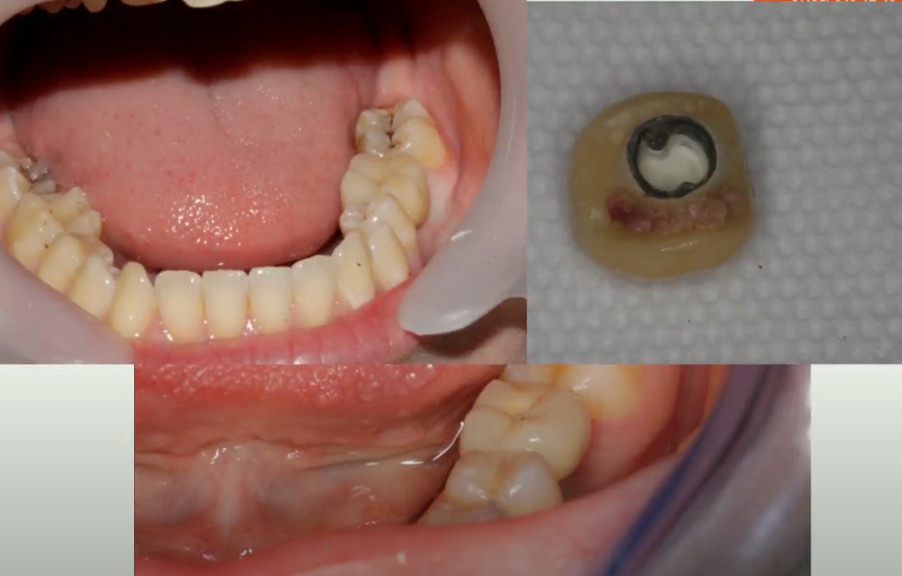
The crown has detached from the abutment – an unsuccessful design due to its insufficient height. The emergence profile is completely flat, whereas a recommended angle is no more than 30° YouTube / Dr. Kamil Khabiev / Dental Guru Academy
As you can see, the crown is completely flat, and the emergence profile is not formed at all. The internal surfaces accumulate debris that cannot be cleaned. The worst aspect is the abutment seat, which is less than 3 mm deep. It is not surprising that the crown did not remain in place.
Prosthetics cannot be done in this manner. We have already discussed solutions to this problem in the first part of this article. Solutions range from reducing the height of the opposing tooth, and fabricating a crown for it in order to create some space, to more complex procedures where the antagonist tooth of the upper jaw is reduced in height, and the mandibular bone is reduced simultaneously, to allow for deeper implant placement. These approaches are complex and time-consuming but are often the only way to resolve the problem and deliver a truly functional prosthesis.
Gaps and incomplete seating of the abutment into the implant – incomplete proximal contact
This problem is most commonly encountered with planar connections and involves the abutment not fully seating in the implant’s receptor.
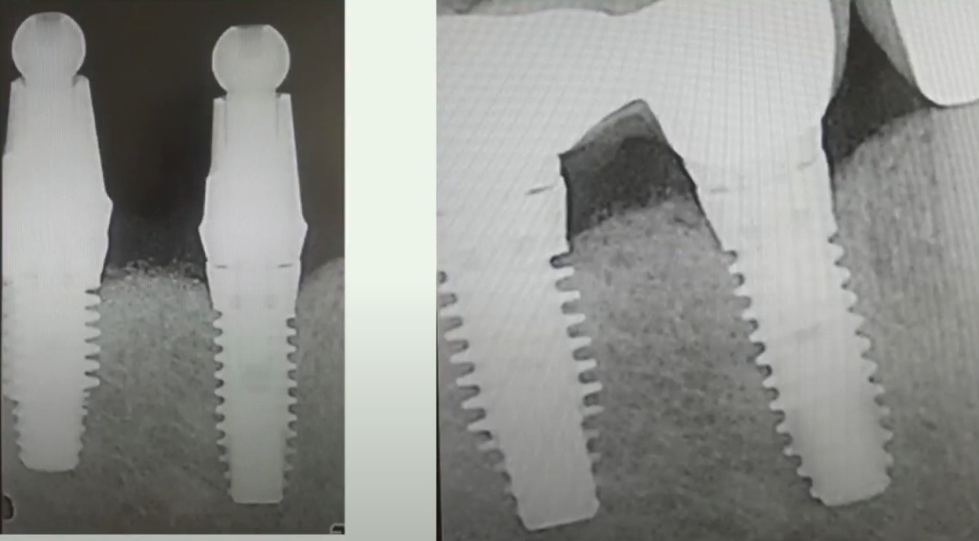
Gaps between the implant neck and abutment – poor fit leads to loosening and increases the risk of screw or abutment failure YouTube / Dr. Kamil Khabiev / Dental Guru Academy
This disrupts the balance of the restoration. Micro-movements can lead to abutment fracture and also cause resorption of the peri-implant bone.
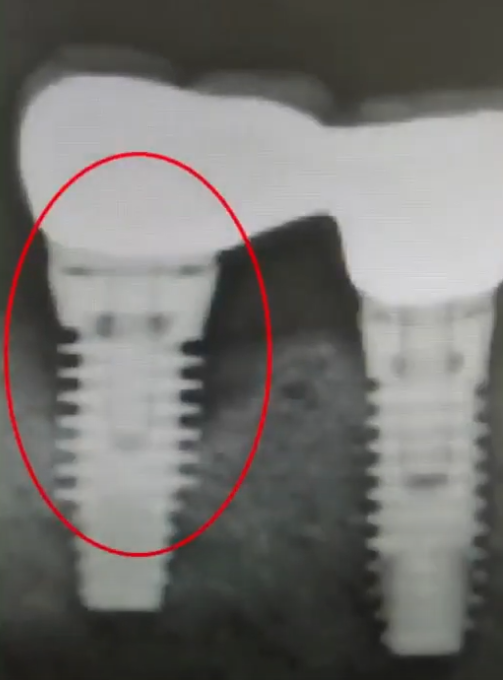
Bone resorption around implants caused by incomplete approximal contact of the abutment with the implant YouTube / Dr. Kamil Khabiev / Dental Guru Academy
Problems with disinfection of abutments and screws
It may seem that every clinician and dental technician is aware of the importance of cleanliness and disinfection, but these rules are violated surprisingly often. Therefore, if you start working with a new laboratory or private technician, it is essential to check the conditions under which they work.
The clinician expects to receive well-finished crowns and abutments, and the technician expects that the clinician will disinfect everything before placement. As a result, the patient may experience such unpleasant complications.
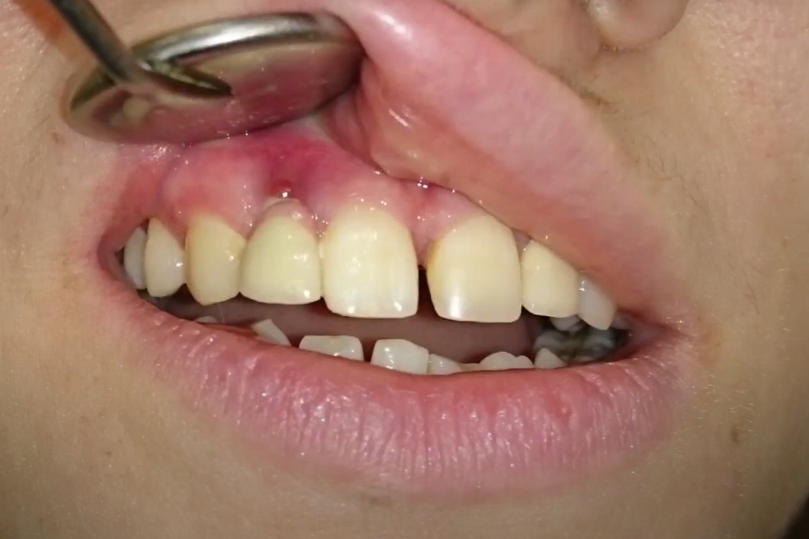
Inflammation of soft tissues caused by insufficient disinfection of the abutment YouTube / Dr. Kamil Khabiev / Dental Guru Academy
Therefore, regardless of your trust in the dental laboratory, make sure to place all superstructure components in a disinfectant solution before placement.
Fractured implants and abutments
When the implant, framework, abutment, or prosthesis saddle fractures, patients often report that they chewed carefully and did not load the prosthesis with overly hard foods. In most cases, this is true.
Chewing places a moderate load on the restoration. The main load occurs during swallowing, when the teeth of the upper and lower jaws close tightly to stabilize the position of the hyoid bone.
This is easy to check; try swallowing saliva and notice the pressure on your teeth. On average, a person makes 1000 to 1500 swallowing movements per day. This explains why failures occur regardless of the patient’s compliance and which side is their preferred chewing side.
Such problems are more likely when the crown is screw-retained, rather than on multi-unit abutments when the crown and abutment are retained by a single screw. See the picture below.
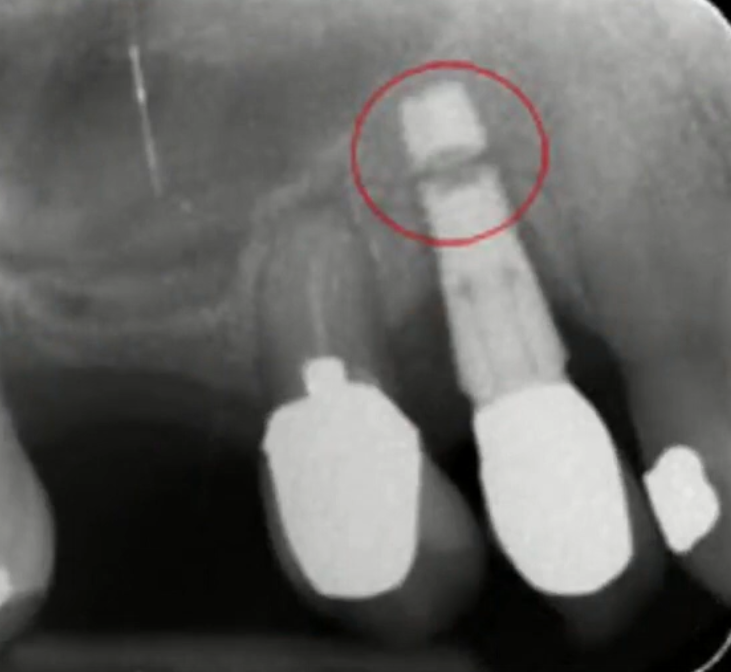
Implant fracture due to a lever created by a screw YouTube / Dr. Kamil Khabiev / Dental Guru Academy
If cement fixation had been used in this example, then it is likely that the crown would have detached from the abutment. The cement would have acted as a fuse. However, the mechanical strength of cement fixation is less than that of screw fixation. Repairing a detached crown is much simpler than replacing a fractured implant.
The illustrations below show the difference in the points of force application when using screw versus cement fixation.
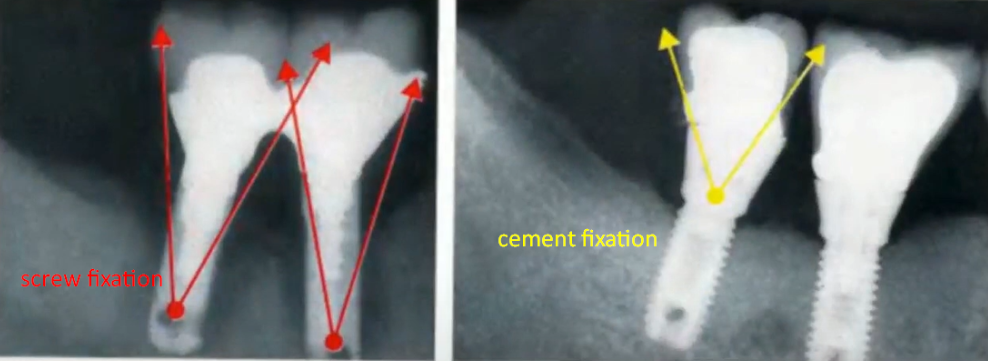
The points of application of forces when loading the crown – screw fixation on the left; cement fixation on the right YouTube / Dr. Kamil Khabiev / Dental Guru Academy
That’s all for now. The third part of the article on prosthetic errors and methods for their prevention will cover the best techniques for passive fit of complex prostheses, and much more. Until our next publication.

