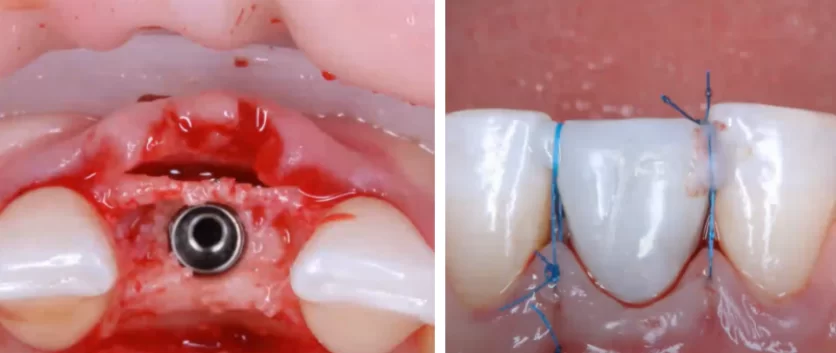
One-stage implantation with and without immediate loading
In this article, we will discuss the biological and aesthetic aspects of immediate implant installation. This method is more complex and has a higher risk of complications, but it has several advantages over delayed implantation. For example, it reduces the loss of height and width of the alveolar ridge, and when it comes to the aesthetic zone, it makes it possible to place a crown immediately so that the patient can leave without a defect in the aesthetic zone.
What are the different types of one-stage implantation?
Immediate implantation is most often used to correct single defects in different parts of the dentition. We can identify two types of immediate implant surgery:
- Immediate installation of an implant and a loaded crown. This surgery is performed only in the area of the front teeth, where a temporary crown is immediately placed and removed from the bite zone to reduce the mechanical impact on the implant.
- Immediate installation of the implant is followed by the installation of a healing cap, or a plug, with suturing of the gingiva over the implant. The latter option is most often used if the patient’s bone density is D4. This operation is performed in the area of molars and premolars. In these areas, successful integration of the implant is not possible if the implant is loaded. If the implant is not stable, the bone tissue will not be able to grow onto the titanium surface, and instead a connective tissue sheath will form (fibrous integration).
There are also immediate implant surgeries with and without bone grafting, but these will be described in detail later.
A bit of biology
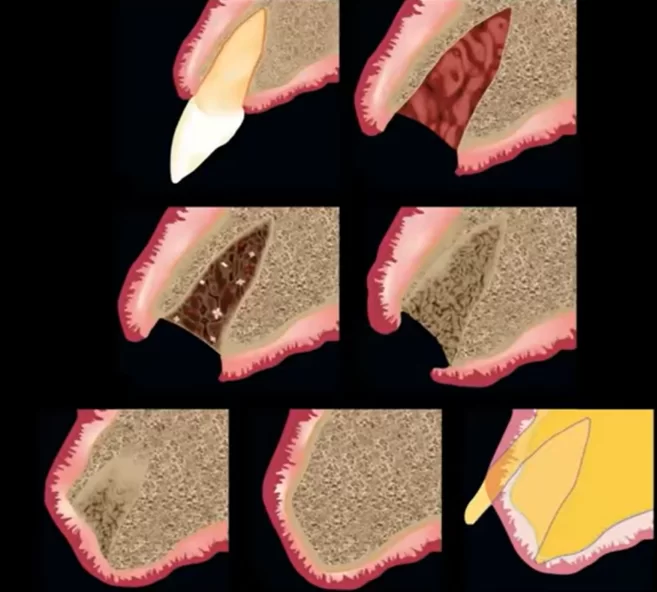
Let’s remind ourselves how the healing of the hole after tooth extraction occurs. It is worth noting that the installation of an implant does not affect the healing process.
- In the first three hours, a blood clot is formed in the hole. Proper clot formation is the key to successful healing. If you do not allow the clot to form properly, wash out, or traumatize the area of the extracted tooth, the likelihood of alveolitis increases.
- Within 48 hours, granulation tissue begins to form.
- Within 96 hours, connective tissue begins to sprout and epithelial proliferation begins.
- During the first seven days, the primary osteoid and bone mineralization begin to form. After two months, healing is almost completely completed. However, a full-fledged cortical layer over the hole is formed only after 3-4 months. The healing process is described in detail in the article “Tooth extraction – healing and implantation”.
In the context of this article, it is important to remind ourselves that a significant amount of bone is inevitably lost during the healing process. This is especially critical in the area of the anterior teeth, which is the case illustrated above.
It is important to realize that bone remodeling happens whether or not an implant is placed. Often, inexperienced surgeons believe that placing an implant in the hole will stop bone loss. In fact, the installation of an implant alone does not help preserve bone volume. You can only preserve bone tissue if you add bone augmentation for guided bone regeneration at the same time as the implant installation surgery.
Now let us remind ourselves why bone loss is inevitable during healing, regardless of whether an implant is placed in the hole.
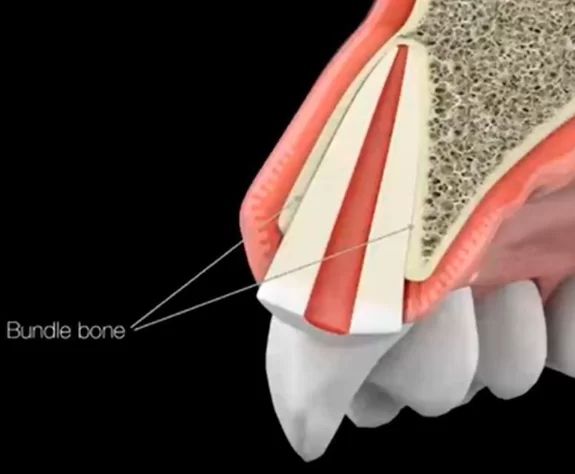
The fact is that from the inside, the hole is lined with a layer of bundle bone that belongs to the dento-gingival complex and, after tooth loss, is inevitably resorbed by the body. The bundle bone receives nutrition from the periodontal vessels; with tooth extraction, the nutrition is completely disrupted.
If the patient has a thin biotype, very often the plate that holds the tooth in place on the outer side consists entirely of fascicle bone. When the tooth is extracted, we will lose this part of the cavity completely. It is very important to understand this at the planning stage of the surgery.
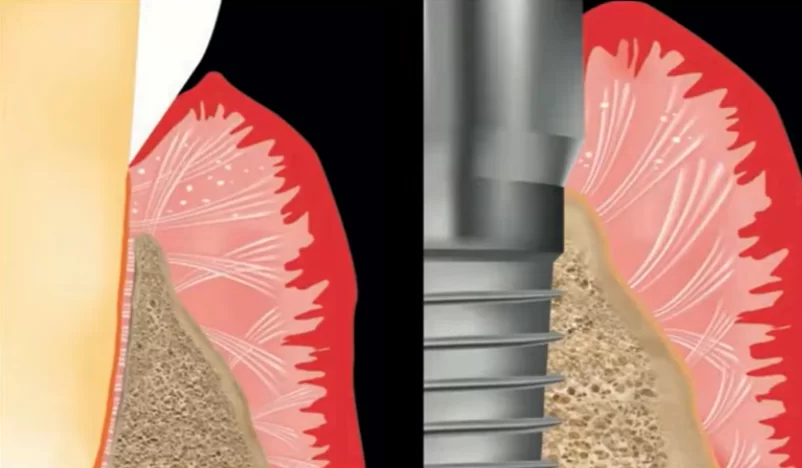
It is also important to understand the difference in the quality and structure of the soft tissue complex that is formed around the living tooth, and around the implant. Our website has a whole series of articles on soft tissue integration, here is a link to the first of them.
Here we will briefly remind ourselves that in the case of a living tooth, collagen fibers are attached to the cement both perpendicularly to the root and surrounding the root of the tooth (arranged in parallel). In the case of an implant, the gingival cuff at the connective tissue level is only partially restored. There are few attachments to the titanium surface and the collagen fibers are predominantly located along the implant surface. In addition, the soft tissue connection is fed only from the gingival side, whereas in the case of a living tooth there is an additional source of nutrition from the periodontal side. This means that the strength of this connection is significantly lower compared to a living tooth.
Indications and contraindications for one-stage implantation
Let’s start with the indications:
- Fractures and cracks of the tooth root.
- Periapical inflammatory processes (but not in the acute stage). In the past, any inflammatory processes of this nature were considered contraindications, but today’s immediate implant protocol allows for the installation of implants with these diseases.
- A tooth extraction in the smile zone is the fifth to fifth tooth on the upper jaw. In this area, immediate implantation allows for the best aesthetic result. It is possible to preserve the morphology and soft tissue level with a good level of papillae. Also, a crown with an optimal eruption angle that does not differ from the neighboring teeth is possible.
Contraindications to immediate implantation:
- Systemic chronic diseases in severe form, including myocardial infarction that occurred within the last year.
- Drug addiction, and soft tissue lesions as a consequence of smoking.
- Decompensated diabetes mellitus.
- Inflammatory processes in the stage of exacerbation. In this case, it is necessary to go on a delayed protocol or postpone surgery, and to bring the disease into remission during this time.
- Blood diseases.
- Lack of the necessary volume of bone to ensure the primary stability of the implant.
Let’s also look at the classification of types of implant installation, see the table below.
| Classification | Name | Time after tooth extraction | Clinical condition of the hole at the time of implant installation |
| Type 1 | Immediate installation | 0 | Hole after tooth extraction without bone and soft tissue healing |
| Type 2 | Early installation with soft tissue healing | 4-8 weeks | Extraction hole with healed gingiva and without bone healing |
| Type 3 | Early installation with partial bone healing | 12-16 weeks | Hole with soft tissue healing and significant bone healing (is standard among delayed protocols) |
| Type 4 | Late installation | 6 months or more | Completely healed hole (rarely used in recent years, as by this time we get significant resorption of the alveolar crest) |
Only the first type of operation belongs to the one-stage implantation; the others belong to the delayed protocol with its own specific features.
Advantages of the one-stage implant protocol
Firstly, this request often comes from the patients themselves, who have researched the issue and learnt about the existence of this method. It is advantageous, because the patient endures fewer surgical interventions, and in some cases, leaves immediately with a corrected defect. If we formulate all the advantages, the advantages of one-stage implantation are:
- Minimal invasiveness – only one surgical intervention is needed.
- Possibility of preserving the original contour of the soft tissue. In the series of photos below you can see how much the bone and attached keratinised gingiva volume decreases a few months after tooth extraction.
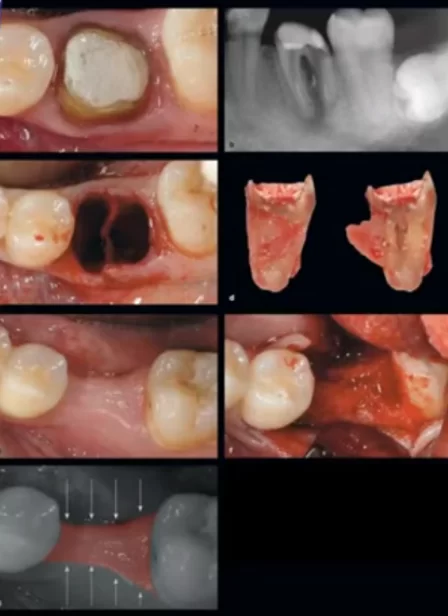
Changes in bone volume and amount of keratinisedized attached gingiva six months after tooth extraction
With implantation in this situation, it will be necessary to perform an operation for guided bone regeneration, and transplant a part of soft tissue, which is very painful and difficult for the patient.
- Accelerating the healing process. Healing and osseointegration occur almost simultaneously.
- One postoperative period, which is especially important when the risk of complications is high.
- Minimal number of visits to the dentist.
If your clinic or private office does not provide this service, the patient will choose another specialist.
Conditions for successful one-stage implantation
Planning the surgery is one of the most important steps, and it is unacceptable to skip any point. For diagnosis, a complete picture is indispensable, which can only be obtained with a cone CT scan. The following points need to be clarified before the surgery:
- Assess the volume of the hole.
- Assess the thickness and integrity of the vestibular wall throughout.
- Assess the thickness of the bottom of the hole and the distance to anatomical structures. The thickness should be a minimum of 2-3 mm for implant fixation. There should be space for the implant so that the maxillary sinuses, or the mandibular nerve, are not affected. It is also important to assess the volume of the bifurcation bone plate, because this is where we will place the implant.
- Preoperatively assess the complexity of the extraction and root anatomy. The extraction surgery should be atraumatic to keep the bony structures and soft tissues intact. Therefore, always think not only as a surgeon, but also as an orthopaedist.
- Assess whether there are inflammatory processes in the area of the tooth, and the degree of their intensity.
- Assess root inclination.
- Model and coordinate the position and inclination of the implant. In the case of immediate installation, it is important to plan the position of the implant from the crown so that it is harmoniously positioned in relation to the neighbouring and antagonist teeth. It is recommended, therefore, to plan this together with the prosthodontist. For this purpose, be sure to take x-ray images of both jaws to understand the situation of the antagonist teeth.
- Assess the density and quality of the underlying bone tissue – this is important for the prognosis of primary and secondary stability.
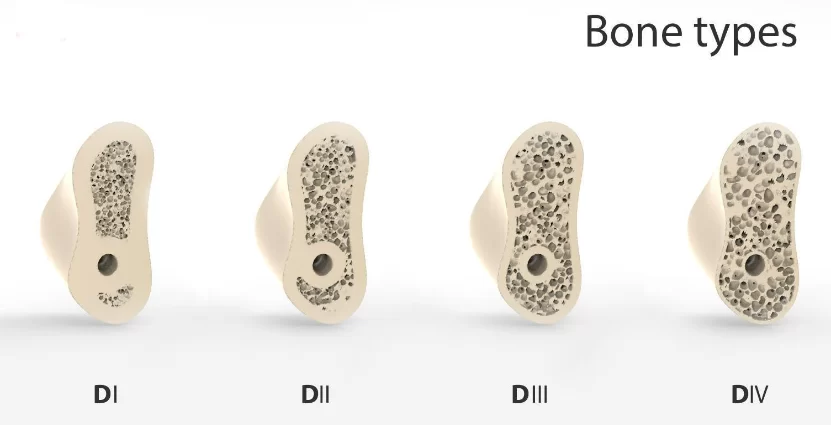
We will focus on the last point in more detail. As a reminder, there are four types of bone density, see illustration below.
- Type D1 very thick cortical layer and high density cancellous bone with limited vascularisation. It is quite rare, and for a long time was considered ideal for implant installation. However, practice has shown that despite good primary stability, osseointegration is difficult due to the small number of blood vessels in the cancellous tissue. Complications such as fibrointegration or rejection of the implant are quite common, especially if the implant was placed with high torque values. The threads and the body of the implant compress and traumatise the bone, thereby further impairing bone nutrition.
- Type D2 has a dense trabecular part and a slightly less dense and thicker cortical plate than the first type. The vascularisation here is sufficient, and good primary stability and osseointegration can be achieved without complications. This is ideal for implant installation.
- Type D3 is relatively thin, but dense, cortical bone and “loose” cancellous bone. This type of bone is often found in the upper jaw. Also, a good bone type for implant installation. It is a little more difficult to obtain good primary stability, but with certain techniques it is possible to obtain good torque and, due to the extensive network of blood vessels, osseointegration is fast and without complications.
- Type D4 is the most complex, with a thin cortical layer and very loose cancellous bone. It is usually found on the distal parts of the maxilla. It is difficult to obtain primary stability in it. However, the installation of an implant and successful integration is possible. We will look at how to achieve this next.
Some specialists also identify the D5 bone, which is immature bone that is sometimes poorly visible on X-rays. It is formed somewhere within 1.5 months after tooth extraction.
Also the understanding of the conditions for success of immediate implantation would be incomplete without reminding ourselves of what primary and secondary implant stability are.
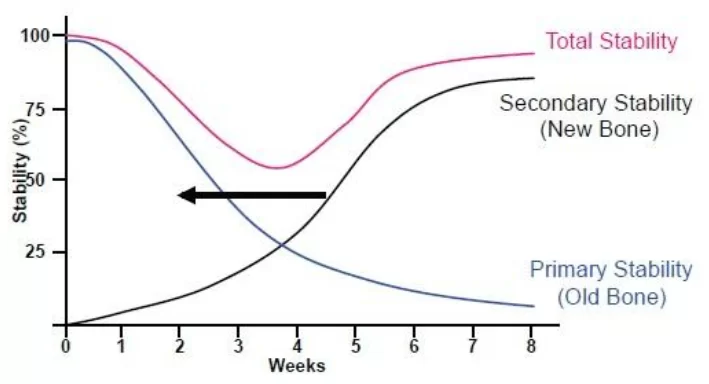
Primary, secondary, as well as total implant stability – the graph shows that weeks 3-5 are the most difficult weeks
Primary stability is determined by the amount of torque, i.e. the force with which the implant is screwed into the bone. For the immediate implantation protocol, a torque of 35 to 40 N*cm is considered optimal. A torque of 23 to 26 N*cm is also acceptable, but in this case a healing cap must be placed, as immediate loading is inadmissible. A torque lower than this is a complication, and it will be necessary to place a plug and suture the soft tissue, thus losing the key advantage of immediate implantation, namely one surgical intervention.
During the implant installation surgery, the bone tissue is traumatised by the crushing and deformation from the screws of the implant. During the process of osseointegration, the traumatised bone is resorbed and new bone structures grow in its place. The growth of bone tissue against the implant body provides secondary stability. There is a period between the third and fifth week, when the overall stability of the implant is almost doubled. During this period, the primary stability, which is obtained through the mechanical adhesion of the implant to the bone tissue, is reduced and the secondary stability has not yet reached normal values.
Which implants are best suited for the immediate implant protocol?
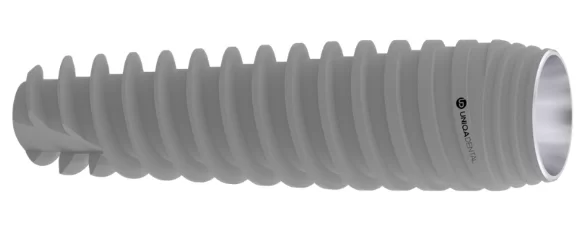
All recommendations in this article are based on the use of bone-level implants with a conical interface. For one-stage implantation, the best implants are conical implants with aggressive threads, which are available from all manufacturers. Aas an example, look at the Uniqa Dental implant.
-
Sale!Original price was: $1,600.$1,200Current price is: $1,200.
-
Sale!Original price was: $1,180.$944Current price is: $944.
-
Sale!Original price was: $600.$510Current price is: $510.
Implants with a smooth thread profile can also be used, but they require separate preparation techniquesand will not be discussed in detail here.
Of course, the key to success in one-stage implantation is atraumatic tooth extraction. It is at this stage that there is a risk of serious complications that would make immediate implantation impossible.
Protocol for immediate implantation
Let’s start with a clinical case of implant placement in the molars and premolars followed by the installation of a healing cap.
- Atraumatic tooth extraction.
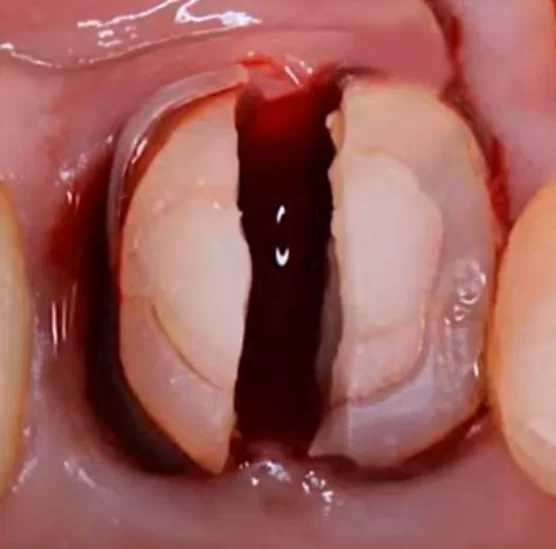
Preparing for tooth extraction – sectioning of the tooth and separation of the circumferential ligament
Standard steps for atraumatic tooth extraction:
- Assessing the anatomy of the tooth by CBCT. It is important to perform the surgery in a way that preserves the bifurcation plate, as this is needed for the installation of the implant.
- Separation of the circumferential ligament with a 15c blade with a curved cutting edge. It is important to cut rather than tear the tissue, minimal damage to the gingiva is important to maintain the level and amount of keratinized gingiva attached.
- Sectioning the tooth into fractions. It is recommended to keep 0.5 mm short of the bony holes. Some surgeons use a spherical bur for this, others prefer the Lindemann bur, but special care must be taken because of the overly aggressive edge.
- Drilling of the future implant hole with the pilot drill and the second drill before tooth extraction. This is an important sequence because the tooth roots will prevent the drill from slipping off the bifurcation plate and the tooth itself sets the direction. With single-stage implantation it is important to place the implant immediately so that it does not deviate from the direction of growth of the tooth we are extracting. It is recommended to drill at high speeds of 1000-1200 rpm, because the higher the speed, the lower the vibration.
- Extraction of tooth fragments with roots using a narrow elevator. Push the elevator into the periodontal gap and dislodge the roots. Try not to press on the vestibular plate or soft tissues. The less trauma during extraction, the better the prognosis for successful implant engraftment.
- Root sectioning in the meso-distal direction (if necessary). If the roots are heavy, it is necessary to separate them with the same bur. The surgeon should not saw the bone, only the roots of the tooth.
There are peculiarities -n the case of extraction of single-rooted teeth, although the general sequence is the same:
- Assessing the anatomy of the tooth on CBCT
- Separation of the round ligament with a 15c blade
- Sectioning of the tooth root in the vestibulo-oral direction. This is very important – you cannot section the tooth in the mesiodistal direction because we can break the vestibular wall when breaking off parts of the root.
- Extract the tooth with a narrow elevator without putting pressure on the vestibular wall and soft tissues. Such teeth can also be extracted with narrow forceps, for this purpose it is necessary to insert them deep enough and rotationally extract the tooth. In no case should you rock the tooth to avoid damaging the vestibular wall.
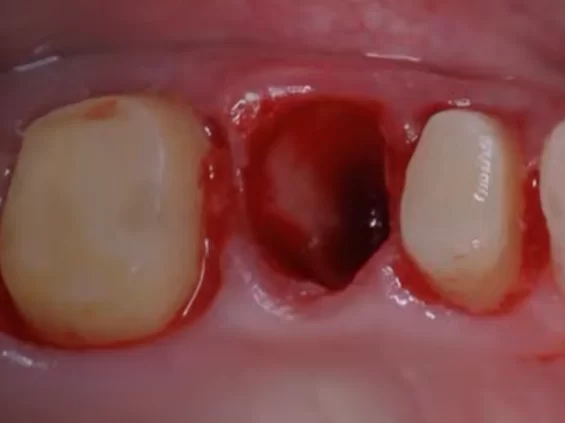
Further evaluate the hole, check the integrity of the bone tissue, assess the consequences of inflammatory processes, perform a careful curettage, and then proceed to implantation.
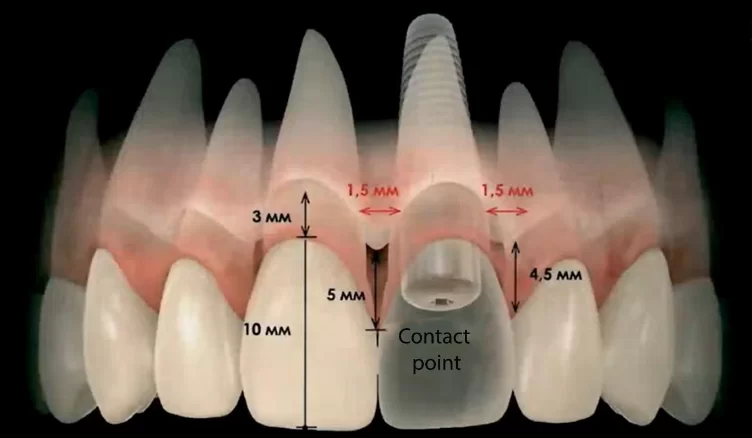
2. Rules for implant installation. The photo below shows an example of the correct position of the implant, both in relation to neighbouring teeth and in depth, to obtain a natural gingival position and an anatomically correct crown.
There must be at least 1.5 mm of bone between the implant body and the neighbouring tooth to maintain full bone nutrition, and avoid significant bone resorption.
There should be at least 4.5-5 mm from the implant platform to the soft tissue level on the palate side. The distance from the zeniths of the neighbouring teeth to the implant platform should be about 3 mm – this is very important in the anterior zone to obtain the correct eruption profile, and for the crown to provide the correct support to the papillae and soft tissues.
It is also important to know that the contact point of the neighbouring tooth and the crown should be 5 mm away from the bone peak, so that the soft tissues can fill this area without problems, and a complete papilla can be formed.
These values did not come from nothing. There is such a concept as biological width, which is essentially a complex of soft tissue connection, which includes epithelial connection and connective tissue connection. It’s also called the gingival cuff. On average, the gingival cuff is 3-3.5 mm deep and is always formed regardless of the soft tissue level above the bone at the time of implant installation. For example, if we place an implant according to the delayed protocol, and we have 2 mm of soft tissue above the bone, then in two months a gingival cuff with a depth of 3-3.5 mm will still be formed. It will simply be formed due to the resorption of the bone around the implant neck by 1-1.5 mm. Therefore, it is important to understand that for successful formation of the gingival cuff and the gingival contour, it is necessary to have at least 3 mm of soft tissues above the implant platform, 3.5-4 would be better. This is another advantage of one-stage implantation, because immediately after tooth extraction the gingiva has not had time to fall off, and there is every chance of maintaining the gingival level including keratinized gingiva.
3. Let’s break down the stages of the immediate implantation protocol using the chewing section as an example.
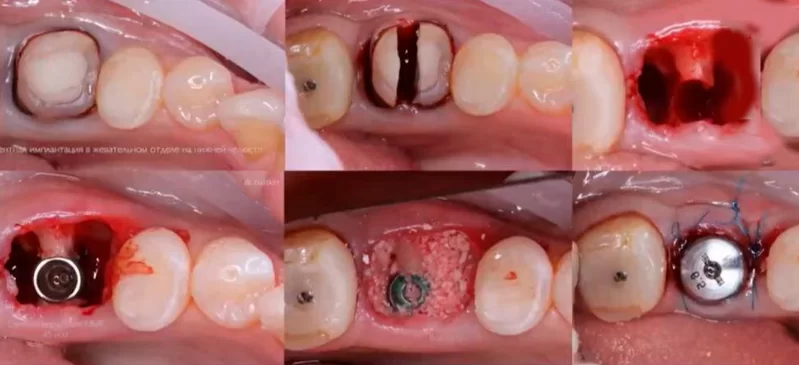
Stages of immediate implantation from tooth extraction to the installation of the healing cap and soft tissue suturing
- On the first slide we see a tooth that is not restorable as we have large periapical defects. Initially it is clear that the extraction will be quite difficult, and it took the surgeon about 20 minutes.
- After cutting off the circumferential ligament, the tooth was sectioned in a vestibulo-oral direction, followed by drilling of the inter-root septum with a pilot drill and a second drill.
- The tooth roots were then gently dislocated. The third slide shows a hole with a partially formed implant installation site.
- After extraction, it is important to clean all periapical areas and remove pathological tissue.
- We then complete the drilling with the third and fourth drill bits to widen the implant site. Bicortical fixation is sometimes used for maxillary implant placement, although this installation is not recommended for the delayed implant protocol. The fixation into the cortical layer of the maxillary sinus causes overstressing of the implant. With classical fixation, the increased load on the implant is compensated for by the elasticity of the cancellous bone. If the apical part of the implant is fixed in the rigid cortical bone, the elastic properties are out of the question. However, if the required level of primary stability cannot be achieved in any other way, bicortical fixation is acceptable.
- Slide 4 shows the implant already in place. In this case it is 4.0 x 10 mm.
- Fix the plug and place bone material in the cavity around the implant. In this case it was Bio-Oss. It is important to place the bone material flush with the hole – this is at the level of the implant platform, maybe 0.5 mm higher. It is not necessary to pour the bone material on top of the implant otherwise the excess bone material will come out through the soft tissue for 6 months or more.
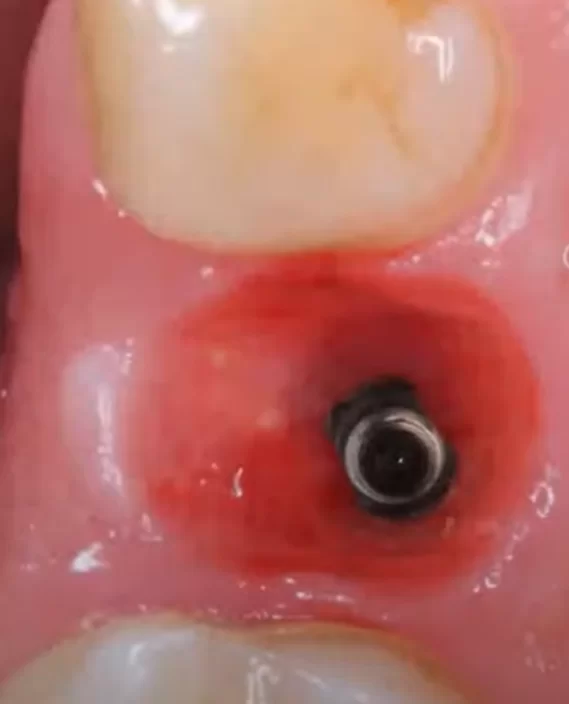
- Installing the healing cap. In this case, a standard healing cap with a height of 5 mm was placed. Suture the soft tissue around the healing cap.
Let’s look at another case – the installation of an implant in the area of tooth 36. Here we see a decayed tooth that cannot be restored. The extraction procedure is almost the same.
On the second slide we can see the formed implant hole, which is located in the bifurcation zone. When we carefully prepare this area, we pull the bone slightly apart and compress the bone tissue to the sides. In this way, the implant will be completely embedded in the bone tissue.
Place the implant with a torque of 35 Ncm, place a 5 mm high healing cap and place bone material in the cavity. Afterwards, the edges are sutured with Prolen 5/0 knotted sutures.
Note the dotted line on the slide below. It shows that the implant shaft goes close to the centre line of the chewing row. This is a general recommendation for the installation of implants in the chewing area, you should try to place the implants in the centre of the furcation well.
If there is no inter-root septum, or its volume is insufficient for the installation of the implant, it is better to follow the delayed implantation protocol. In the case of immediate implantation, it is not worthwhile to place wide or angled implants. The implant is likely to survive, but it will not be a reliable support for the crown.
With the installation of the healing cap there is an important feature, it must not put pressure on the underlying bone tissue. Otherwise, necrotic processes and significant bone resorption may occur. It is also important that the eruption angle of the healing cap is smooth, approximately 30° is recommended.
Immediate implantation with installation of a crown in the anterior region (smile area)
In this area, aesthetics and properly shaped soft tissues are one of the key factors for a successful restoration.
The following conditions must be fulfilled to ensure the correct eruption profile and proper burial of the implant:
- The implant platform should be 4.5-5 mm below the soft tissue level on the palatal side. We always focus on the level of the soft tissue on the palatal side, because this tissue is always stable and will not be subject to remodelling.
- It is necessary to have at least 2-3 mm of bone stock apically, because this is what will provide the primary stability of the implant.
- The implant should be placed in such a way that the screw shaft has an exit to the palatal slope of the crown. This is not so critical in cemented crowns, but screw fixation has become the standard for such restorations in recent years, where it is important that the screw shaft does not protrude to the outside of the crown. Otherwise, there will be a visible stain from the material used to fill the screw shaft. Sometimes, surgeons only care about the stability of the implant and place the implant at such an angle that the screw shaft extends to the front surface of the tooth. This happens when different specialists place the implant and prosthetics. Therefore, it is good if one specialist performs the entire work ,or if there is good co-operation between the surgeon and prosthodontist.
- The preparation method for immediate implantation is used as for low-density bone. That is, the last drill bit has a smaller diameter than the implant itself, and the implant further expands the hole with its own thread. For example, we pass the full depth with a 2.0 mm drill bit, 2.7 mm drill bit does not reach 2 mm to the apex, and 3.2 mm drill bit widens the mouth of the hole to a depth of 2-2.5 mm to give the direction of the implant. The implant will then create a bed with its own threads and provide acceptable primary stability.
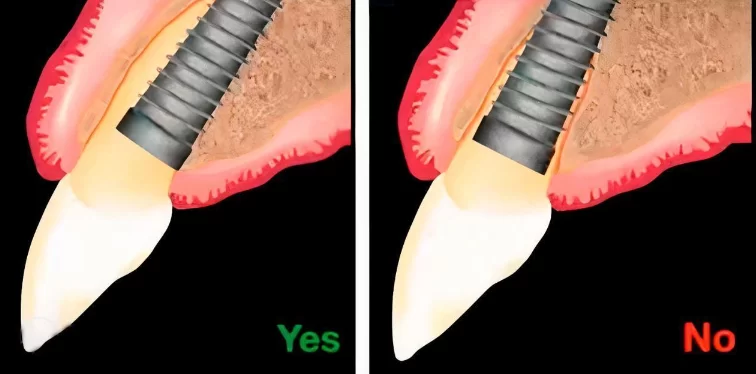
- It is important to position the implant so that there is 2 mm between the implant body and the vestibular wall, this volume will be filled with bone augmentation. The illustration below shows the correct and incorrect installation of the implant.
If the implant is placed as shown on the second slide, there will be significant bone loss due to resorption of the buccal bone, and part of the implant will not be covered by bone. With the correct protocol, however, a sufficient amount of bone will form due to directed bone regeneration to hold the implant completely.
- Let’s look at the peculiarities of preparation in the case of one-stage implant installation in the frontal zone. In this case, there is no inter-root septum, which serves as a base for the installation of the implant. Start at 1,200 rpm with intensive cooling. The drill must be positioned at an angle of 45° to the palatine bone. It is critical to set the correct drilling direction, because the drill usually slips and tends towards the bottom of the hole. A globular bur, a lance-shaped drill bit (1.6 mm) or a Lindemann drill bit can be used to create the primary burial. The correct drilling angle is shown in the illustration below.
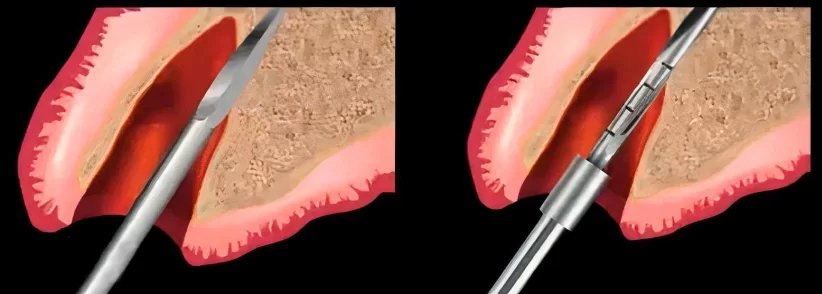
Creation of a depth for the implant hole with a lance drill and passing through with the first drill bit
During further drilling, it is important not to apply excessive pressure so as not to accidentally perforate the palatal bone wall.
The implant itself is installed in the prepared hole according to the standard procedure with the recommended torque.
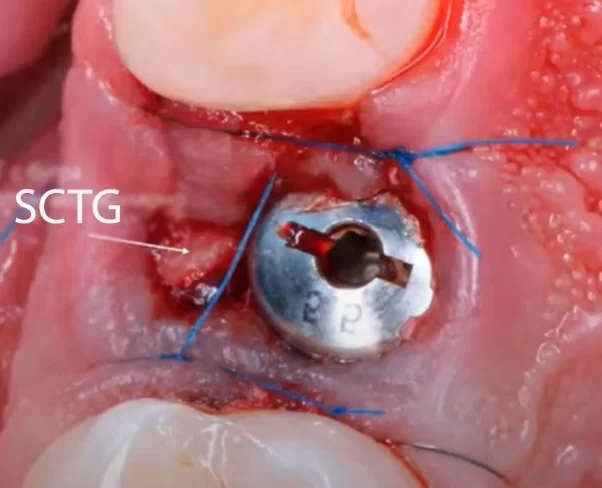
In the anterior zone, it is particularly important to preserve the soft tissue contour and the volume of the hole. However, with any type of gingiva, an average of 1 mm of gingival recession occurs during tooth extraction. Therefore, to preserve the volume of soft tissues it is necessary to first build up additional volume with the help of a subepithelial connective tissue graft SCTG – it is a fragment of connective tissue without epithelium.
The graft is taken from the patient’s mouth, and there are two sources of connective tissue – the palate and the maxillary tuberosity region. As to which source is better, there was a 2018 study entitled: Tuberosity versus palatal donor sites for soft tissue grafting: A split-mouth clinical study authored by Peter N. Amin, Nabil F. Bissada, Paul A. Ricchetti, Andre Paes B. Silva, and Catherine A. Demko.
They compared the advantages and disadvantages on the following key parameters:
- Patient comfort is a big part of it, and it turned out that taking from the tuberosity area was much more comfortable, and less painful.
- Graft thickness was also greater when taken from the tuberosity, averaging 2.9 mm, versus 2.3 mm when taken from the palate.
- The shrinkage of the graft was already lower when taken from the palate because of the much higher collagen content. However, there is another peculiarity. Grafts from the palate can overgrow, and this can be a problem in the long-term.
- The growth of the graft is expectedly better from the palate, but as mentioned above, sometimes overgrowth can be a problem.
- The collagen content is higher in tissue taken from the palate.
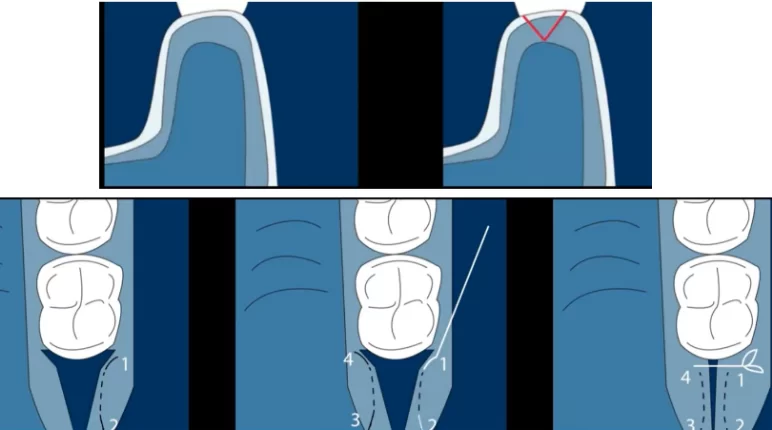
The technique of SCTG sampling also matters, the illustration below shows a standard tissue sampling protocol with V-shaped incisions in the area behind the seventh or eighth (if present) tooth.
We will not describe how to extract and de-epithelialise the graft, but we will consider another technique for tissue extraction because with the standard technique we get a defect that will take quite a long time to heal.
With the alternative technique, we need to make two parallel incisions at an angle of 45° relative to the tooth row, connect them and extract the graft. As a result, we get a slit-shaped defect, which is sewn up with one suture and heals much faster.
In general, it should be remembered that it is very likely that this is not the last implant in this patient and care should be taken to ensure that in the future it is also possible to take tissue for grafting. Therefore, for the sake of one implant it, is not necessary to cut off the entire tubercle of the patient, it is enough to take only the necessary amount of tissue. The tuberosity will then regenerate and can be used as a source for SCTG again.
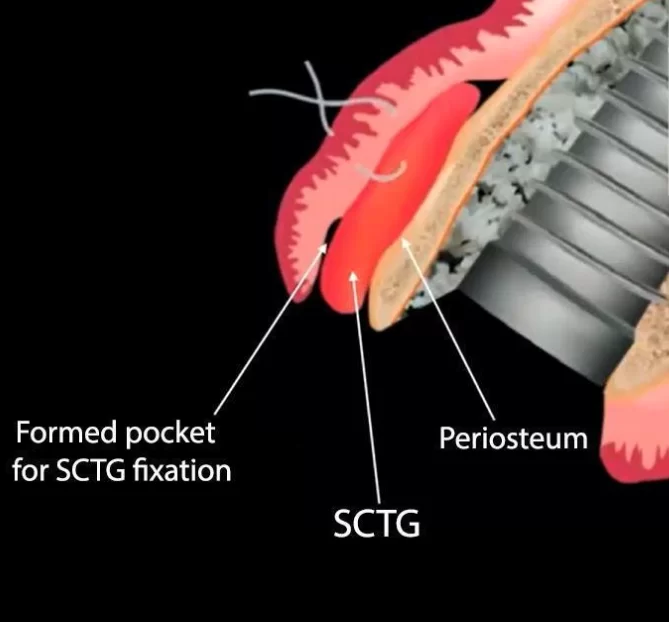
The illustration below shows the placement of the graft in relation to the periosteum and the existing soft tissue.
Recall that the graft should be cleaned of epithelium and fatty tissues. Also, the prepared fragment should not be very thick, usually a thickness of 1 mm is enough to ensure full nutrition and integration of connective tissues in the desired area.
- Forming the pocket for fixation of the SCTG is a split pocket, the epithelium and connective tissue are separated from the periosteum.The pocket can be formed either with a tunnel rasp or a microblade.
- Forming the pocket for fixation of the SCTG is a split pocket, the epithelium and connective tissue are separated from the periosteum.The pocket can be formed either with a tunnel rasp or a microblade.
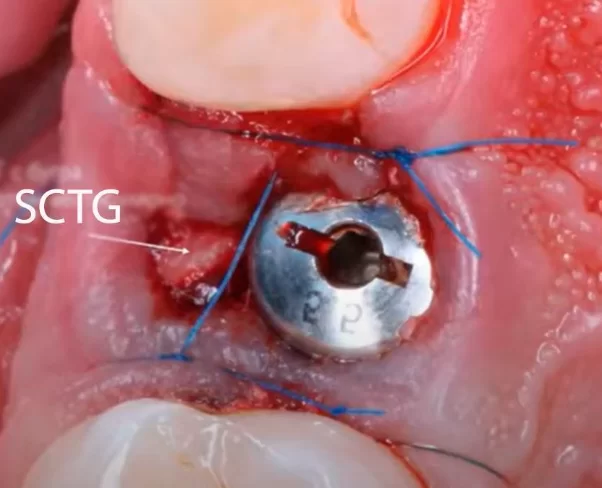
- Fix the graft with a U-shaped suture, for that we make a puncture through the vestibular part of the flap, stitch the graft, withdraw the thread, pierce the graft from the other side, withdraw the thread to the outer part of the flap and suture with a V-shaped suture. This suture is usually enough to keep the graft immobile. There is another important rule: the graft should not be larger than the formed pocket. Otherwise, when placing it in the pocket, folds may appear, which should not be allowed. The connective tissue should lie flat on the surface of the periosteum. In this case, the nutrition of the grafted tissue will be fine, and there will be no problems with healing.
7. It is important to perform the bone graft augmentation after SCTG fixation so that graft particles do not enter the area between the gingiva and mucosa and cause inflammation or impaired healing.
8. In case of immediate loading, it is recommended to use the suture described in the book “Plastic-Esthetic Periodontal and Implant Surgery” by Marc Hurzeler and Otto Zuhr.
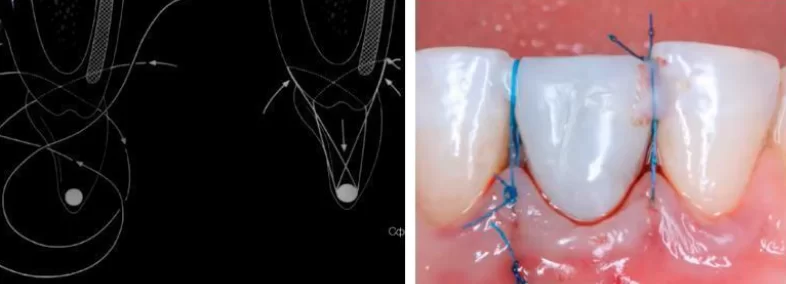
Hurzeler-zuhr suture for gingival fixation in cases of single-stage implantation with immediate crown installation
In this way, we not only reduce the hole, but also pull the tissue and the graft upwards and thus encourage it to grow vertically. This is a very comfortable suture and two sutures are sufficient to close the hole completely.
Features of bone graft filling – can we do without adding bone augmentation material?
There is still a debate about whether it is necessary to place a bone graft or whether it is possible to do without it. There are many cases where the graft was not placed and bone tissue was formed from blood clot. We will first look at the scientific documentation.
Here’s a quote from Professor Denis Tarnow:
“With immediate implantation into intact holes, even at long distances, without suturing and grafts, the bone regenerates according to the usual type of healing, from the clot.”
There are more studies from leading experts Sonalika Kabi and Rosalin Kar. Here is a quote:
“Bone holes at immediate implantation filled with or without bone grafts had similar hard and soft tissue changes when the defect size was ≤2 mm.”
From these, we can make the following recommendations: if the distance from the edge to the edge of the defect is less than 2 mm, there is no point in adding bone graft, healing will be of the same quality. If the defects are larger, it is recommended to fill them with bone graft, despite the fact that the hole will heal on its own, we will lose a significant amount of bone tissue in the healing process.
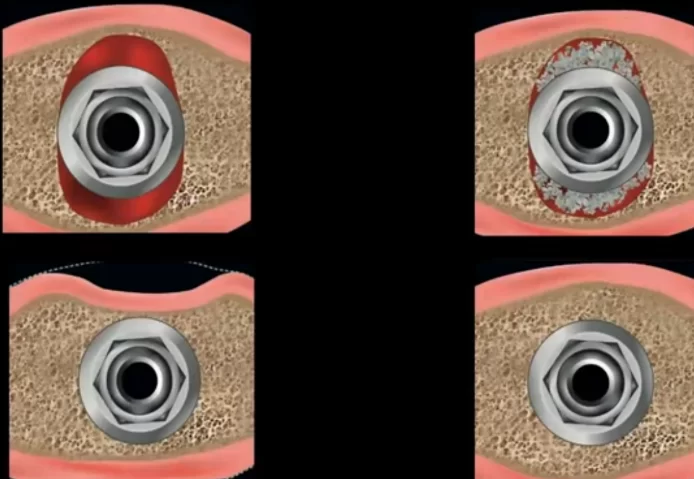
Comparison of healing results without bone graft and with filling the defect with bone material – without bone graft there is a significant loss of bone volume on the vestibular side
As for the question of what to use as bone material, we have a series of articles on guided bone regeneration, in which the advantages and disadvantages of both autogenous and xenogenous bone materials are discussed in detail.
Here we will briefly remind ourselves that the key advantages of autogenous bone material are:
- Absolute compatibility with the patient’s body, and fast healing;
- Low material costs, as part of the bone chips can be obtained during the preparation of the hole; and
- Acceptable preservation of the volume and contour of the soft tissues above it.
There are however, also disadvantages:
- More often than not, the bone material collected during drilling is insufficient and additional bone material has to be collected, which is an additional trauma for the patient;
- As it is the patient’s own tissue, the added volume can resorb as easily as the patient’s own bone.
Xenogenic bone material (processed animal bone) is also widely used to fill bone defects, and has i advantages:
- Better preservation of tissue volume and contours;
- Simplicity of the technique – we take the bone from the jar, prepare it by adding blood and part of the patient’s own bone chips, and fill the defect; and
- Minimal traumatisation for the patient.
Disadvantages include:
- Increased healing time;
- Increased cost of the procedure.
For the best effect, it is recommended to add autogenous material to xenogenic material in the proportion of 30/70%.
Specifics of SCTG and bone graft application for patients with thin and thick biotype
- If the patient has an intact vestibular wall and a thin biotype, then it is recommended to use SCTG and fill the defect with bone graft.
- If the patient has an intact vestibular wall and a thick biotype, then only filling the defect with bone graft is recommended. In patients with such a biotype, the connective tissue graft may start to overgrow, and then a part of the soft tissue will have to be extracted.
- If there is a defect of the vestibular wall, we use directed bone regeneration, filling the defect without flap detachment according to the method of Istvan Urban. A combination of xenogenic and autogenous bone material is used as a graft in the inverse proportion of 70% autogenous and 30% xenogenous material. In this case it is difficult to perform simultaneous SCTG surgery, so it is recommended to perform tunneled SCTG grafting during the healing phase while the temporary crown is in place. It is important to understand the difference in the healing processes of a well with and without peeling of the well. There is a 2018 study on this, titled: Immediate dental Implant placement with a horizontal gap than two millimetres: a randomized clinical trial. The researchers found that when the flap is peeled off and with a bone graft, the well loses virtually the same amount of bone volume as without peeling off the flap and without the graft. Therefore, it is critical not to detach the flap when the vestibular wall is damaged.
Peculiarities of implant installation in the area of premolars in the upper jaw
Let’s look at another case, where a decayed tooth 24 was extracted, and an implant was placed in its place in the palatal wall. The first image shows a decayed tooth to be extracted. The protocol of atraumatic extraction follows the same rules as described above.
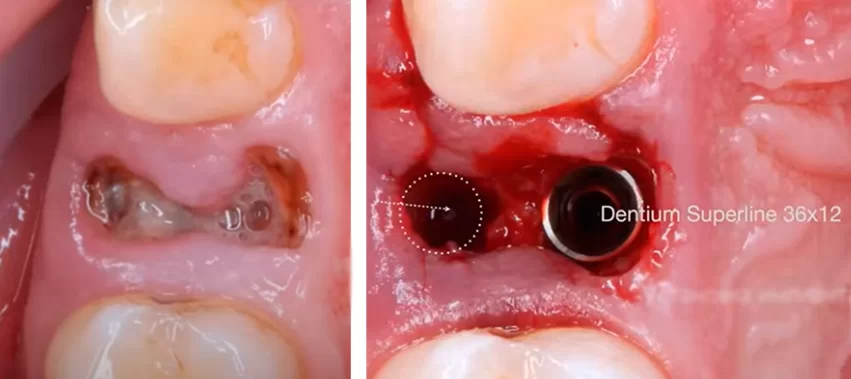
Installation of the implant in the palatal wall in the case of immediate implantation in the maxilla
Notice that the implant is placed in the palatal wall and the hole left by the second root is filled with bone graft.
Place the healing cap flush with the soft tissue, in this case the healing cap is 5 mm high. Place the SCTG envelope on the vestibular side and suture the soft tissues.
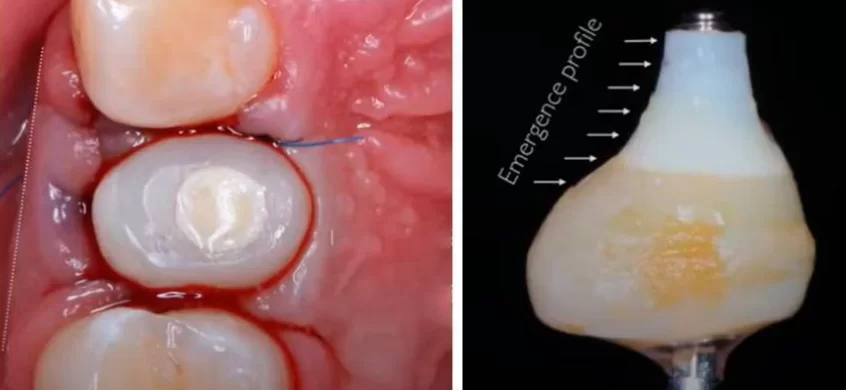
That’s not all. We also produce an individual healing cap. Here it is important to find the correct, and very smooth, eruption profile. Usually, the surgeon is responsible for shaping the contours of the individual healing cap, but if in doubt, consult your orthopaedic surgeon or ask the orthopaedic surgeon to fabricate it while observing the operation.
It is important that the expansion angle of the healing cap, and thus of the future crown, is no greater than 30°. In this case, the soft tissue will be properly supported without compression.
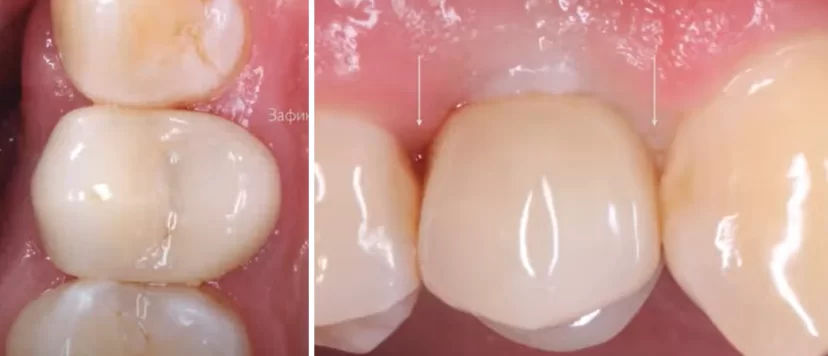
After three months, we had a perfect contour of the root canal with a good eruption profile, and no loss of soft tissue height.
The completed crown is shown in the picture below. It is made on a titanium abutment, has polished zirconia under the gingiva and the ceramic coating is only applied to the crown area above the gingiva. The polished part has excellent epithelium attachment so the gingiva is stable and will always have a good contour. In the side view after two weeks, you can see that the papillae will develop and cover those triangles between the teeth.
To compare the results, look at the pictures used to plan the surgery and the pictures with the implants already in place.
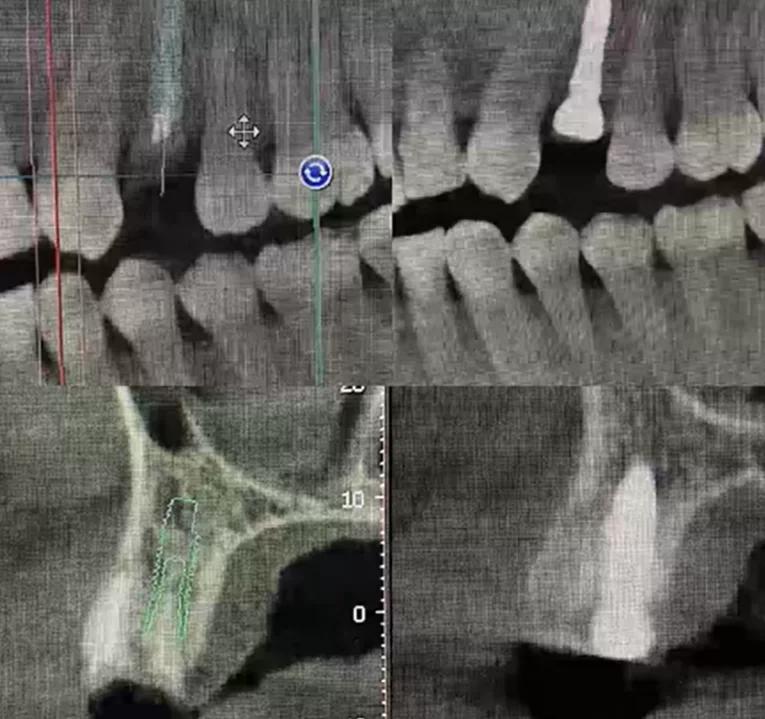
The pictures confirm the minimal deviations of the actual implant position from the planned position at the beginning of the surgery
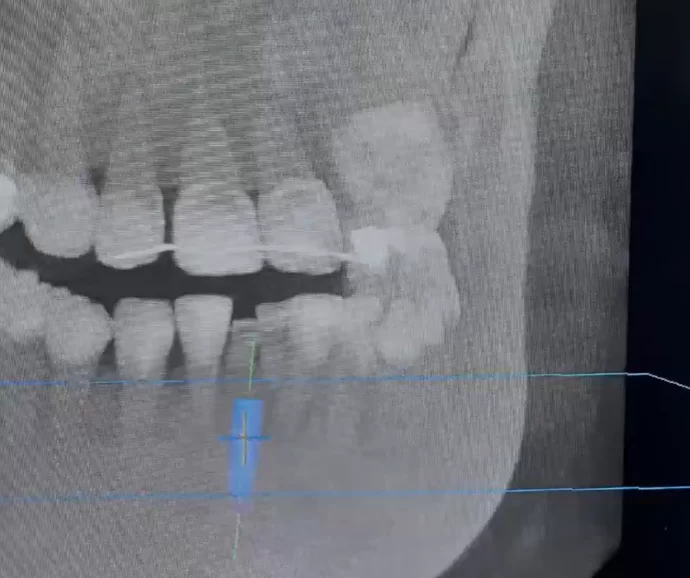
For single implants there is usually no reason to make surgical guides, but it makes sense to take targeted images with the drill to select the correct drill inclination to start the preparation of the hole.
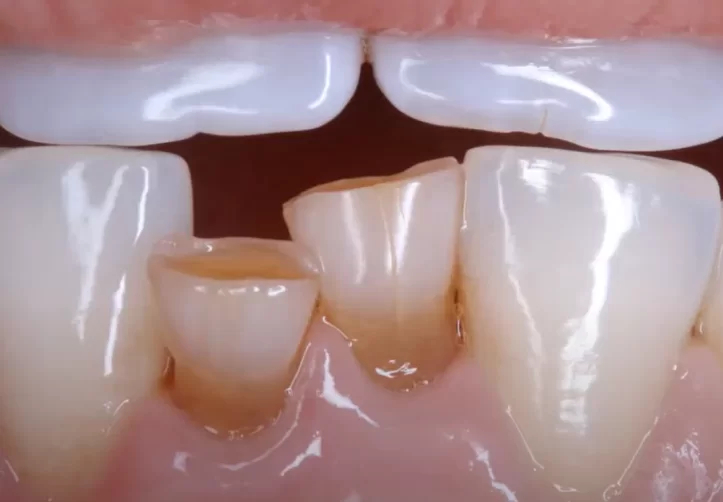
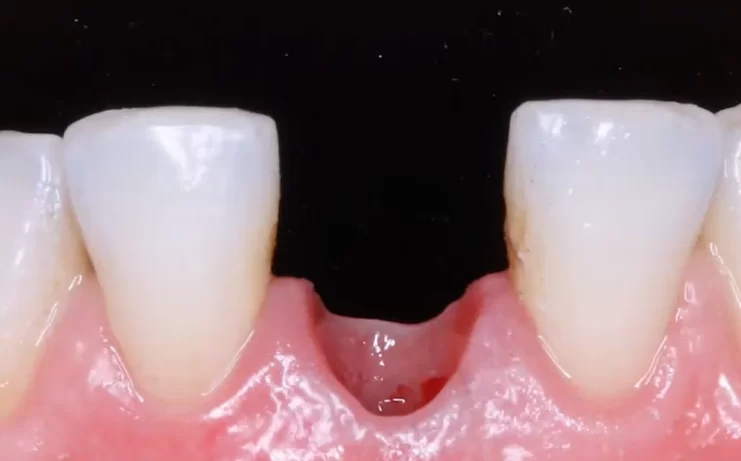
Let’s look at another clinical case of one-stage implantation on the maxilla. See the image below. The patient has congenital adentia of the two lower incisors.
The neighbouring teeth had shifted towards the defect, and since there was no specific orthodontic pathology, it was decided to place one implant and one crown. The operation was planned according to the CBCT data. From the images we can see the inclination of the roots and we can model the inclination of the implant. Here you can see how important it is to see the antagonist teeth. We understand at what depth the implant should be to be able to bring out the screw shaft for screw fixation.
The implant was placed with a diameter of 3 mm, which is ideal for the mandibular incisors and lateral incisors of the maxilla. Even with such a relatively thin implant, we were able to place the implant with a torque of 45 N*cm, all depending on the correct preparation of the hole.
A composite bridge was made between the temporary crown and the neighbouring teeth so that the threads have something to hold on to. Otherwise, they would fall between the contact points of the teeth.
If you look at the pictures immediately after surgery (left) and five months after surgery (right), you can see that there is almost no marginal bone loss and everything looks fine.
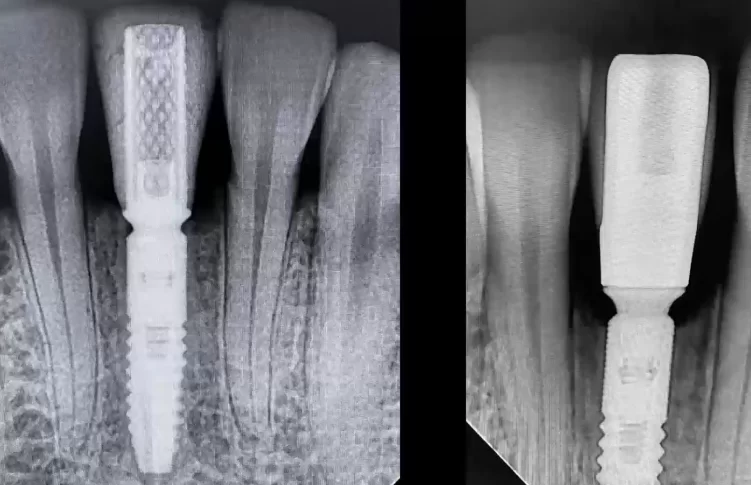
Immediately after surgery and 5 months later – you can see that the bone crest height is almost intact
When the temporary crown was replaced with a permanent one, a photograph was taken where the condition of the soft tissues can be clearly seen.
The papillae are high and at the same level as the papillae between the teeth.
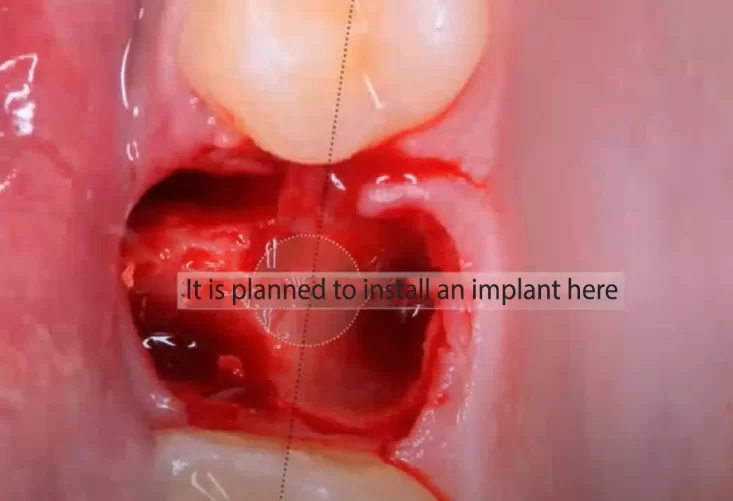
The next case is a one-stage implantation on the upper jaw, the photo below shows the condition of the hole and soft tissues after tooth extraction and the point where the implant installation is planned.
As we have mentioned before, in the upper jaw region there is often not 2-3 mm in the apical direction for fixation of the implant. There will most likely be an immediate exit into the sinus. However, if the inter-root septum is at least 6 mm high, a closed sinus implant can be placed without bone augmentation. A small closed sinus surgery allows the implant to be placed with bicortical fixation of the implant. It is the bicortical fixation that allows the necessary primary stability to be achieved in this case. In this case, an 8 mm long implant was placed, 2 mm of which is lifted into the maxillary sinus. The soft tissues detached during the closed sinus surgery will cover the tip of the implant, and a blood clot will form around it. New bone tissue will form from the blood clot in a normal healing pattern. This will provide good secondary stability.
The photo below shows an already placed implant with a good position in relation to the centre of the tooth row and from the neighbouring teeth.
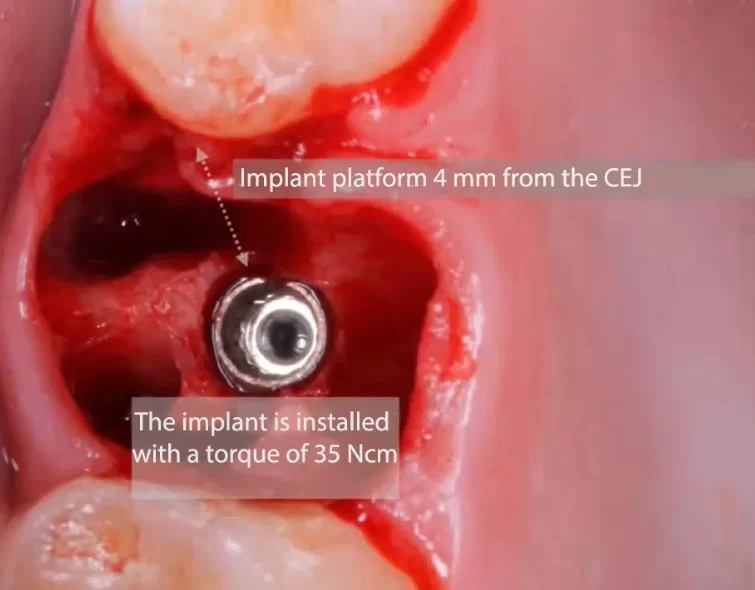
The implant is installed with a torque of 35 ncm, the distance to the cement-enamel joints of the neighbouring teeth is 4 mm – this is a successful implant installation
Then, we install the temporary abutment and use it to make an impression for the customised healing cap.
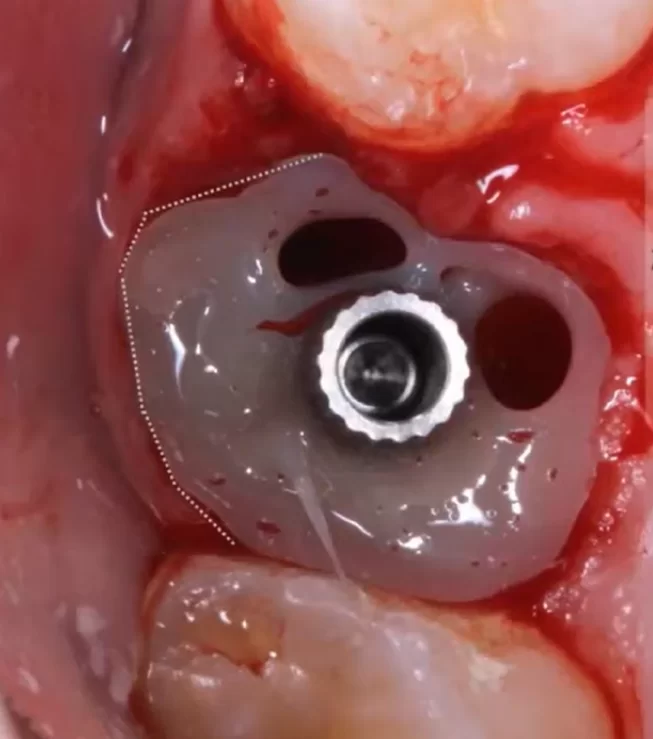
Intermediate stage of manufacturing a customised abutment – liquid composite is applied around the temporary abutment and then illuminated with uv light
First, the bond is applied to the abutment itself before installation in the implant, then the abutment is illuminated and the abutment is installed. Liquid composite is then poured over the contour of the hole to connect this spot with the abutment with separate bridges (rays). The fact that at this time there is blood in the hole is not important. After illumination, the composite becomes solid and remains firmly attached to the temporary abutment. Then we pour another layer and illuminate. After removing the abutment, we have an impression of the contours of the hole. All that needs to be done is to shape the optimal contour of the eruption. The prosthodontist can help with this. The finished composite healing cap must be polished well, because the adhesion of the epithelium is much better on smooth surfaces.
While manufacture the healing cap is in progress, we place a plug in the implant, and fill the cavities from the roots with bone graft. After that, we remove the plug, place the customised healing cap, and suture the soft tissues as shown in the picture below.
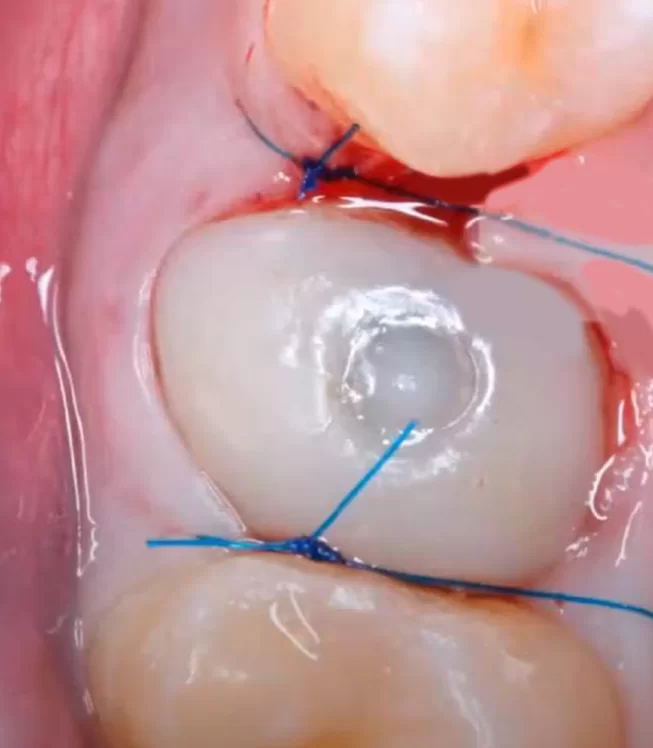
Completion of the surgery with installation of the customised healing cap and suturing of the soft tissues
In this case, it would have been possible to avoid suturing the soft tissues because another advantage of the customised healing cap is that it completely seals the hole, and the soft tissues would have healed properly anyway.
Let’s summarise and list the success factors of one-stage implantation:
- Correct positioning of the implant – this includes the exit of the screw shaft in the correct area, 5 mm of soft tissue above the implant platform, 3 mm from the cement-enamel junction of the neighbouring teeth, a bone partition between the implant and the neighbouring tooth of at least 1.5 mm.
- Atraumatic extraction without trauma to soft and bony tissues.
- Obtaining sufficient primary stability – 35-45 Ncm under immediate loading.It is possible to install with a lower torque in the masticatory zone, and to install a standard or customised healing cap.
- Fixation of the implant in at least 3 mm of bone apically, which is necessary to securely fix the implant in the hole.
- Filling the space around the implant with an osteoplastic material with a long resorption time – a combination of autogenous and xenogenous bone materials is best.
- Soft tissue augmentation with SCTG – always recommended in thin biotypes, may not be used in thick biotypes.
- Correct positioning of the crown in relation to the other teeth, and a smooth crown eruption profile, to support the soft tissue and obtain an optimal gingival contour.
Mistakes and complications that occur with one-stage implantation
Most complications are related to a violation of one of the items in the previous list. However, for the benefit of young specialists, let’s analyse the most worrying variants of complications:
- Alveolitis is an extremely rare complication. The point is that the implant itself partially fills the hole, and its rough surface holds the blood clot preventing it from being washed out. The patient should still be educated in the same way as after a normal tooth extraction: you can not rinse the mouth, take hot food, do not traumatise the clot with a toothbrush and so on.
- Schneider’s membrane perforation can occur in two cases:
– when installing an implant, more precisely, when drilling a hole for the implant. In this case most often the implant is still installed, and the implant body serves as a plug and the healing process takes place without additional actions.
– in case of tooth extraction – in this case we suture the hole, and follow the procedure of delayed implantation. So it is always necessary to check the bottom of the hole after tooth extraction of the maxillary sinus area. - Installation of an implant with insufficient primary stability can lead to fibrointegration or rejection of the implant. There are two ways to close the implant with a plug and suture the soft tissue over it and wait until secondary stability is formed. Or you can refuse the installation of the implant, and follow a delayed protocol.
- Soft tissue rupture during tooth extraction is a serious problem that will lead to gingival recession. In such a case, tissue stabilisation with the addition of SCTG will help, where the graft will serve as a patch on the inside.
- Break/fracture of the vestibular bone wall of the root canal is a very serious complication that requires targeted bone regeneration,and implantation should be put on a delayed protocol.
That’s all for now. We hope this article has been useful for you. Until the next publication.

