Features of a Sinus Lift Surgery. Part 1
Every practicing implantologist should be proficient in the sinus lift technique. This surgical procedure has been known for a long time and its effectiveness has been proven. However, experienced specialists always have insights to share with beginners. Therefore, we decided to address the most important aspects, such as the technique of detaching the Schneiderian membrane and when a closed sinus lift is preferable to an open one. And of course, we’ll examine why sinus lifting should ideally be performed concurrently with implant placement.
What is a sinus lift?
A sinus lift is a surgical procedure performed on the upper jaw to increase bone volume sufficiently to accommodate dental implants. Bone is augmented by filling the maxillary sinus space with osteoplastic (bone grafting) material. Sinus lifting is typically performed in the posterior (lateral) regions of the maxilla during implant-supported dental prosthetics.
If a clinician is not familiar with the sinus lift technique, they may have to place implants in less-than-ideal locations, avoiding problematic areas, as illustrated below.

The location of implants when a sinus lift is not performed YouTube / Dr. Kamil Khabiev / Dental Guru Academy
It’s difficult to create a functional and stable restoration based on such a limited number of implants. You might encounter bulky and uncomfortable prostheses that address the aesthetic problem, but fail to adequately restore chewing function, as seen in the image below.

Removable denture supported by attachments YouTube / Dr. Kamil Khabiev / Dental Guru Academy
Indications for sinus lift
The primary indication is inadequate bone tissue in the posterior regions of the upper jaw, preventing the placement of dental implants.
Contraindications for sinus lift
The limitations listed below are generally considered relative and can be addressed in many cases.
- Diabetes Mellitus: Sinus lift surgery can be considered if the patient’s condition is well-controlled and average daily blood sugar levels do not exceed 10-11 mmol/L. However, a cautious approach is necessary, and endocrinological clearance is required.
- Untreated Oral Cavity: Issues like caries or periodontal disease must be treated before sinus lift surgery can be considered. All deposits are removed, caries are treated, etc., and if oral health is satisfactory, then sinus lifting can be revisited.
- Unsatisfactory Oral Hygiene (Patient Non-Compliance): If the patient cannot be convinced or motivated to improve their oral hygiene, removable dentures might be a better option.
- Gingivitis: This condition needs to be resolved before considering sinus lifting.
- Pathological Occlusion (Malocclusion): Orthodontists, prosthodontists, and gnathologists address this issue.
- Diseases of the Temporomandibular Joint (TMJ): These issues are managed by gnathologists.
- Smoking, Alcoholism, Drug Addiction: The patient’s condition requires management and a period of abstinence before sinus lift surgery can be considered. While smoking can make the Schneiderian membrane denser and thicker, potentially reducing the risk of tearing during elevation, it also promotes and aggravates inflammatory processes in the oral cavity.
There are also temporary contraindications that are addressed by physicians outside of oral surgery.
- Acute diseases including exacerbation of herpes, acute respiratory viral infections, acute respiratory infections, etc.
- Stages of rehabilitation and recovery.
- Pregnancy. Pregnancy itself is not a contraindication, but during surgical operations in the oral cavity and during the recovery period, medications are often prescribed that cannot be taken during pregnancy.
- Condition after radiation and chemotherapy. You need to pause for at least a year, and preferably a year and a half.
If the above restrictions are relevant for all bone tissue augmentation operations, then there are also specific contraindications for sinus lift surgery.
- Acute Diseases: Including herpes exacerbations, acute respiratory viral infections (ARVI), acute respiratory infections (ARI), etc.
- Stages of Rehabilitation and Recovery
- Pregnancy: Pregnancy itself is not a contraindication, but medications often prescribed during and after surgical procedures in the oral cavity may be contraindicated during pregnancy.
- Post-Radiation and Chemotherapy: A waiting period of at least one year, preferably 18 months, is recommended.
All of these contraindications are also relative.
Types of sinus lift
Let’s reiterate the definition of a sinus lift. Sinus lift (subantral augmentation) is an artificial increase in the volume of bone tissue in the upper jaw, in the area of missing posterior teeth, by elevating the floor of the maxillary (antral) sinus.
There are two main types of sinus lift surgery:
- Open sinus lift: A technique for performing subantral augmentation where an opening (window) is created in the lateral wall of the maxillary sinus. Through this window, the mucous membrane of the maxillary sinus (Schneiderian membrane) is carefully elevated using specialized instruments, and the resulting space is filled with osteoplastic material.
- Closed (soft) sinus lift: A technique for performing subantral augmentation where access to the Schneiderian membrane is achieved through the implant osteotomy. That is, through a prepared hole in the alveolar crest. The osteoplastic material is inserted into the socket, and an implant is immediately placed. Thus, the same hole is used for both bone graft placement and implant insertion. This technique involves less surgery and potentially easier healing.
How to decide which technique to use: open or closed sinus lift
Both methods are commonly used and each has its own specific indications:
- Bone Height and Quality
- Anatomical Features
- Implant Design
- Bone Graft Material
Let’s examine the bone height requirements for implant placement with and without sinus lifts.
- Bone height greater than 10 mm: Implants can typically be placed without a sinus lift.
- More than 6 mm: Implants with bicortical fixation are sometimes recommended. However, this method has drawbacks; rigid fixation at the apex increases the risk of superstructure fracture, and the cancellous bone is slightly springy and compensates for the load on the implant.
- 4-6 mm: Closed sinus lifting with simultaneous implant placement is a classic indication for closed sinus lifting, because the Schneiderian membrane can be elevated by only approximately 3-4 mm through the crestal access.
- 2-4 mm: Open sinus lift with simultaneous implant placement.
- Less than 2 mm: Open sinus lift with delayed implant placement. However, there are nuances. On the one hand, most of the bone graft material resorbs if implant placement is delayed. Especially if the patient is lost to follow-up and returns much later than scheduled. On the other hand, there are implants with a conical neck, which allows fixation even in bones less than 2 mm thick. In any case, each clinical case must be considered individually, taking into account bone density and cortical bone thickness.

Thickness to the bottom of the maxillary sinus and methods of implant placement YouTube/Dr. Kamil Khabiev / Dental Guru Academy
Let’s analyze the dependence of the primary stability of the implant on its shape. Typically, when the implant enters the site and engages the bone with its threads, the torque (also known as insertion torque, indicating primary stability) is approximately 30 Ncm, which is generally sufficient for most cases. However, if the implant has an expansion in the neck area, as shown in the illustration below, the primary stability increases to 50 Ncm when the neck is seated in the cortical layer, see the graph below.

Dependence of primary stability on immersion depth and implant shape YouTube / Dr. Kamil Khabiev / Dental Guru Academy
Good primary stability is key to successful implantation, which is why, when placing implants in the maxillary sinus area, it is preferable to use implants designed to provide maximum primary stability.
What happens if the apex of the implant perforates the mucous membrane
This question was addressed in a 1993 study by Dr. Paul J. Boyne’s team. This study examined the effect of perforation of the maxillary sinus floor with titanium implants on the metal-bone interface.
Findings from this study:
- When the implant perforates the membrane by 2-3 mm, complete spontaneous regeneration occurs over the entire surface
- When the implant extends up to 5 mm beyond the membrane, only partial bone growth occurs around the apex
In other words, implants protruding up to 5 mm into the sinus can function normally without the need for bone grafting, provided that at least 6 mm of the implant body is within the bone.
It is interesting to understand what stimulates bone tissue growth at the site of membrane perforation. The Schneiderian membrane has a robust vascular network.

Schneiderian membrane lumen YouTube / Dr. Kamil Khabiev / Dental Guru Academy
Even in the absence of osteoplastic material, a blood clot forms at the site of perforation, from which new bone tissue can form.
Open sinus lift techniques
Let’s begin with open sinus lift techniques. There are three main types:
1. Grind out: This technique uses a specialized coarse diamond bur to thin the lateral wall of the sinus.

Diamond burs to form a bone window for sinus lift YouTube / Dr. Kamil Khabiev / Dental Guru Academy
Sweeping movements expose the sinus membrane, which is then elevated using special curettes. The bone chips created during the process are collected, mixed with allogeneic or xenogeneic bone graft material, and introduced into the maxillary sinus cavity beneath the membrane.
This technique has become widely adopted due to its simplicity and ease of learning.
The initial steps are standard: infiltration anesthesia, followed by periosteal flap elevation to expose the lateral wall. It’s important to avoid excessive flap reflection, as this can lead to significant swelling and delayed healing.
Next, one or more windows are created in the lateral wall of the upper jaw. A mushroom-shaped cutter with a diamond coating is used for this purpose. Maintaining the integrity of the Schneiderian membrane during window creation is crucial, as shown in the illustration below.

The process of forming a bone window with diamond burs YouTube / Dr. Kamil Khabiev / Dental Guru Academy
The rotation speed of the bur when working with diamond burs should be in the range of 700-800 rpm, with copious irrigation.
IMPORTANT! Initially, the bur should be held at a 90° angle to the lateral wall. However, once a thin bone wall remains between the bur and the Schneiderian membrane (when the mucous membrane becomes visible through the thinned bone), the bur should be angled to 45° and used in circular movements to complete the window formation.

The final stage of the formation of two bone windows – a thin bone through which the vascular pattern of the Schneiderian membrane is already visible YouTube / Dr. Kamil Khabiev / Dental Guru Academy
The case shown in the picture above is typical. Frequently, it is necessary to augment a relatively long section of the alveolar ridge. Instead of creating one large window, it is preferable to create two smaller windows and introduce osteoplastic material through them, gradually filling the entire required volume.
Using this approach, the membrane is elevated over the entire area where bone volume needs to be increased, simply through two windows.
Next, a Platelet-Rich Fibrin (PRF) clot is obtained from the patient’s blood, shaped into a membrane-like structure, and inserted through the bone windows into the maxillary sinus cavity.

Introduction of a membrane made of PRF clot YouTube / Dr. Kamil Khabiev / Dental Guru Academy
The cavity is then filled with an osteoplastic mixture, the implant osteotomy is prepared, and the operation is completed in a standard manner.

Bone graft filled area of the maxillary sinus YouTube / Dr. Kamil Khabiev / Dental Guru Academy
2. Wall out: This technique involves creating a window in the lateral wall of the sinus using a piezo instrument. The bony window is completely removed, allowing access to and elevation of the sinus membrane. The space is then filled with bone graft material.
3. Wall in: This technique also involves creating a window in the lateral wall of the sinus, but the bony window is not completely removed. Instead, it remains attached to the membrane and is rotated inward, providing access to the sinus while preserving the bone fragment for later restoration.
This is an interesting technique. In the picture below, you can see an already formed window. At this stage, the bone fragment “hangs” on the Schneiderian membrane.

A bone window prepared for immersion into the cavity of the maxillary sinus: the Grind out technique YouTube/Dr. Kamil Khabiev / Dental Guru Academy
Next, the bone window is gently pushed inward with a curved curette, opening it like a lid into the sinus cavity. The clinician’s goal is to achieve detachment of the membrane inferiorly from the window, towards the alveolar ridge (alveolar bay), reaching the palatal wall.

Initiation of mucosal detachment using a mushroom-shaped curette while preserving the bone window YouTube / Dr. Kamil Khabiev / Dental Guru Academy
The bone window assumes a horizontal position and will subsequently serve as a lid for the cavity filled with osteoplastic material.

Stage of deep detachment of the Schneiderian membrane in the area of the alveolar bay YouTube / Dr. Kamil Khabiev / Dental Guru Academy
After filling the space under the membrane with osteoplastic material, the implant osteotomy is prepared and the implant is placed..

Placement of a titanium implant after sinus lift surgery. YouTube/Dr. Kamil Khabiev / Dental Guru Academy
After implant placement, the surgical area, including the window, is also filled with osteoplastic material..

One of the final stages of sinus lift: filling the surgical field with a window and an implant with a bone graft YouTube / Dr. Kamil Khabiev / Dental Guru Academy
If multiple implants are placed within the same surgical field, the procedure does not become significantly more complicated.
The wound is then sutured and a control radiograph is taken. The image shows a typical “dome” of bone graft over the apexes of the implants, indicating a successful procedure.

Control image after sinus lift surgery with simultaneous implant placement YouTube / Dr. Kamil Khabiev / Dental Guru Academy
This technique is complex and requires skill and patience, but it has a distinct advantage. The sectioned bone fragment, acting as a “lid” for the bone window, remains in a horizontal position and covers the osteoplastic material. This bone window protects the graft from excessive pressure transmitted through the membrane during breathing. There have been cases where the osteoplastic material “spread” along the alveolar ridge, exposing the apices of the implants. This technique minimizes that risk.
Method of performing a closed sinus lift
If the bone height at the alveolar crest is 4-6 mm, a closed sinus lift, also known as a soft sinus lift, can be performed due to the smaller surgical volume.
For a closed sinus lift, a set of osteotomes of varying diameters and a slightly different set of instruments are required. Let’s review the difference between the impact of a standard implant drill and an osteotome on cancellous bone. Although the illustration below shows an already placed implant, the condition of the cancellous bone clearly illustrates the difference in impact.

Difference in the structure of trabeculae after forming the implant site with a drill bit and osteotome YouTube / Dr. Kamil Khabiev / Dental Guru Academy
The osteotome compacts the bone tissue by crushing the trabeculae rather than cutting them. This allows for local bone compaction, potentially improving bone density from D3 to D2, for example.
The initial steps are standard, starting with infiltration anesthesia, followed by incision and periosteal flap elevation.

Beginning of window formation for closed sinus lift YouTube / Dr. Kamil Khabiev / Dental Guru Academy
Next, the implant osteotomy is initiated. Before reaching the floor of the maxillary sinus, a thin (approximately 1 mm) bone septum is left intact..

Formation of the implant site begins according to the standard protocol, but without reaching the bottom of the maxillary sinus YouTube / Dr. Kamil Khabiev / Dental Guru Academy
The osteotomy is expanded to the required diameter for implant placement. After this, the osteotome is gently tapped until the bony septum fractures into the maxillary sinus space. This action slightly elevates the Schneiderian membrane (see illustration below).

Working with an osteotome to gain access to Schneiderian membrane YouTube / Dr. Kamil Khabiev / Dental Guru Academy
Once the bone plate is fractured and the Schneiderian membrane is elevated, bone graft material is carefully introduced into the cavity. The pressure of the bone graft material itself further elevates and detaches the Schneiderian membrane. The consistency of the osteoplastic material should be moderate – neither too loose nor too dense.

Injection of osteoplastic material into the alveolar bay area YouTube / Dr. Kamil Khabiev / Dental Guru Academy
Osteotomy-free closed sinus lift technique
This technique utilizes specialized diamond burs. The initial steps are identical to the standard closed sinus lift procedure. The implant osteotomy is initiated, stopping approximately 1 mm short of the sinus floor.

Formation of implant site followed by a closed sinus lift YouTube / Dr. Kamil Khabiev / Dental Guru Academy
A specialized semicircular diamond-coated bur is then used to carefully remove the remaining bone wall. This step requires meticulousness and precision..

Forming access to the Schneiderian membrane with a diamond-coated boron YouTube / Dr. Kamil Khabiev / Dental Guru Academy
A curved curette with a mushroom-shaped tip is used to carefully detach the Schneiderian membrane in a circular fashion. The adhesion of the membrane to the bone at the edges of the bone window is a vulnerable area, and this technique reduces the risk of membrane perforation.

Peeling of the mucous membrane with a mushroom-shaped curette YouTube / Dr. Kamil Khabiev / Dental Guru Academy
The cavity is then filled with osteoplastic material in multiple stages, and the procedure is completed according to the standard protocol.

Filling a cavity with a bone graft with a previously detached Schneiderian membrane YouTube / Dr. Kamil Khabiev / Dental Guru Academy

Further detachment of the mucosa with already partially inserted bone material YouTube / Dr. Kamil Khabiev / Dental Guru Academy

Placement of a dental implant after the introduction of osteoplastic materia YouTube / Dr. Kamil Khabiev / Dental Guru Academy
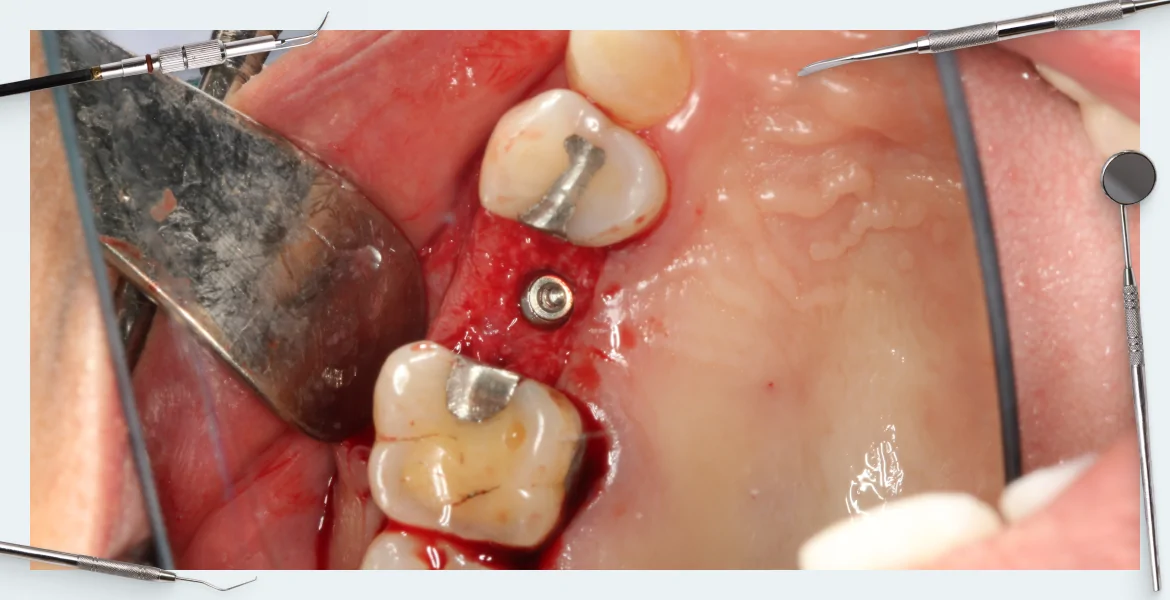
What is a sinus lift with ridge access?
The closed sinus lift technique is also referred to as a crestal sinus lift or sinus lift with ridge access. This type of procedure is indicated when the bone height at the alveolar crest is less than the bone thickness of the lateral wall, as determined from a tomogram. Accessing the maxillary sinus through the thinner bone at the crest is logically easier.
Note in the image below, the bone thickness at the crest is approximately 2 mm, while the thickness of the lateral wall is 4-5 mm.

Clinical picture in which sinus lift surgery with ridge access is indicated YouTube / Dr. Kamil Khabiev / Dental Guru Academy
While traditional guidelines recommend an open sinus lift in this situation, a closed approach can shorten healing time and reduce the risk of complications.
Notice that the implant acts as a plug, closing the bone window (which also serves as the implant osteotomy) and compacting the bone graft material that surrounds the apex of the implant.
The image below shows a dome-shaped elevation above the apex of the implant, indicating a successful sinus lift procedure.

Snapshot of the situation before surgery and the implant after sinus lift surgery with ridge access YouTube / Dr. Kamil Khabiev / Dental Guru Academy
How can you use the PRF clot?
It is important to remember that Platelet-Rich Fibrin (PRF) clot is a cornerstone of many dental surgical procedures. This material is obtained from the patient’s intravenous blood, which is centrifuged at 2600 rpm for 12 minutes.

Preparation of PRF clot from patient’s blood YouTube / Dr. Kamil Khabiev / Dental Guru Academy
The result is three fractions, visible in the test tubes in the illustration above:
- Dead Red Blood Cells: Occupy the bottom of the tube and are discarded as biological waste.
- Fibrin-Rich Plasma with Platelets: This is the jelly-like clot used as the PRF clot.
- Liquid Plasma: Light yellow in color, and used to mix the osteoplastic material. The osteoplastic material typically includes a combination of the patient’s own bone chips and allogeneic or xenogeneic bone graft material. Using xenogeneic and allogeneic bone grafts yields similar results.
The further applications of fibrin clot are interesting:
- Injected Unmodified: It can be injected directly into any bone cavity created during surgery, such as the socket after tooth extraction when immediate implantation is not planned. This promotes faster and better healing and reduces patient discomfort. Unmodified clot is also used to fill large cystic formations in the jaw bones after cyst removal, accelerating the healing process. While it is possible to fill these cavities with osteoplastic material, there is a risk of infection. Cavities are often contaminated, requiring re-opening and cleaning. PRF clot minimizes this risk and increases the likelihood of new bone formation within the cystic cavity.
- Crushed and Mixed: The PRF clot can be crushed and mixed with the bone graft, making the osteoplastic mixture more physiological.
- Fibrin Membrane: A thin (1.5-2 mm) fibrin membrane can be obtained by compressing a PRF clot. Previously done manually with sterile wipes, specialized titanium boxes are now available for creating these membranes. The resulting material is very pliable and, most importantly, completely biocompatible with the patient’s tissues.

PRF clot and one of the methods for obtaining a membrane by squeezing the clot with sterile wipes YouTube / Dr. Kamil Khabiev / Dental Guru Academy
These membranes can be used to cover bone graft areas where bone material has been placed, as shown in the illustration below.

Appearance and structure of the PRF membrane and one of the ways to use it YouTube / Dr. Kamil Khabiev / Dental Guru Academy
The membrane essentially functions as a barrier between the soft tissue and the bone graft. However, the mechanical properties of the PRF membrane are significantly inferior to collagen membranes, and it should not be used when significant contour maintenance and space creation are necessary.
What osteoplastic material to use
Regardless of the chosen bone graft material, it should be mixed with bone chips harvested from the patient’s own bone. This speeds up healing and bone formation.
There are several ways to obtain an autogenous bone graft:
- Disposable Bone Scrapers: These provide high-quality bone chips.
- Auto-Max Tool: A specialized tool designed to collect a larger volume of bone in a very gentle manner, preserving the structure of the bone graft.

Preparation of osteoplastic material: Auto-Max method of collecting autogenous chips YouTube / Dr. Kamil Khabiev / Dental Guru Academy
The Auto-Max tool is simple in design, consisting of a cutting head with two cutting edges and a guide sleeve. The collected bone material remains in the sleeve and is easily retrieved. The shank is standard, the same as on dental drills.

Auto-Max tool for collecting bone material YouTube / Dr. Kamil Khabiev / Dental Guru Academy
To collect bone material, the soft tissue is reflected in the chosen harvest area. The tool is pressed against the bone, the drill is activated at 350-400 rpm, and bone material is collected.

The principle of using the Auto-Max instrument for collecting bone material YouTube / Dr. Kamil Khabiev / Dental Guru Academy
The quality of the bone material is excellent, the internal structure is preserved, and the bone fragments readily integrate into the new location and become part of the new bone.
Previously, it was common to harvest bones in small blocks and grind them in a special mill.
However, this method had several disadvantages:
- The bone had to be harvested from the external oblique ridge, or from the retromolar or mental region. This is very traumatic, causing significant swelling and severe pain for the patient.
- The quality of the bone material after milling is very low. The mill compresses and destroys the trabeculae, rendering the bone material incapable of regeneration. They can only serve as a source of mineral and biological components for new bone formation.
The resulting autogenous bone material is mixed with external bone graft material. Both xenogeneic (animal origin) and allogeneic (cadaveric origin) bone grafts are suitable. Synthetic bone graft materials also show good results, especially in cases where immediate implant placement is not possible. It is known that significant resorption of bone graft material occurs when implant placement is delayed. Synthetic bone graft materials are resistant to resorption.
Recently, a 50/50 ratio of autogenous shavings and external bone graft material has been considered optimal.

Preparation of osteoplastic material for sinus lift surgery YouTube / Dr. Kamil Khabiev / Dental Guru Academy
In the next part of our article, we will discuss:
- Postoperative procedures and medications
- Requirements for implant shape and surface treatment
- A step-by-step analysis of a typical clinical case
- Answers to common questions from young dentists
Stay tuned for next publications.


