Using Surgical Guides During Implantation

(guide for doctors)
This article explores the creation and application of surgical guides in implant dentistry. We will examine the use of celluloid and universal guides, addressing scenarios for their appropriate use. We’ll also discuss why some clinicians question the necessity of surgical guides. In essence, a surgical guide guides the surgeon to align the implant’s axis as closely as possible to the center of the planned crown. It also aids in ensuring parallelism when placing multiple adjacent implants. This article will detail how various guide types achieve these objectives.

The principle of using a surgical guide to prepare a site for an implant YouTube / Dr. Kamil Khabiev / Dental Guru Academy
What types of surgical guides are used in dental practice?
Of course, we will not consider all options, but only the most interesting and effective to use.
- Celluloid Guides: Fabricated using a wax-up or cast model.
- Universal Guides: Utilize drills with rings of varying diameters. Application is straightforward, eliminating the need for jaw models or custom guide fabrication.
- Tooth-Supported Guides: Relies on the support of the remaining dentition for stability.
- Mucosa-Supported Guides: Suitable for flapless implantation. Guide stability is achieved through fixation to the underlying bone via small punctures, preserving the periosteum and minimizing mucosal detachment.
- Bone-Supported Guides: Employed after flap elevation, these guides are directly anchored to the bone in the surgical area.
- Collapsible Guides: A relatively recent innovation used for crestal bone reduction and simultaneous implant placement. These guides feature multiple tiers that can be sequentially removed as the procedure progresses. A more in-depth discussion of this system follows later in the article.
- Guides for Bone Grafting: Used to guide the harvesting of bone blocks, etc. This specialized application warrants separate discussion in a dedicated publication.
Without surgical guides, achieving ideal prosthetic positioning of implants can be challenging. Complex jaw configurations (particularly in edentulous cases) may result in suboptimal implant placement, as demonstrated below.


Example of unsuccessful placement of implants YouTube / Dr. Kamil Khabiev / Dental Guru Academy
The implants exhibit misalignment, with some positioned outside the intended arch form. In the region of teeth #46 and #47, the emergence profile of the healing abutments are compromised, making it impossible to remove one healing abutment without affecting the adjacent. Impression-taking and transfer coping placement would be difficult in this scenario. While intraoral scanning might assist, it would still be a multi-stage, complex process. Restoration is possible, but as shown, the result may be compromised in aesthetics and maintenance.


Temporary restoration on non-optimally placed implants YouTube / Dr. Kamil Khabiev / Dental Guru Academy
Suboptimal implant placement can occur even in single-tooth restorations. Therefore, surgical guides are valuable for precise positioning, even in simpler cases.
n this example, the implant placed at tooth #34 is positioned too distally. This necessitates a cantilever bridge, creating a potential point of failure for the restoration.

Inaccurate positioning of the implant in the area of tooth #34 led to the emergence of a cantilever YouTube / Dr. Kamil Khabiev / Dental Guru Academy
Although the cantilever is short and directed anteriorly (making it somewhat acceptable), this situation could have been avoided entirely with a surgical guide.
Celluloid guides: advantages, disadvantages, application features
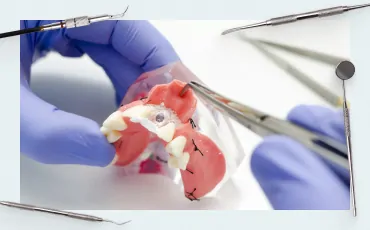
Celluloid guides are one of the most accessible and affordable options. Production doesn’t require specialized equipment. A dentist (either the restorative dentist or surgeon) takes an impression and creates a simple jaw model. A wax crown is fabricated to represent the missing tooth/teeth; alternatively, a pre-fabricated plastic tooth can be modified.

Making a celluloid surgical guide using a wax-up crown YouTube / Dr. Kamil Khabiev / Dental Guru Academy
This results in a model of the arch with the defect filled. A celluloid plate is then trimmed, heated (60-90°C), and adapted to the cast. After cooling, a guide is created, supported by the remaining teeth. Celluloid sheets used for bleaching trays or thicker, more durable sheets for occlusal splints are suitable for this purpose.
A hole is then drilled through the cooled plate (while still on the cast) to guide the drills during osteotomy preparation.

An example of a celluloid guide attached to the remaining teeth YouTube / Dr. Kamil Khabiev / Dental Guru Academy
Advantages of this method include:
- Ease of fabrication
- Low cost of materials
- Rapid guide production
But such a simple design also has disadvantages:
- Most effective for small, bounded edentulous spaces. While usable for larger or fully edentulous cases, it requires considerable skill.
- The drill may deviate from the intended axis after passing through the guide. Deviation is especially likely in the mesiodistal dimension, potentially endangering adjacent tooth roots. Therefore, this guide is better than no guide, but requires significant clinical experience. We do not recommend it for beginners.
However, a celluloid plate can be useful even for complex multiple implant cases when no other options are available.
Consider the case requiring precise implant placement in both the anterior and posterior regions. A celluloid guide is made from a cast where a dental technician has already created a diagnostic wax-up of the planned restoration, verified with a bite registration on an articulator. The guide, similar to a removable denture, includes palatal support.

Celluloid guide for the anterior upper jaw YouTube / Dr. Kamil Khabiev / Dental Guru Academy
Holes are pre-drilled in the guide before surgery. For molars and premolars, holes are centered on the planned crowns. For anterior teeth, holes are placed in the region of the cingulum or lingual fossa.
Remember the key limitation of celluloid guides: the absence of a guide sleeve allows for potential drill deviation. The surgeon must carefully control the drill angle to ensure implants are positioned in the correct prosthetic location.
Returning to our specific case, the patient had congenitally missing lateral incisors and a significant diastema, presenting an esthetic concern.

Initial situation: congenital absence of lateral incisors, wide diastema, and anterior incisors at an incorrect angle YouTube/Dr. Kamil Khabiev / Dental Guru Academy
A full-arch restoration is planned. The dental technicians face a complex challenge because it is impossible to replicate such anomalies within natural teeth. It is necessary to design the dentition from the ground up, carrying out all checks, both virtual and physical, starting with the articulator. The laboratory of dental technicians successfully coped with this task. A surgical guide was made based on the model of the future prosthesis. A temporary prosthesis is also made in advance before surgery and will be installed on plastic abutments.
Thus:
- The guide is ready and it has support on the palate.
- All teeth of the upper jaw were removed atraumatically in order to preserve the volume of soft tissue as much as possible.
We place the first implant and the parallel pin in it, then again apply the guide to make sure that the implant is placed in the desired position.


Placement of implants using a celluloid guide: each step is followed by checking the correct position of the implant YouTube / Dr. Kamil Khabiev / Dental Guru Academy
Next, we prepare the site for the second implant. The picture below shows the stage when the first pass with the pilot drill has already been made, and now the doctor checks the parallelism of the pass relative to the parallel pin, which is located in the first implant, and if necessary corrects the direction of the drill passage. When the second implant is also in place, we again check how they are located relative to each other and relative to the guide.


Placing the second implant and checking its position relative to the first and future prosthesis using a surgical guide YouTube / Dr. Kamil Khabiev / Dental Guru Academy
The remaining implants (10 in total) were placed using the same principle. The temporary prosthesis will rest on plastic abutments. And at this stage there is another check with a celluloid guide. If the guide “does not fit,” the doctor understands which abutments need additional processing. If the doctor took a temporary prosthesis and it turned out that it did not fit into place, then it would be difficult to understand exactly where the problem was, because the prosthesis, unlike the guide, is not transparent.


Checking the volume of plastic abutments before attaching the temporary prosthesis using a celluloid guide and modifying the abutments YouTube/Dr. Kamil Khabiev / Dental Guru Academy
Next, we take a pre-made temporary prosthesis, also plastic, and check the fit. If necessary, we further modify individual abutments.

Placement of a temporary prosthesis on plastic abutments YouTube/Dr. Kamil Khabiev / Dental Guru Academy
Let us remind you how important surgery planning and preparation is. This operation of immediate implantation with a load took 1 hour 40 minutes. And this is a full-arch restoration with the placement of 10 implants. The patient goes home with a beautiful smile and waits for the implants to heal and fully integrate, after which they will receive a permanent denture.

Temporary prosthesis successfully placed YouTube / Dr. Kamil Khabiev / Dental Guru Academy
The permanent dental prosthesis in this case will consist of three bridges: the anterior section and two lateral ones.
The definitive prosthesis will consist of three bridges: an anterior segment and two posterior segments.
We will not analyze the next case in such detail; the principle of working with a celluloid guide is similar, but it is important to mention that the patient has noticeable prognathism of the lower jaw. Restoration of the upper and lower dentition should bring the bite into an orthognathic position. To do this, the implants in the upper jaw must be installed with a forward tilt, and in the lower jaw, the implants must be tilted backward.
This is a critically important point. It’s possible to insert the drill precisely through the guide hole, but still end up with the drill angled incorrectly within the bone. Therefore, the surgeon must have a strong understanding of the alveolar ridge’s anatomy and bone tissue location when using celluloid guides.

The initial situation is prognathism of the lower jaw and preparation of the site for implants using a simple celluloid guide YouTube / Dr. Kamil Khabiev / Dental Guru Academy
To minimize angulation errors, the surgeon starts with a small-diameter drill. After the initial osteotomy, the guide is removed to evaluate the drill path, probing, palpating, etc., to confirm correct placement relative to the palatal and buccal walls.
Consider another approach: using a temporary prosthesis as a surgical guide. Holes are drilled in the prosthesis to guide drill placement during osteotomy preparation.

A temporary prosthesis can serve as a surgical guide – saving the patient time and money YouTube / Dr. Kamil Khabiev / Dental Guru Academy
The same prosthesis can then serve as the temporary restoration. While not ideal, this approach can be viable. The image shows the temporary prosthesis three months after placement. Immediately after implantation and installation of the temporary prosthesis, the screw shafts were closed with A-silicone. It was planned to replace the silicone with a composite in a week, because immediately the soft tissues were noticeably bleeding. But for some reason the patient did not come, and as we see, this decision lasted three months.

Temporary structure which served as a guide with screw shafts closed with A-silicone – after 3 months of use YouTube/Dr. Kamil Khabiev / Dental Guru Academy
Subsequently, the patient received a permanent restoration, functional results and aesthetics at the highest level.
Universal surgical guide type: BonePen (kitted)
This is an excellent solution for everyday practice, although it is only suitable for the restoration of local defects of two or three teeth. We do not advertise a specific brand, it’s just that a guide of this format under the BonePen brand was one of the first to appear, but now many companies offer similar solutions.

Example of using the guide from a set YouTube / Dr. Kamil Khabiev / Dental Guru Academy
A typical set includes five drills (e.g., 2.8 mm diameter) with restrictive rings in sizes such as 6, 7, 8, 9, and 10 mm.

Drills with restrictive rings from a set for preparing a site for an implant YouTube / Dr. Kamil Khabiev / Dental Guru Academy
The 2.8 mm drill serves as the initial drill. Each drill with a ring also acts as a trap for collecting autogenous bone chips, as illustrated below.
 For Collecting Bone Chips From The Patient Themselves Youtube / Dr. Kamil Khabiev / Dental Guru Academy")
Each drill with a hollow ring from a set is a drive (trap) for collecting bone chips from the patient themselves YouTube / Dr. Kamil Khabiev / Dental Guru Academy
The set also includes 5 pins with restrictive rings of the same diameters 6; 7; 8; 9; 10 mm. All sizes are marked by color.

Pins for placement in implants from a surgical guide YouTube / Dr. Kamil Khabiev / Dental Guru Academy
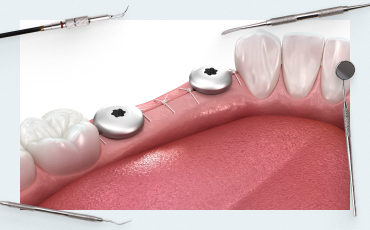
The following picture shows an example of using a drill and pins with restrictive rings. We have two premolars here: for the first one we used a drill with a 6 mm sleeve, for the second one 7 mm, and for the molar a 10 mm sleeve. Restriction rings prevent implants from being placed too close or too far apart. Pins have already been installed at the positions of the second premolar and molar, which shows that the beds for the implants were prepared correctly. The implants will be installed parallel to each other and the axes of the implants will clearly extend into the fissure of future crowns. The orthopedist who will be given this work will be pleased, the prosthesis is simple and easy to fit.
 Youtube / Dr. Kamil Khabiev / Dental Guru Academy")
An example of the use of a surgical guide from a set for the treatment of a local defect (the absence of three teeth) YouTube / Dr. Kamil Khabiev / Dental Guru Academy
Look at the same case from a different angle, in the right picture you can see successfully installed implants, and the first thing that catches your eye is why they were installed that way. It is very difficult for us to visually correlate the location of the implant and the future crown. The placement of the implants in the right image seems strange, but it is optimal from an orthopedic perspective.
 - Implants In Optimal Prosthetic Position (Right) Youtube / Dr. Kamil Khabiev / Dental Guru Academy")
Using a surgical guide (left) – implants in optimal prosthetic position (right) YouTube / Dr. Kamil Khabiev / Dental Guru Academy
Restrictive rings, among other things, imitate contact points with adjacent teeth. And when installing the bridge, there will be no problems with misalignment and jamming due to the unsuccessful inclination of the remaining teeth.
The stacked guide works well for flapless implantations; it is possible to accurately prepare the bed for the implant with minimal invasiveness, an example in the photo below..

Flapless implantation using a surgical guide YouTube / Dr. Kamil Khabiev / Dental Guru Academy
Let’s look at the next example in more detail – this is the use of a guide from a set for implantation with simultaneous gum surgery. Gum plastic surgery using the ASL (apically displaced flap) technique. The first picture shows the initial situation – four teeth 4,5,6,7 are missing. The teeth were lost a long time ago and the volume of attached keratinized gum is almost zero. Therefore, it was decided to place implants and restore the volume of the attached gum in one surgical intervention.

Initial situation: complete absence of teeth in the lateral region + significant atrophy of the attached gum YouTube / Dr. Kamil Khabiev / Dental Guru Academy
We will not delve into the description of the process of splitting and fixing the flap; we will have a separate article for this. In this case, it is important for us that during the operation the periosteum will be exposed, and the soft tissues will be displaced and sutured in a new position, and guides based on the mucosa will not be suitable. It is also impossible to first make a bed for implants through punctures, and then peel off the mucous membrane, because we will have holes in the mucous membrane which we displace and fix in a new place, and this is unacceptable. Also, guides based on the remaining teeth are not suitable due to the fact that there are no lateral teeth at all and there is nothing for the guide to rest on in the distal area of the jaw. And for universal guides, it does not matter whether the implants will be installed through a puncture of the mucous membrane or with complete detachment of the flap, and the presence of remaining teeth also does not matter.
In the picture below, the next stage is when the flap rich in keratinized tissue is peeled off and fixed with sutures.

The apically displaced flap is fixed with sutures at the site of formation of the new attached gum YouTube / Dr. Kamil Khabiev / Dental Guru Academy
Let us remind you that we are missing 4 teeth, but it is planned to place only three implants at positions 4,6 and 7. But we make 4 holes, starting from the fourth tooth so that we have a clear reference point. The picture below shows how a 6mm diameter restrictive ring helps make a hole next to the nearest remaining tooth.

The first pass with a drill with a restrictive ring next to the remaining tooth; at the first stage, the hole is needed to install a pin with a restrictor into it and be guided by it when drilling the next holes YouTube / Dr. Kamil Khabiev / Dental Guru Academy
Next, a pin with a restrictive ring of the same diameter (6mm) is placed in the first hole. In this case, you can ask the patient to partly close their mouth to see where the pin comes out relative to the antagonist teeth.

The first pin is placed and serves as a guide for the next holes YouTube/Dr. Kamil Khabiev / Dental Guru Academy
Next we work using the same algorithm. We make a second hole next to the first pin. Restrictive rings around the pin and drill determine the optimal distance between holes.

Drilling through the second hole at position 5 – this is where the implant will be placed YouTube / Dr. Kamil Khabiev / Dental Guru Academy
The hole and the pin in it at position 5 are used only as a guide for positioning the next holes; the implant will not be placed in this position.
Next, we take a drill with a large diameter ring (9mm) and make a hole for the implant on which the molar crown will rest.
 Youtube / Dr. Kamil Khabiev / Dental Guru Academy")
Drilling a hole to place an implant at position 6: the restrictive ring here has a large diameter (9mm) YouTube / Dr. Kamil Khabiev / Dental Guru Academy
Then we insert a pin of the same diameter (9mm) into the third hole and begin drilling a hole for the last 7th molar. The contours of the future restoration are already visible and it is clear that the implants will fit into the optimal orthopedic position.
 Using A Surgical Guide Youtube / Dr. Kamil Khabiev / Dental Guru Academy")
Drilling a hole for the last molar (tooth 7) using a surgical guide YouTube / Dr. Kamil Khabiev / Dental Guru Academy
The rods on the pins are spring-loaded and if the patient closes the jaws, they are hidden inside the restrictive ring. At the same time, the doctor clearly sees how the axes of the implants will be directed in relation to the antagonist teeth. In this clinical case, the result is simply excellent.

Checking the orthopedic position of future implants by closing the jaws – closing shows how well the holes correspond to the orthopedic position YouTube / Dr. Kamil Khabiev / Dental Guru Academy
It is recommended to bite down and check where the top of the pin is relative to the antagonist tooth after each pass of the drill and installation of a new pin. This way the likelihood of error is minimized.
Then the installation of implants proceeds according to the standard protocol. The bed for the implants is expanded with drills of large diameters, and the preservation of parallelism is controlled by standard pins.

Placement of three implants at positions 4, 6 and 7 YouTube / Dr. Kamil Khabiev / Dental Guru Academy
We close the “extra” hole with a small PRF clot. In this case, we have a large amount of work with soft tissues and it is not recommended to leave the hole unclosed.
So, the whole operation, namely the placement of implants and gum grafting, took less than 40 minutes. In this case:
- there was no need to take impressions to make a guide
- no need for wax modeling and making the guide itself
- bone chips (autogenous) are collected in a convenient container; they can easily be used to prepare an osteoplastic mixture
- the risk of damage to adjacent teeth is almost zero; the restrictive ring will not allow the passage to be made too close to the roots of the remaining teeth
All you need is a physical or digital impression that will show the location of the implants, which is necessary for the manufacture of prostheses and does not depend on the type of guide.
But for all the benefits of a guide from a set, it has limitations:
:
- High quality of the alveolar ridge – the width and height should be sufficient for preparing the site without restrictions
- The doctor must be sure that the drill will not touch any anatomical structures, such as the mandibular nerve or the structures of the maxillary sinus
With all the advantages and disadvantages, a surgical guide from a set should be in the arsenal of every surgeon. Yes, it will not suit all cases in your practice, but this is the tool that pays for itself as quickly as possible, literally in 10 drillings with each drill size. So not only is this a convenient tool, but it also allows you to earn more. After all, money saved is the same as money earned. One quality set of drill bits with stops from BonePen or another manufacturer with similar properties allows you to install 400-500 implants before they wear out and become dull.
Why doctors don’t always use a surgical guide
This question involuntarily arises in everyone who begins to get acquainted with the dental field. Before continuing our review of the types of guides and the nuances of their use, let’s try to figure out why many implants are installed without surgical guides. After all, if guides provide so many advantages, and the accuracy of implant installation is higher, and the trauma rate is lower, and it will be easier for an orthopedist and a laboratory of dental technicians, then why do doctors decide to do without guides.
Some surgeons are so confident in their own experience and manual skills that they do not consider this necessary, but prefer to see the entire surgical field and feel how the drill goes through the bone without thinking that this pattern distorts the sensations or that there is something wrong with the bone. But this is mainly due to the additional costs of time and money for making guides. And patients are reluctant to agree to additional procedures for taking impressions or CBCT and can go to the clinic, where they will be promised to do everything without all these unpleasant procedures. And in more detail, for production:
- A simple guide requires to:
- take impressions of the jaw
- make a wax-up model of missing teeth
- make a celluloid guide based on the resulting model
- time-consuming, at least 1-2 days, and when the laboratory is busy, a few more days
- financial costs are small – 50-70 dollars, but they still exist
- the result is not always accurate and convenient to use, because the risk of the guide shifting is quite high or the drill may move to the side if there is no guide sleeve.
")
Simple surgical guide (image from Shutterstock)
- A complex surgical guide requires to:
- do a tomography of the jaws, process the CBCT results and create a virtual 3D model of the patient’s jaws
- make a stereolithographic model of the jaws, requiring a 3D printer
- cast or print a surgical guide on a 3D printer, and not every clinic has 3D printers, not to mention private dental offices
- total time spent – several days
- noticeable financial costs of 150-250 dollars per guide
- and still, the guide is not always accurate and easy to use, there is a risk of displacement, and there are anatomical features of the jaws when the guide hinders more than it helps.
")
Complex custom surgical guide (image from Shutterstock)
In the second part of the article dedicated to surgical guides, we will figure out how to work with:
- periosteal guides without fixing screws to the bone – this is one of the most difficult guides both to manufacture and to use, but it has a right to exist
- supramucous guides, let’s look at all their diversity and why these are some of the most popular options.
All this will be accompanied by examples from real cases. We hope this article was useful and interesting for you. See you in the next publications.