What to do if the screw in the implant breaks
This article focuses on a practical approach and recommendations on how to remove a screw fragment in a way that preserves the infrastructure inside the implant. It is possible to remove a fragment of any complexity; the only question is what will be the consequences. It is extremely important to preserve the thread and the configuration of the internal part, so that a new screw and crown can be set and the complete restoration of the tooth row can be performed. Removal of the implant itself should be avoided if at all possible.
How often does the screw break?
A complex bashing of the abutment screw when part of the screw remains in the implant shaft, although complex is quite rare. There are statistics about it that were announced at the ITI conciliation conference in 2004. A huge amount of work has been done to study all types of complications in dental implantation of both biological and mechanical nature.
As a result, we have data showing that the incidence of abutment screw fractures or of the abutment itself does not exceed 2-3% of all complications. Recall that the number of successful implantations without any complications exceeds 90%, which means that the frequency of problems with screw fracture is very low compared with the general background.
But time goes on and technology changes, new materials and processing methods appear. The use of abutment connection platforms with external hex is decreasing, and increasingly with internal hex. The new platforms have undeniable advantages. A new study was made in 2014, which divided the results into conventionally old before 2000 and new ones made after that year, see the table below:
| Frequency of implant orthopedic treatment complications (5-year period) | Old research (before 2000) | New research (after 2000) |
|---|---|---|
| Screw and abutment unwinding | 3,9-26,2% | 3,1-10,8% |
| Abutment or screw fracture | 0,8-2,2% | 0-5,8% |
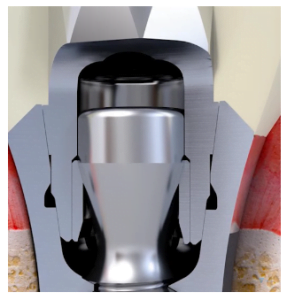
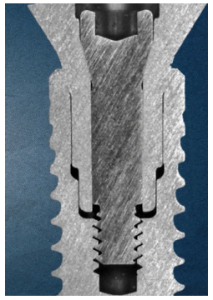
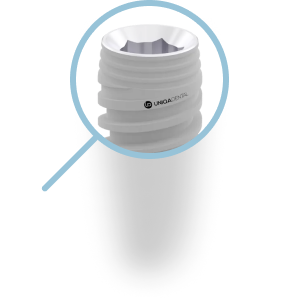
From this table it is seen that the incidents of untwisting have become less frequent, but the frequency of propeller fractures has become more frequent. This is due to the design of the new platforms. The overall length of the screw is longer, and the screws themselves are often thinner, so they break more easily. As a consequence, modern technicians have to repair the consequences of fractures more often, while problems with unwinding have become much rarer. For a sample of the internal infrastructure of modern dental implants, see the illustration below
We will not discuss here the reasons why abutments or occlusal screws break off. This is a big topic for a separate article.
Where does a screw in an implant break most often and what happens to the screw when tightened?
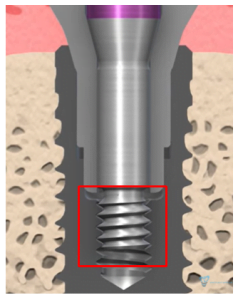
Almost all modern implant platforms have the screw head above the bone level. This means that you get a long enough lever, where the main load is on the lower third of the screw. As a consequence, screws hardly ever fracture at the top. Most of the fractures are in the lower part of the screw – indicated by the red rectangle in the illustration below.
For a clear understanding we need to know how the mechanics of the screw works. When we apply a torque wrench to the desired value (between 15 and 35 H/cm on different platforms), there is a vertical tensile load on the screw. Of course, much of the load that we apply with our hands is dissipated and has to overcome the friction between the abutment and the implant, but the remainder is applied to the screw. The point stresses are where the screw is lapping. These are the threads that engage with the internal threads of the implant, see the section below. It transpires that the maximum stress is on the thinnest part of the screw in its coronal part.
In normal mode, the screw is in a tensioned state, but if a break occurs, then the lower part of the screw bounces and, as it were, subsides. This is good news, because contact friction in the threads weakens, which means it will be easier to remove the fragment. The main thing is not to jam the wreckage with careless action.
The nuances of material science – what implant screws are made of
Many manufacturers make their screws in more ductile and stronger titanium alloys than the other parts (implants and abutments). For example, the entire system is made of Grade 4 with a tensile strength of 550 MPa and the connection screws are made of Grade 5 (titanium/aluminum/vanadium) with a tensile strength of 860 MPa. No less important is the elasticity index, because in addition to the side loads, a screw is constantly subject to tensile forces. That’s why our UNIQA DENTAL screws are made of Grade 23 titanium, which surpasses Grade 5 in ductility and has almost the same fracture strength. The section below shows a sample of this solution. The color of the screw is different from that of the abutment and the dental implant itself.
The quality of our products will be similarly high, because all elements are made of Grade 23 titanium alloy.
What should you do if the screw in the implant breaks?
Let’s move on to the main question: what should you do if the patient comes in with a denture fragment in his hands and a screw residue in the implant shaft?
- The first rule is not to panic, everything is solvable and most often much easier than it may seem at first glance. In most cases the screw fragment is not wedged and can be removed without complex specialized tools. It is easier to remove the screw fragment as soon as it has broken, or when the patient comes in right away and you are the first specialist they go to. If there have already been unsuccessful attempts to remove the screw fragment, the situation is much more difficult.
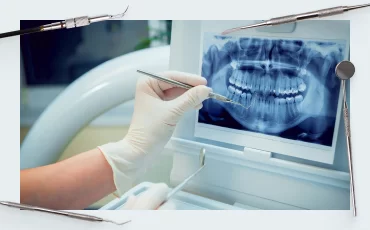
- The second critical rule is visualization. You don’t have to touch it or do anything else with it to get it out. First, you need to clearly examine the condition of the broken screw with a good magnification. It is also highly recommended to take an X-ray to assess the length of the fragment and its position in the implant shaft.
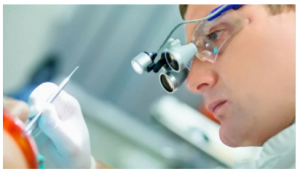
In some cases, binocular glasses with at least fivefold magnification are sufficient, but it is best to work through a microscope.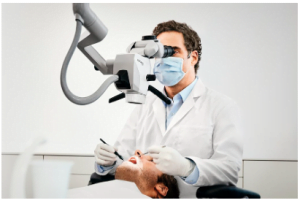
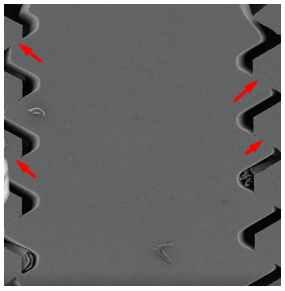
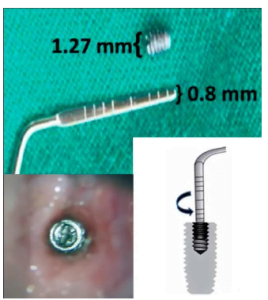
However, you should take into account that the image in the microscope will be inverted and if you do not have good skills in “mirror mode” it is better to refer the patient to a more experienced specialist. For example, an endodontist, who often works under high magnification and also with an inverted lens.The other good news is that the surface of the chip is never flat and smooth, and more often than not, the edge of the thread coil comes out on the end of the break. In any case, the surface has plenty of bumps and indentations that you can grab onto to unscrew the screw, see the photo below: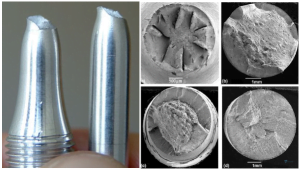
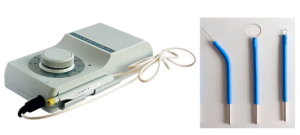
For a successful removal, it is important to see and understand what can be done and how it may be done. - Provide good access to the screw shaft. This is important both during the visualization phase and during the screw removal operation. The problem is that the gum will begin to fall and close the implant shaft within a couple of hours. You can expand the canal without bleeding using an electrocoagulator.
- Caution and smooth operation. Tolerances in the manufacture of dental implant elements are very small. The slightest carelessness can jam the wreck in the mine. Therefore, even to dry the shaft, it is recommended to use a salivary pump with the thinnest nozzle. It is better not to blow into the implant canal so as not to move the fragment down. Whereas the salivary pump works at a vacuum and draws in the flow of air along with the liquid.
- Instrument for removal. The first and most important tool is a very sharp probe. The usual working probe is often already blunt, and the new one does not always have a thin enough tip. Therefore, the probe must be prepared and sharpened with a polishing paste. This will prevent the tip from slipping and clinging to the irregularities of the debris. Also, you need to take care to have something to cover the shaft of the implant. It is easier to prepare a new screw and gum shaper of the same manufacturer and the same series. As a last resort, a quality generic too may be used. You don’t want to send the patient home with an open implant shaft.
- After all of the above, you need to analyze the mobility of the fragment. You may recall that when a breakage occurs, the fragment bounces deep into the shaft and the grip on the threads loosens. In most cases the fragment is movable, which means you can proceed with the extraction.
Simple ways to remove screws from implants
- Unscrew the loose and movable fragment with the same sharpened probe. But remember, even if the fragment is movable, you definitely need lubrication. It is necessary to drop some kind of grease. Grease for the tips of dental drills, silicone grease will do. In an extreme case, a drop of WD-40 general-purpose grease can be used. This is the easiest way, but unfortunately, from excitement or lack of experience it does not happen and the specialist skips the stage of visualization or tries to pull out a fragment of a broken screw with an inappropriate tool.
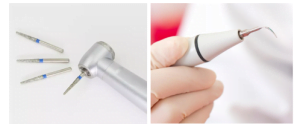
- If the screw fragment sits firmly, you can cut the spline on the surface of the scrap and unscrew. A very thin diamond drill or an ultrasonic drill with a very thin nozzle are both suitable for tools for creating a spline.
But remember that ultrasonic nozzles are very expensive and after such an operation the thin and expensive nozzle will be out of use. The diamond drill will also be out of use, but its price is noticeably lower.
When working with these tools it is obligatory to lubricate, which we have mentioned above, and to irrigate for cooling the working surfaces.
It is important not to lose visual control, which means that the suction of liquid should work perfectly.
Unfortunately, there are no special screwdrivers to help in this case. A bent paradontal probe or a sharpened smoothing tool, see illustration below, will do the job of meshing with a homemade slot.
Implant Broken Screw Removal Kit
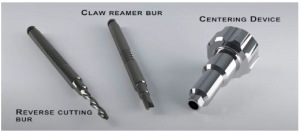
Slicing the spline doesn’t guarantee 100% success. Then you would have to use a specialized tool to remove broken the screw. Many companies produce these tools. The main thing is to choose a set for removal for your interface. A typical set for removing broken screws looks like this.
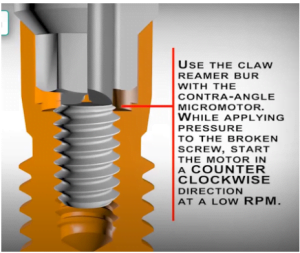
The centering sleeve is fixed in the shaft of the dental implant, and then one of the types of burs is used. The first illustration below, works due to the contact of sharp petals with the rough surface of the fragment, due to which it can be twisted at low speeds.
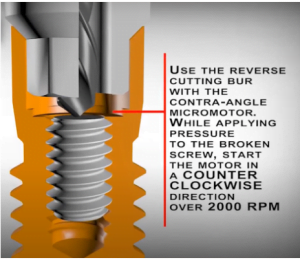
However, sometimes this is not enough for the most difficult cases, in which a reverse drill is used. It works through the same guide sleeve; the drill rotates so as to unscrew the screw. At the same time, it plunges into the body of the fragment and sooner or later there is sufficient adhesion between the drill and the fragment to unscrew and remove it with the drill.
All of the above methods preserve the internal infrastructure and threads. Tougher options are also possible, when you have to restore the threads after removing the screw debris. However, these are quite different devices and skill levels, which are beyond the scope of this article.
We hope the material of this article was useful for you, until the next publication.

