Soft tissue integration part 6. What to do if there are problems with attached keratinized gingiva
This article returns to the issue of attached keratinized gingiva. This topic was raised in a previous article in the series. Clear conclusions were made that the attached keratinized gingiva is responsible for the stability of the soft tissue complex and that the thicker and more massive it is, the better it is. What if the keratinized gingiva is not attached well enough, how to diagnose it and how can the situation be improved?
Let’s look at these and other questions in more detail.
The significance of the mucogingival junction position for assessing the prospects of implant survival
Let’s start with the terms. The modern term for the soft tissue complex discussed in all parts of this series is the supracrestal attachment tissue complex. In this section, we will look more closely at how to determine the quality of attachment of the keratinized gingiva. This article will help us with A new definition of attached gingiva around teeth and implants in healthy and diseased areas. It was published in 2019 by Dr. Tarnow and colleagues. It may not be a voluminous study, but it lays out clinical observations with an attempt at classification. This article is very useful for practicing dentists. The material in the article provides insight into how to determine the quality and sufficiency or conversely insufficiency of attached tissues.
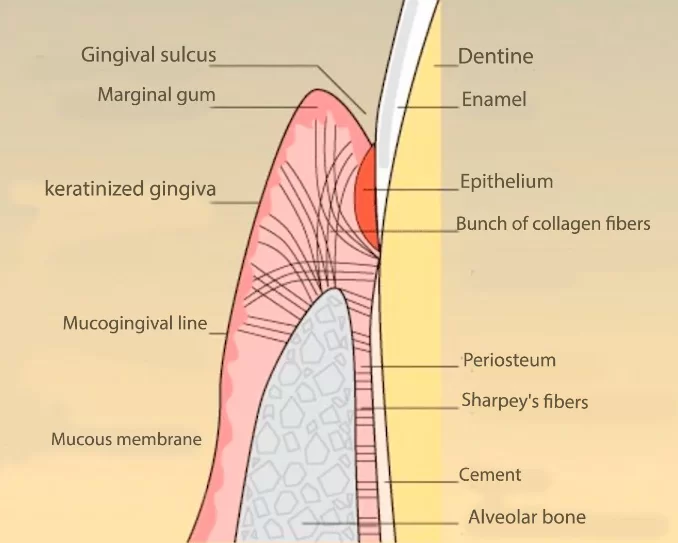
Dr. Tarnow and his colleagues have identified a very important anatomical landmark to guide us. It is the mucogingival line. This is the boundary that separates the soft mobile mucosa from the attached keratinized gingiva.
The presence of the mucogingival line and keratinized gingiva does not mean anything. Even the term “attached gingiva” implies the question – attached to what?
Normally, with healthy teeth and a well-developed alveolar process, the gum is attached to the bone. This is a fairly strong connection; practicing dentists know that it is not easy to break this connection.
The mucogingival line is at the boundary where the incremental area of the gingiva with a lot of collagen bundles ends, and soft unattached mucosa begins.
Keratinized gingiva attachment options for teeth
The following slide shows two variations of keratinized gingival attachment in people without pathology.
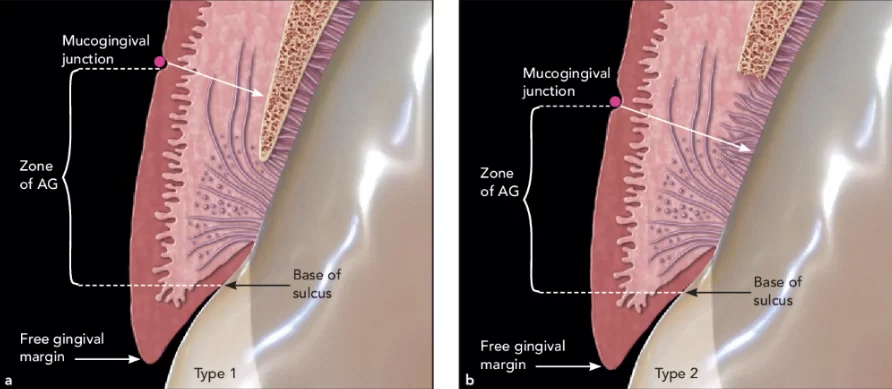
Healthy tooth with the MGJ apical to the bone crest. Part A of the new definition. The AG is from the base of the sulcus to the MGJ. (a) Type 1. The AG is attached via the junctional epithelium, connective tissue fibers, and periosteum over bone. (b) Type 2. The AG is attached via the junctional epithelium and connective tissue fibers, but is not attached to the bone.
Type 1 is a case where the mucogingival line is located apically relative to the alveolar process. In this case, there is a strip of keratinized gingiva attached to the periosteum of the alveolus. This is the most successful case.
Type 2 – we also deal with healthy tissues, but here the mucogingival line is located coronal to the alveolar bone. Keratinized gingiva is attached only to the cementum of the tooth root. This variant is quite often observed in thin phenotype. It is also normal, and the connection is quite strong, although not as strong as in the first case. If there are no inflammatory processes, there are no problems with this type of connection.
See the following illustration for what happens if periodontitis occurs.
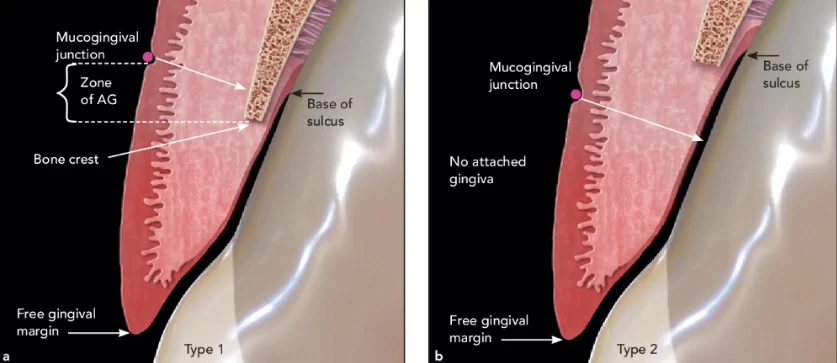
Infrabony defect on a tooth. The MGJ is apical to the bone crest. (a) Type 1. The zone of AG is from the crest of the bone to the MJG, attached only to the bone and not to the tooth. (b) Type 2. There is no AG, only a zone of keratinized tissue.
There are different options. In the first case, where the mucogingival line is apical to the alveolar process, a part of the attached keritized gingiva will be preserved even if it is only a thin strip. In the second case, the periodontal pocket will destroy the entire attachment.
How can this be determineds in a clinical setting? With the help of a periodontal probe, the answer is very simple. It is necessary to immerse the probe into the periodontal pocket, notice the depth to which it is immersed, take the probe out of the sulcus, and apply it from the outside. If it appears that the probe was immersed deeper than the mucogingival line, there is no attachment. If it appears that the depth of the pocket is at least 1.5-2 mm above the mucogingival line, then the attachment remains.
It is very important to know whether the gingival attachment remains because the course and methods of treatment of periodontitis in the first and second cases will be different.
Keratinized gingiva attachment options for implants
Dr. Tarnow and his colleagues found the same pattern in the attachment of keratinized gingiva in the case of dental implants. Both tissue-level and bone level-implants were considered. The illustration below shows the variants of attachment with tissue-level implants.
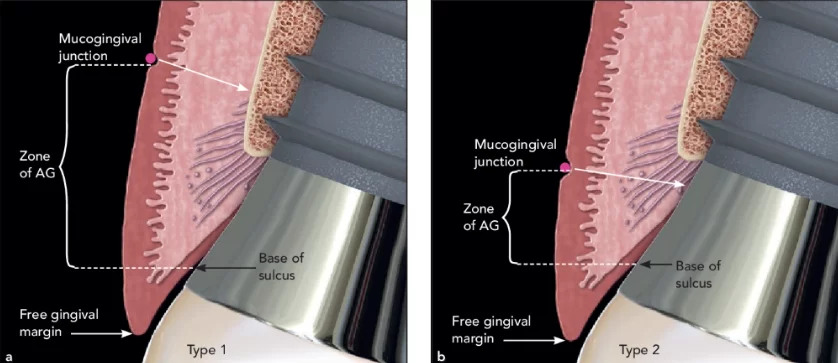
Tissue-level implant with the MGJ apical to the bone crest. Part A of the new definition. The AG is from the base of the sulcus to the MGJ. (a) Type 1. The AG is attached via the junctional epithelium, connective tissue fibers, and periosteum over bone. (b) Type 2. The AG is attached via the junctional epithelium and the connective tissue fibers, but is not attached to the bone.
In the first variant, the mucogingival line is below the bone crest, so there is both attachment to the periosteum and partial attachment of the epithelium to the milled part of the implant. This is an excellent option.
In the second case, the mucogingival line is above the bone crest, and all attachment exists only at the level of the milled part of the implant. We have already analyzed in previous articles in this series that the quality of the gingival attachment to the implant is much inferior to the quality of the soft tissue complex around the living tooth.
Now let’s imagine that peri-implantitis has occurred in the area of the tissue level of the implant. See the illustration below.
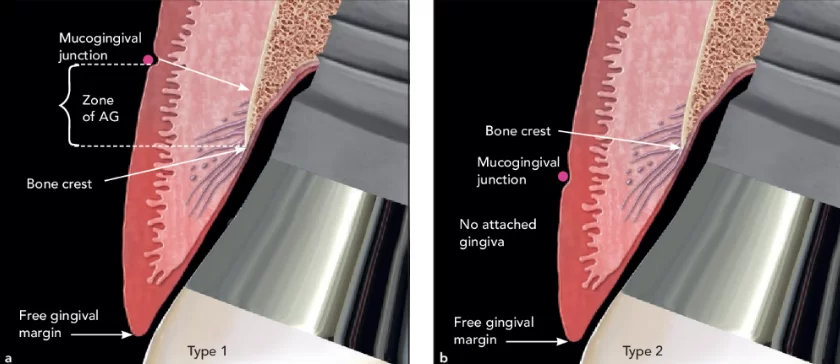
Peri-implantitis on a tissue-level implant. The MGJ is apical to the bone crest. (a) Type 1. The zone of AG is measured from the crest of the bone to the MGJ, attached only to the bone and not to the tooth. (b) Type 2. There is no AG, only a zone of keratinized tissue.
In the illustration, we see the bone pocket typical of peri-implantitis. Again, we see the difference. In the first case, the attachment is preserved and there is a narrow strip of attached keratinized gingiva. In the second case, the attachment is destroyed. These are two different clinical situations, and the prognosis of treatment will be different.
Now let’s look at the case of a bone-level implant. See the illustration below.
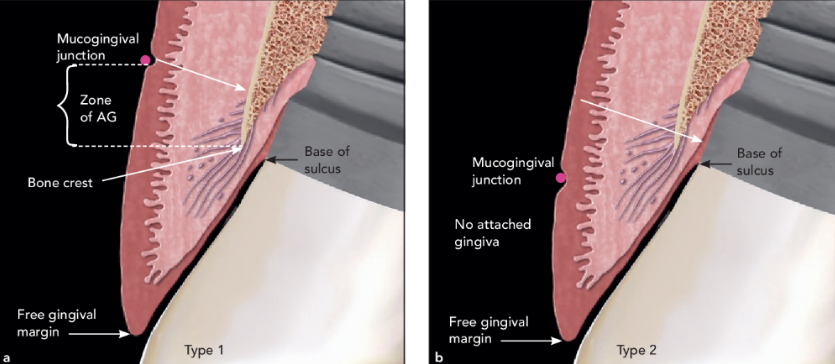
Healthy bone-level implants. The MGJ is apical to the bone crest. (a) Type 1. The zone of AG is measured from the bone crest to the MGJ, attached only to the bone and not to the tooth. (b) Type 2. There is no AG, only a zone of keratinized tissue.
Two variants of attachment are also possible here. The first is the mucogingival line below the level of the bone crest and is the attachment of the gingiva to the bone. The second variant – the mucogingival line is above the bone level and the attachment is very conditional, i.e. much less developed in comparison not only with a living tooth but also with tissue-level implants. This may be an indication for an operation to displace the mucogingival line, but we will talk about that in detail later.
In the case of peri-implantitis, the clinical picture is similar to the previous variants. See the illustration below.
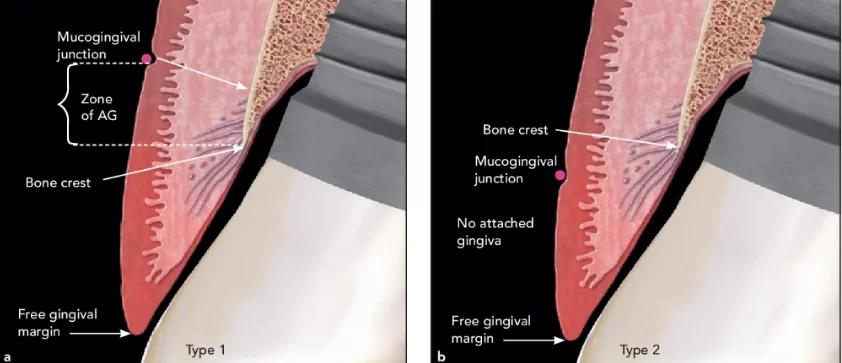
Peri-implantitis on bone-level implants. (a) Type 1. The MGJ is apical to the bone crest. AG is measured from the bone crest to the MGJ, attached only to the bone and not to the tooth. (b) Type 2. The MGJ is coronal to the bone crest, and therefore there is no AG, only a zone of keratinized tissue.
In the first case, part of the attachment of the keratinized gingiva will be preserved; in the second case, no attachment is possible.
Understanding the condition of the attached gingiva is important not only for the treatment of peri-implantitis but also for evaluating the success of the restoration. For example, we have increased bone tissue, placed the implant, and produced and placed the restoration. Somehow, we have to assess the medium and long-term survival of the implants. If we know that the quality of soft tissue integration determines the risk of peri-implantitis, we need to assess the quality of the attached keratinized gingiva and take action if it is insufficient.
Note another image, here you can see the mucogingival line, you can see that there is keratinized gingiva, but is it attached? Of course not, the image shows that the probe goes almost to full depth and dips below the mucogingival line.
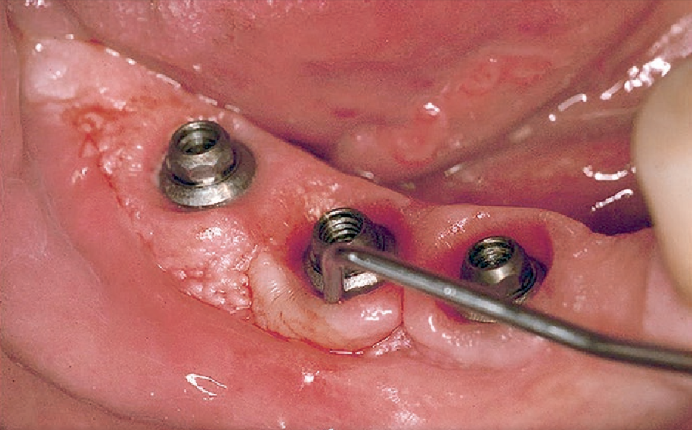
Example of Part B of the new definition. There is a zone of AG, but it is only attached to the bone where, due to the pocket present around the implant, the biologic width is subcrestal. In this situation, the zone of AG would be measured from the bone crest to the MJG, not from the base of the sulcus. See also Figs 4a and 6a.
We will now revisit the conclusions we drew in Part 5 of this article series, and look at them in light of what we have discussed above.
- Supracrustal attachment tissues (gingival cuff) are structurally the same in implants and teeth, but differ in quality.
- Gingival attachment is provided by a strong attachment of connective tissue fibers and epithelium to the surface of enamel and root cementum.
- Implants do not have such a strong bond. The stability and immobility of the gingival cuff around implants is ensured by the circumference of the attached keratinized gingiva around the implant.
- The height of the supracrestal attached tissues depends on the phenotype of the gingiva both around the implants and around the teeth. The thick phenotype averages 2.5 mm; the thin phenotype averages 3.7 mm.
In their study, Dr. Tarnow and colleagues explain the content of the third point and provide conclusions and recommendations for practicing dentists. It becomes clear how important it is to have the attachment of keratinized gingiva exactly to the bone, and not only to the implant surface.
In which part of the dentition is the presence of attached keratinized gingiva is particularly important?
We’ve established how important attached keratinized gingiva is to the bone. However, many patients have problems with gingival volume and attachment especially if it’s been a long time from tooth loss to seeing a dentist.
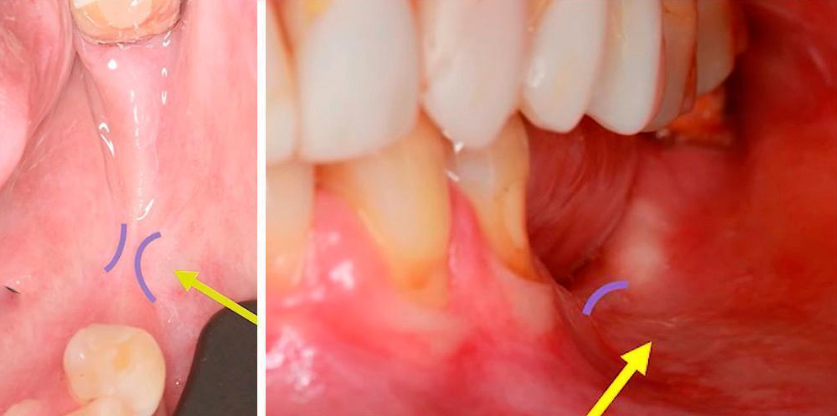
For example, take a look at this image, which we have posted in a previous article. It will be very informative here as well.
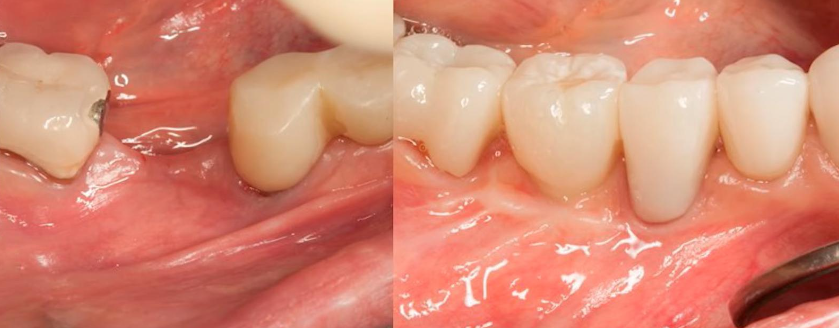
We see that the patient is left with a thin strip of keratinized tissue surrounded by soft mobile mucosa. The blue lines on the image indicate the mucogingival line, and the yellow arrows indicate the unkeratinized and unattached mucosa underneath which are muscle fibers that grow on the alveolar ridge.
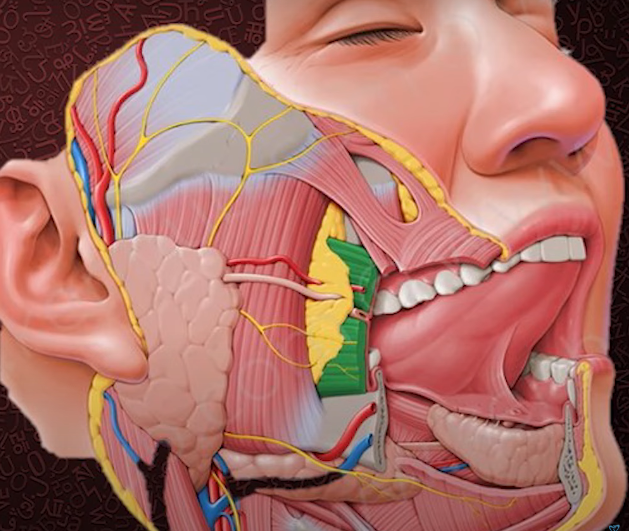
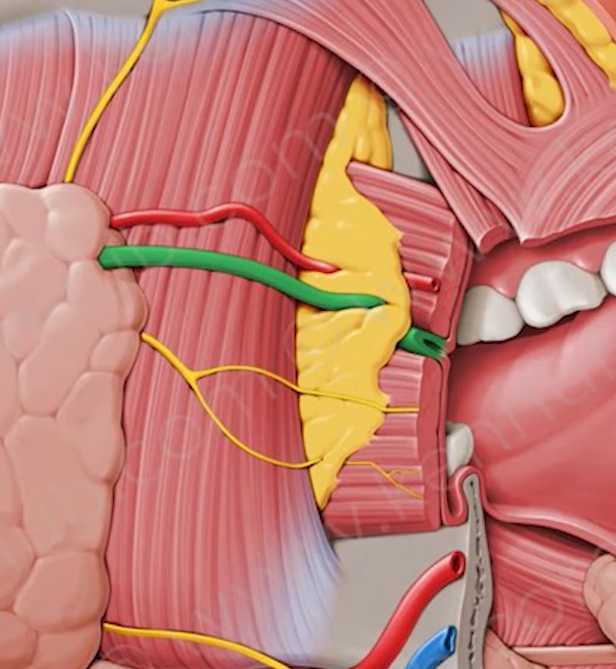
Any implant placed in this area will not last long without proper soft tissue work. This is because not only do we have a deficiency of keratinized attached gingiva in this area, but also the musculus buccinator, see the illustration below, where it is marked in green.
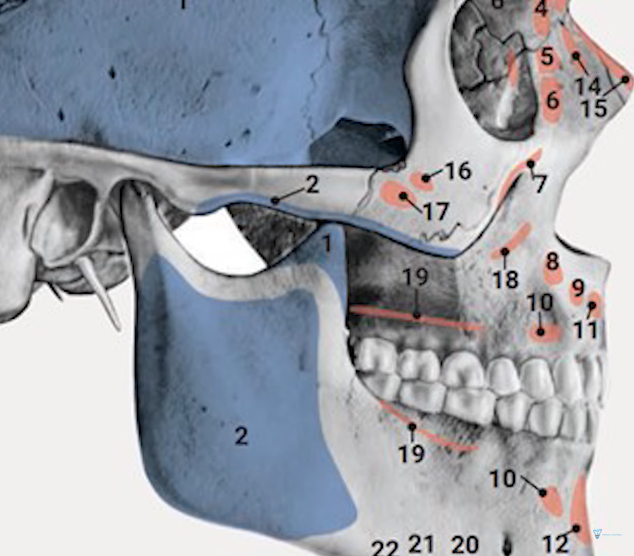
This muscle is attached at the base of the alveolar process in the area of the molars and sometimes goes into the area of the premolars. The majority of lost and restored teeth are molars, so this area is of particular interest to us. The enlarged illustration shows that this muscle is attached just below or at the level of the mucogingival line.
In the next illustration, we see the attachment points of the musculus buccinator on the bones of the skull – this is line number 19.
We know that after tooth loss, bone tissue resorbs and the height of the alveolar crest becomes lower and thinner than the original size of the alveolar process. While previously there was enough space between the attachment of the buccinator musculus and the apex of the alveolus for the attachment of keratinized gingiva, with the loss of bone mass there is almost no space for the attachment of gingiva and the strip of bone suitable for gingival attachment approaches the line of attachment of the musculus buccinator.
It is important to realize this because the task of the dentist is not only to make a functional and aesthetically correct restoration for the patient, but also to make it last for many years.
To assess the prospects, it is necessary to study the condition of soft tissues in the area of the future prosthesis starting with the presence of attached keratinized gingiva.
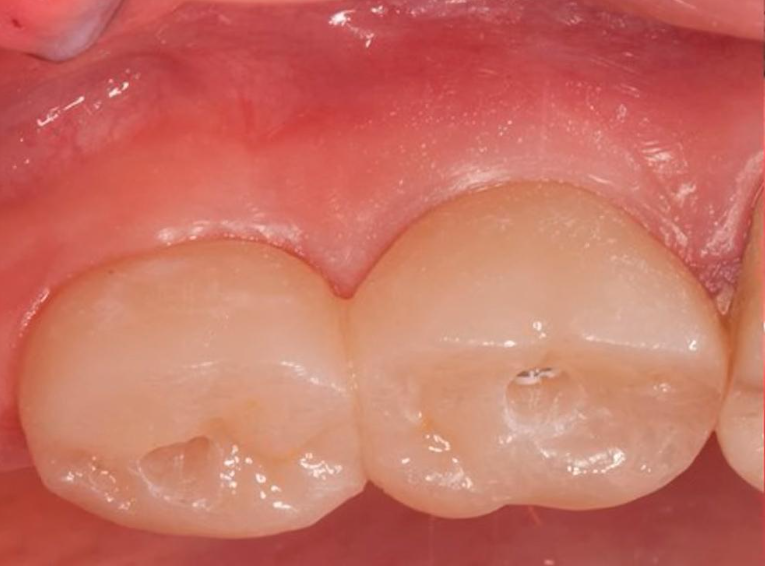
It is quite easy to assess the quality of the attached tissue complex, but there are nuances. For example, we often see this image in publications.
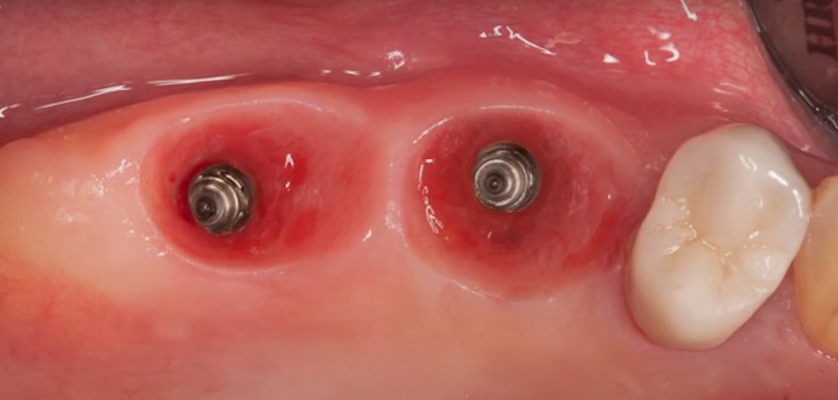
The image shows well-formed soft tissues for the installation of the restoration, but it is difficult to assess the quality of the attached keratinized gingiva from the image
The image shows well-modeled soft tissues with a good thickness of keratinized gingiva. However, we cannot assess the quality of the attachment from this angle. We need to look from the side to see where the mucogingival line runs, and what part of the keratinized gingiva is attached. If all of this is present, we can talk about an excellent restoration with a good prognosis for the next 5-10 years.
It is important to always measure the depth of the sulcus so that we can fully assess the quality of the attachment of the keratinized gingiva.
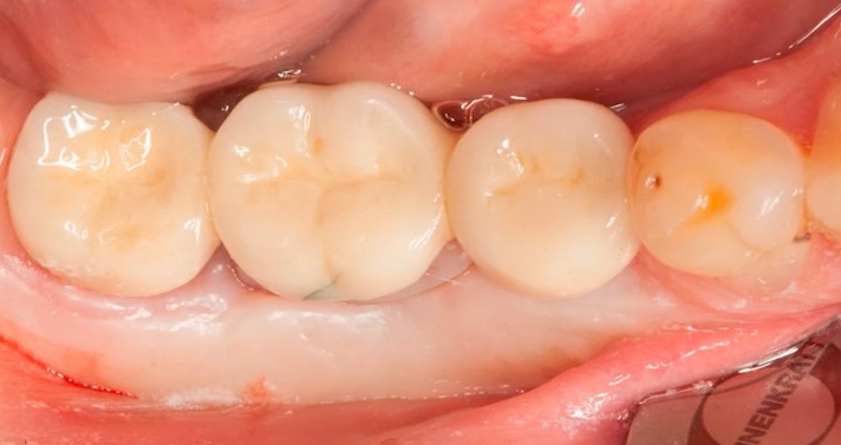
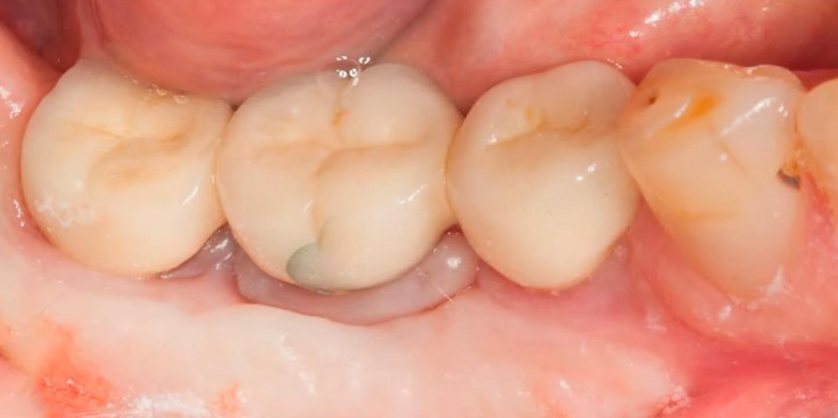
For example, in the following picture from an occlusal angle, everything looks good. The experienced doctor has worked with bone volume and soft tissue. The gum graft tissue was most likely taken from the palate.
The color shows that this is keratinized gingiva and everything seems to be in the right place. However, if you look at another image, there is some doubt.
The image shows a thin strip of some bluish tissue, which is indicative of a problem. Most likely there is at least mucositis, but possibly peri-implantitis.
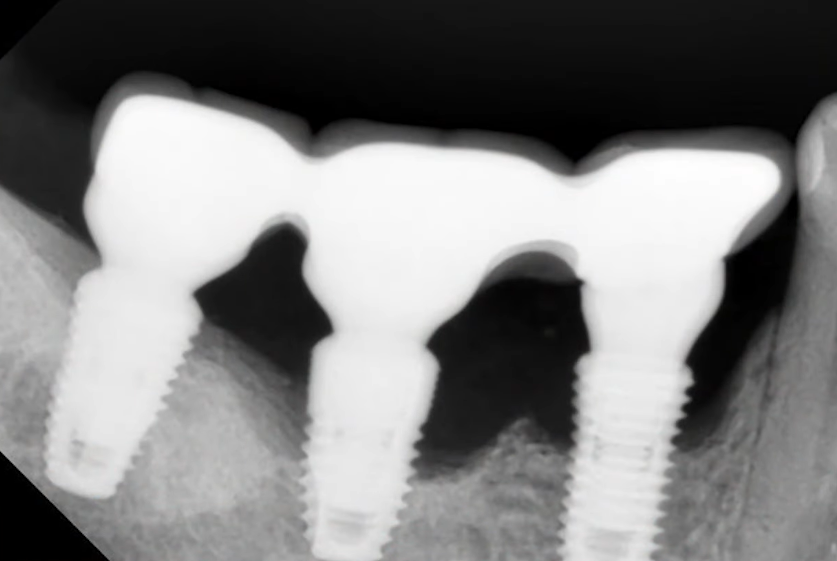
If we take an X-ray, we will see an advanced peri-implantitis with very serious bone loss.
You can see from the image that there is an indication for the removal of at least one and possibly two implants. The process image clearly shows where the bone crest was located. It is obvious that any quality gingival attachment was out of the question, even though the volume of keratinized gingiva was more than sufficient, and everything looked very good.
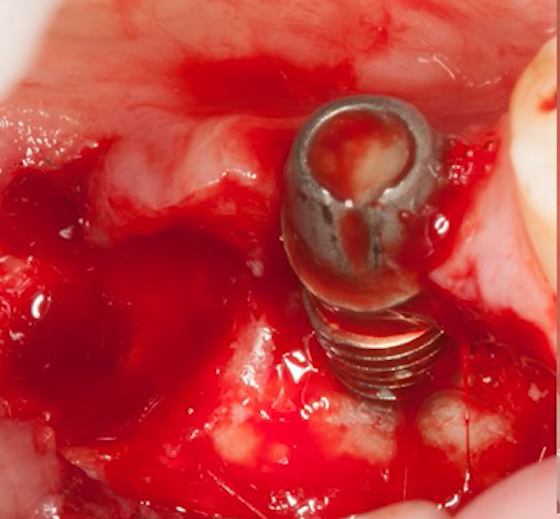
If there is significant bone resorption caused by peri-implantitis, i the presence of a dense keratinized gingiva is irrelevant because it is not attached to anything
To summarize the article and the clinical case just discussed, the most important thing is to control the quality of the attachment of the keratinized gingiva in the molars and premolars.
What to do to obtain a sufficient volume of attached keratinized gingiva in problem areas
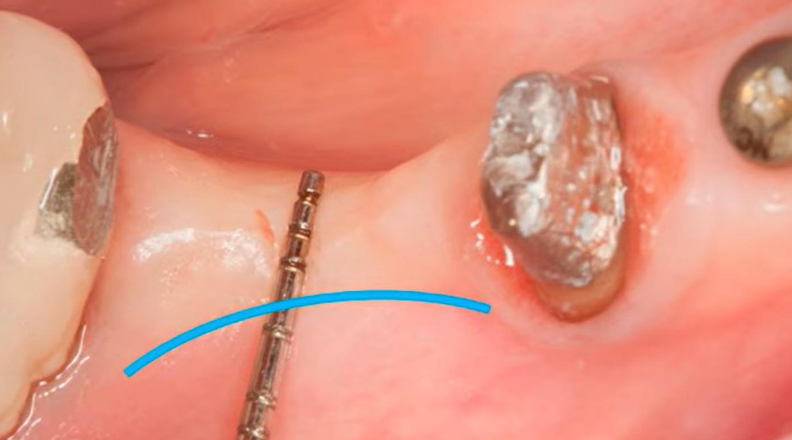
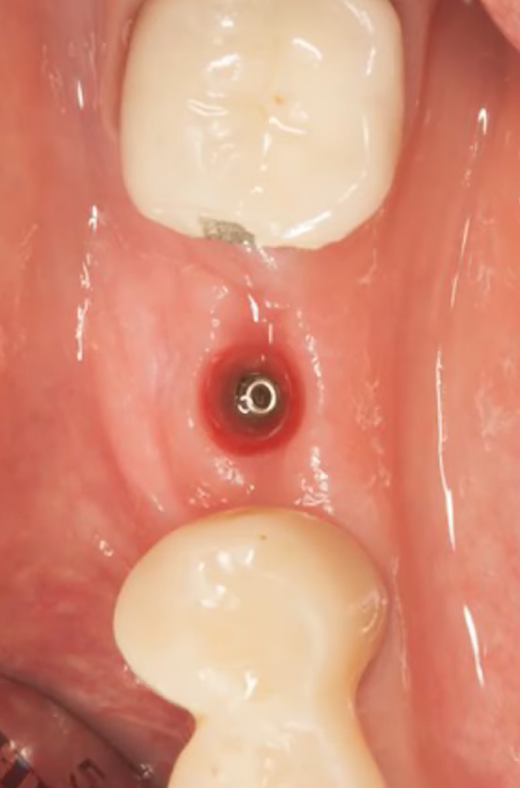
The following image shows one of the cases. This patient had undergone a directed bone regeneration procedure and an implant had already been placed, causing the soft tissue to be stretched over the bone crest, leaving only a narrow strip of keratinized gingiva. Note where the mucogingival line passes.
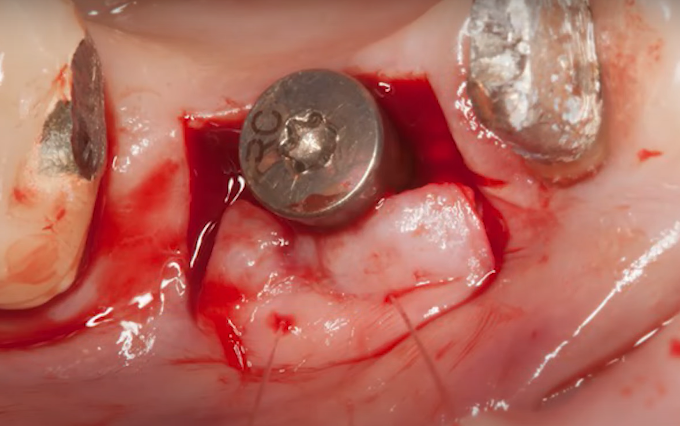
Next, we need to open up the implant and find a way to increase the area of attached keratinized gingiva. One of the easiest ways to augment the area of attached keratinized gingiva is with an apically displaced flap. However, this method is not well suited for the mandible because there is nowhere to get additional tissue to increase the width and volume of the keratinized gingiva.
We can’t go to the tongue side, because we need the attached gingiva there too. It is much easier in the upper jaw. We can move the flap from the palate, and take the necessary amount of tissue with almost no restrictions.
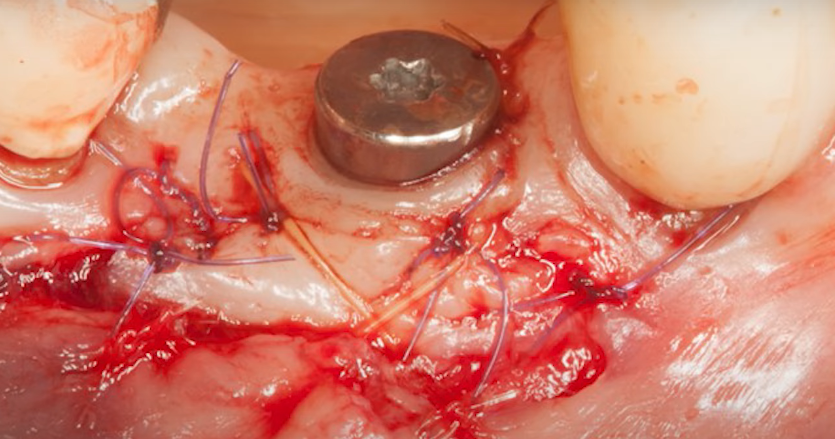
Where it is possible on the lower jaw, it is essential to operate to shift the flap. We strongly recommend that you sew the flap on the sides to fix the flap that you shifted in the correct position, and increase the chances of its reattachment. The following photo shows the result – the formed gingiva after the flap displacement surgery.
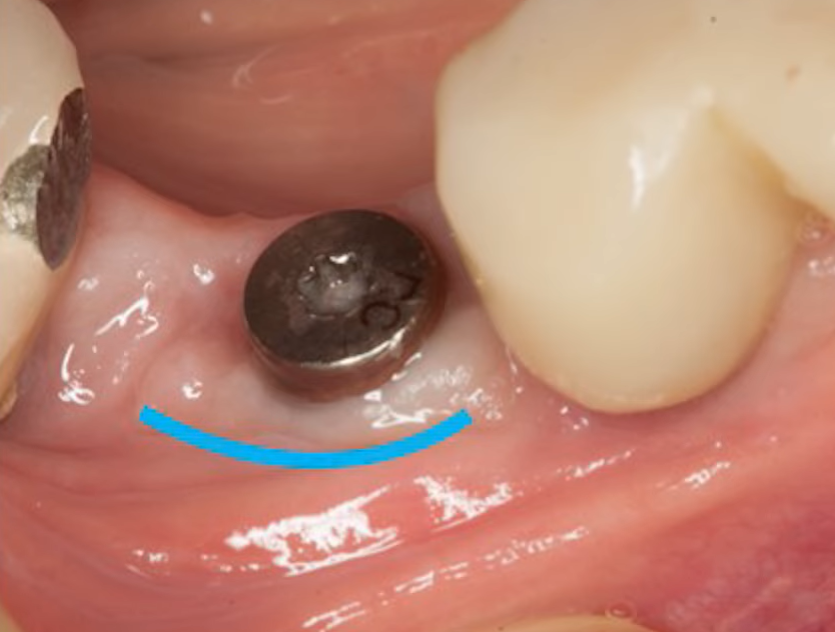
From this angle, we can see that the gingiva has become thicker, and at first glance, the situation has improved. What about the attachment? Let’s look at a few more images. The first one is with the gingival former still in place, it too shows the keratinized gingiva and the mucogingival line (blue stripe). However, the quality of the attachment is questionable because the mucogingival line is at the level of the body of the gingiva former.
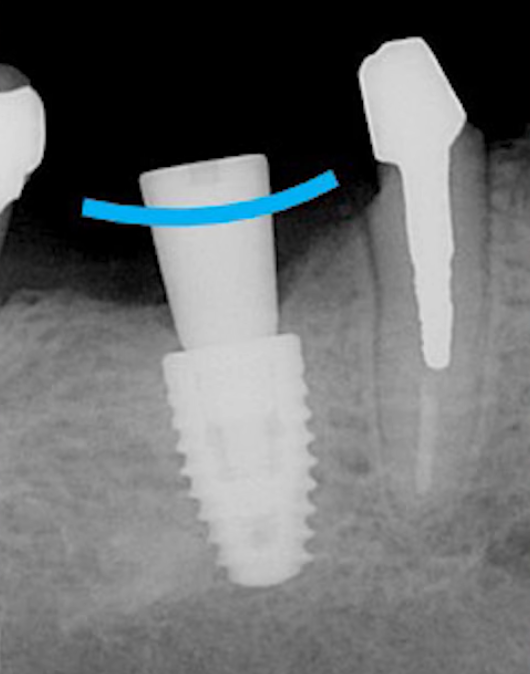
This is proved by the X-ray, which shows that the mucogingival line is much higher than the bone crest, which means that a good attachment of the keratinized gingiva is out of the question.
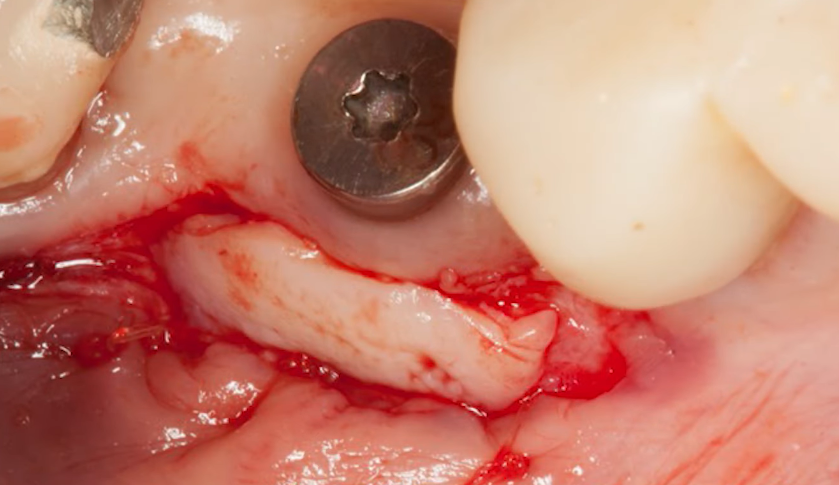
In this clinical case, there is an indication to increase the area of attached keratinized gingiva. See the following images.
Such an operation was performed. A flap of keratinized gingiva was taken from the palate, placed, and fixed in such a way that its lower edge overlaps the periosteum. In this case, we will obtain good-quality attachment and stability of the gingival cuff in the medium to long term. In this case, the graft was fixed with sutures and this is what the final surgery looked like.
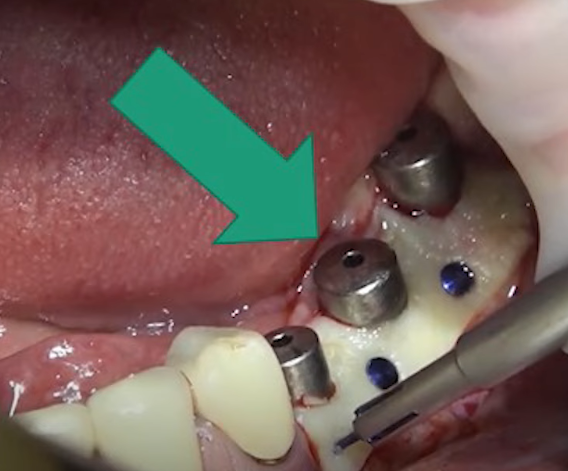
This, however, is not the only way to attach a fragment of keratinized gingiva to the periosteum. Some specialists successfully practice tissue fixation with the help of pins. To do this, the flap is completely displaced from the alveolar ridge. Essentially, the bone is scalped and then completely covered with a connective tissue implant, which is fixed with pins. There is a fairly large and documented base of successful operations of this kind, including histology of the tissue condition.
The result of both types of surgery should be the displacement of the mucogingival line below the level of the bone crest.
To summarize.
- For successful implantation, sufficient bone volume must be provided. We have a series of articles on directed bone regeneration.
- Provide a sufficient volume of soft tissue over the implant platform. This is can be achieved in different ways, the simplest of which is the subcrestal installation of a dental implant. The features of this technique were discussed in detail in a previous article in this series.
- Ensure that the implant cervix is surrounded by keratinatinized and quality attached gingiva. We have discussed how to determine the quality of attachment by simply placing the probe into the sulcus to the depth of the bone crest. Then move the probe and see where to compare where the mucogingival line is in relation to the edge of the bone crest. If the mucogingival line is below the bone crest, then there is a guarantee that there is attachment of keratinized gingiva to the periosteum.
This concludes this series of articles on soft tissue integration. We hope you found the material in this article useful. Until our next publication.

