Subcrestal implant placement and soft tissue integration
Contents
In this, the penultimate article in the series on the formation of the soft tissue complex around the implant, we will look at what happens if the implant is placed below the level of the cortical layer, the so-called subcrestal implant placement; and what happens to the bone tissue around the implant and how bone loss affects the long-term survival of implants. This builds on our previous discussions of guided bone regeneration using membranes, autologous bone grafts, and allogenic, xenogeneic, and alloplastic transplants. It also relates to our analysis of how different implant/abutment interfaces behave under mechanical loading. And here we further explore the effects of subcrestal implant placement on soft tissue integration and bone loss over time.

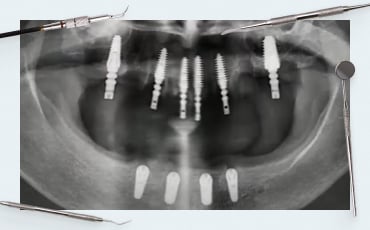
Example of subcrestal implant placement 1.76 mm below the marginal bone level
Why subcrestal implant placement is necessary
Many colleagues know that bone loss with subcrestal implant placement is greater than with any other technique. However, there are still indications for this technique:
- Patient with a thin biotype and soft tissue thickness over bone less than 3 mm: It is not uncommon to find patients with a gingival thickness of 1-1.2 mm above the bone. See the illustration below. If the implant is placed at the same level as the bone, the body will dissolve some of the bone around the implant neck to make room for the soft tissue connection, and the implant/abutment connection will be above the gingiva, which is unacceptable.

Subcrestal implant placement in a patient with thin gingiva
We already know from previous articles in this series that the thickness of the gingival cuff should be 3.5-4 mm. If the gum thickness over the bone is insufficient, it is necessary to provide space for the formation of soft tissue connection. This is why implants are placed deeper into the bone to create room for the formation of the gingival cuff over the implant. In this case, the border between the implant and the abutment will be within the soft tissue. See the illustration below.

X-ray and optical imaging of the implant below the marginal bone level
With this approach, there will still be bone resorption, but the bone will be lost at the abutment level, and the implant body will remain almost completely immersed in the bone. This is especially important for short and thin implants with a length of 6-8 mm, diameter of 4.2-4.8 mm. If an 8 mm implant loses 2 mm of bone tissue around the platform, only 6 mm of implant body will remain in the bone, which is not enough, especially in areas with significant chewing load.
- Reduction of perioperative risk: A number of specialists install implants sub-crucially regardless of the thickness of the soft tissue. They argue that such a landing over the implant platform forms a large volume of soft tissue; and dense gingiva prevents the pathogenic microflora from reaching the implant, which minimizes the risk of inflammation and perioperative onset. They even say that this preserves the volume of bone tissue.
Does the sub-cross implant installation help to preserve bone and protect against peri-implant?
Let’s see what research there is on this starting with a fundamental work that has already been cited in previous articles of the cycle. This is the famous work of the Bernese group led by Dr Bragini.

In this study, bone tissue remodeling was compared across different implant installation scenarios:
- Supracrestal – above the bone level.
- Сrestal – at the bone level.
- Subcrestal – below the level of the marginal bone.
The outcomes of the study distinctly illustrate that the most significant bone loss is observed in cases of subcrestal implant placement, refer to the illustration below.

Levels of bone loss in different methods of implant placement relative to the marginal bone
However, this study also observed another aspect that was not emphasized in previous articles in this series on soft tissue attachment formation. This pertains to the inflammation of peri-implant tissues depending on the positioning of the implant/abutment interface. The objective was to determine what happens to the peri-implant mucosa with different interface placements.
The illustration below clearly shows the highest concentration of neutrophilic leukocytes in the case of subcrestal implant placement.

Histologic sections of the soft tissue around the implants placed in different ways
The histological section was taken from the same point for all three implant installation variations.
This is an important observation from which Dr. Bragini and his colleagues concluded that the deeper the implant/abutment platform is placed, the higher the concentration of inflammatory factors in the soft tissue complex. This means that we can conclude that considerations of protecting against peri-implantitis by placing the implant deeper are fundamentally flawed.
The scientists checked the concentration of other cells that may signal some pathological processes. They checked monocytes and macrophages, but it is neutrophilic leukocytes that show the most significant maximum in subcrestal implant placement.

Graph of neutrophil leukocyte distribution in different methods of implant placement relative to the marginal bone
It would be incorrect to have stopped at just this study. Readers have probably noticed that the study by Dr. Bragini’s group was performed on a planar implant/abutment connection.
In previous articles in this series, we have discussed that switching platforms allows for a larger area for soft tissue contact, and thus less bone resorption around the implant. It would be proper to see what happens when subcrestal implant placement is combined with a tapered interface (platform switching). For this, we will look at another study from 2019.

The researchers took two implants with a cone interface, Bicon and Astra. They placed the implants equicristally and subcrestally with a 1.5-2 mm depth.
 Bicon (Right) Interface")
Test samples of platform-switched implants in the Astra (left) Bicon (right) interface
The study was conducted in animals on the same jaw to see how the soft tissues behaved in terms of infection by pathogens that cause periodontitis and peri-implantitis.

Implants placed in the jaw of an animal
There were two groups in the study, a control group and a test group. In the control group, all processes occurred as in the normal healing of implants. The test group was caused artificial peri-implantitis. For this purpose, a special ligature was placed, which retained the plaque without any cleansing. See the photo below.

Artificially induced inflammation around implants
The researchers investigated what was in the tissue fluid around the implants and what was deep in the implant/abutment interface. They also did an in-depth study using PCR tests.

Sampling for test studies
They found that subcrestal implant placement does not hinder the penetration of pathogens into the depth of the interface and peri-implant tissues. Here are the conclusions of this study:
- Subcrestal implant placement increases T. Forsythia levels early in the progression of peri-implantitis regardless of the size of the microgap between the implant and abutment.
- The content of T. Forsythia in the peri-implant sulcus is related to the depth of probing of the peri-implant tissues. That is, if peri-implantitis has started, the deeper we probe the pocket, the higher the titers of this bacterium.
This once again confirms the fallacy of the position that the deeper the implant is placed and the lower the implant/abutment interface, the lower the likelihood of inflammatory processes occurring.
The results of the studies we have reviewed are most often the basis for criticizing the subcrestal implant technique. There are many world-renowned specialists who are strongly opposed to this technique of implant placement. It is noteworthy that all of them are related to the field of periodontology. In private, they say something like this:
“We are not crazy to put soft tissue where the bone should be.“
Why subcrestal implant installation is still successfully used
If everything is so bad, why does this technique exist and is widely used? Let’s return to the indications for subcrestal implant installation. We took the following illustration from Spanish specialist Jorge Campos Aliaga, who created his own concept of implant installation.

Recommendations for the depth of implant installation depending on the soft tissue thickness
This diagram shows very well the recommended depth of implant installation depending on the thickness of soft tissues above the cortical layer of bone. According to Dr. Aliyago, if we have only 1 mm of gingiva, we should “sink” the implant into the bone by 3 mm, so that the total height of the soft tissue connection is 4 mm, and so on, depending on the thickness of the gingiva. In this way, we allow the soft tissue remodeling to take place and make room for the formation of the gingival cuff.
This is a logical and clear scheme, which leaves us with one indication for placing implants below the level of the marginal bone – insufficient soft tissue thickness above the marginal bone.
The problem of bone loss with different implant installation techniques is not so clear-cut either. The photo below shows an example of equicristal implant installation.

At the time of installation of the restoration, we see that about 1 mm of bone has already been lost and the platform is over the crestal ridge.

Restoration on two implants with a poor eruption profile
There are no signs of inflammation, but this still poses several problems. First, the profile of the restoration has to be convex with a very high angle above the soft tissue line. This is not good for the long-term prognosis. We will talk about this in more detail in a future article, let us now simply acknowledge this fact. The second issue pertains to the loss of marginal bone around the implant neck. We will examine the advantages offered by subcrestal placement despite bone resorption occurring in both instances.
For this purpose, let’s familiarize ourselves with the findings of another qualitative study.

- High survival rates and comparable bone loss were obtained for both equicrestal and subcrestal implant installations.
- Quantitative analysis considering homogeneous sample selection showed that both vertical positions of the implant platform were similar in terms of sacral bone loss.
- However, considering soft tissue, in the presence of a thin phenotype, it is preferable to place implants subcrestally, as this may reduce the likelihood that the implant will be denuded in the future and, thus, avoid the risk of peri-implantitis.
That is, the technique of subcrestal implant installation does not preserve bone tissue at the level of the marginal bone, but preserves bone tissue around the implant. In fact, the bone is remodeled around the abutment, while the implant body remains fully immersed in the bone tissue.
To confirm this, let’s look at another very interesting qualitative study.

The researchers installed implants in patients with a thin phenotype in several clinics. Some of the patients had the implants placed equicristally and some of the patients had the implants placed subcrestally. They found that if the implants are placed equicristally, as in the illustration below, the average bone loss below the implant platform is 1.13 mm.

Equi-crestal implant installation under experimental conditions
In the case of subcrestal implant installation as in the following illustrations, the bone loss below the level of the implant platform is only 0.57 mm. Let us remind ourselves that we are not talking about the total bone loss, but about the bone resorption below the implant level.

Subcrestal implant installation under experimental conditions
Conclusions:
Within this study, bone loss was higher in the case of subcrestal implant installation, although clinically these implants had bone levels above the implant platforms after 12 months of follow-up.
Another study was made in 2019 by Italian specialists. It was a multicenter study where the same protocol was used in several clinics.

As part of the study, implants were installed subcrestally and then observations were made as to what the effects were and what the advantages and disadvantages were in the long-term.
They reached a number of conclusions that support what we talked about earlier. It goes like this:
- Early marginal bone loss is a non-infectious process of remodeling of a variable structure that occurs within the first year after implant installation. It has a multifactorial etiology, influenced by both surgical and prosthetic factors.
- The height of the gingival cuff varies in the frame from 3.26 mm to 3.6 mm.
We have considered this in previous articles in the series. If the patient has a thick phenotype with massive, well-keratinized gingiva, the gingival cuff height may be less, the same 3.26 mm. If the patient has a thin phenotype with high papillae and noticeable tooth recessions, the gingival cuff height will be greater than 3.5-3.6 mm. - In the present study, thin vertical mucosal thickness (≤2mm), short gingival formers (≤3mm), and short permanent abutments (≤3mm) were significantly associated with greater marginal bone resorption.
This is the most interesting conclusion. It turns out that not only the depth of implant installation, but also the shape of the suprastructure (gingiva former and abutment) affects the degree of marginal bone resorption.
What requirement does subcrestal implant installation place on the shape of the suprastructure?
Let’s move on to the next study, which was made by Spanish colleagues in 2018. This is a fairly simple qualitative study on animals.

The histologic sections were supplemented with high-resolution tomographic images. The researchers placed the same implants, but with different shaped gingival formers. See the illustration below.
")
Identical implants with different gingival shaper shapes (convex and concave)
Colleagues installed gum shapers with 15° and 45° angles and this was the result, see the pictures below.

Comparison of the level of bone loss when using a suprastructure with different eruption angles.
It is clear from the images that if a wide gingiva former is installed, which almost rests on the marginal bone, the resorption is significantly greater. We already know why this happens. It is because the body must make room for the formation of soft tissue attachment. To do that, it dissolves part of the bone tissue. If the gum shaper is thin, there is more space for the gingival cuff, and, as a consequence, bone loss is significantly lower.
This is supported by the findings of the study:
The shape of the trans-gingival portion of the abutment may influence the formation of the gingival cuff around the implant.
A flat and wide abutment penetration profile causes apical displacement of the gingival cuff and a greater loss of bone mass.
Therefore, if the implant is to be installed subcrestally, care must be taken to ensure that the gingiva former and abutment have a narrow and preferably concave profile. Bone loss will then be significantly less.
Consider another study that was performed on humans. However, the observation time of the study is only 1 year, but we are just interested in the processes of bone remodeling that occur in the first year after the installation of the implant.

This is a randomized study that examined how the abutment height and depth of implant installation affects the bone health between the two implants. Seethe images below.

X-rays of implants installed at different depths and abutments of different shapes
The focus of the study was on clinical cases in which the restoration is supported by two adjacent implants. The situation is quite common and familiar to every practitioner. As can be seen from the images, the colleagues also obtained data on the state of the bone tissue on the proximal sides of the implants.
This is the effect they observed:
- If the implants were installed equicristally (at bone level), but wide and convex gingival shapers were installed on them, the bone loss was significant.
- If the implants were placed subcrestally, but with narrow and concave gingival formers, the bone loss was less significant, which can be seen clearly in the radiographs above.
The study concluded that:
The use of long, internally tapered abutments placed during surgery, combined with subcrestal positioning of the implants, resulted in greater bone preservation between the implants compared to the use of short abutments placed at bone level in clinical cases where thin gingiva is present.
How to get the most out of a subcrestal implant installation
Another important point that should not be missed is the physical size and positioning of the implants compared to the living teeth. All implants are much narrower than the two or four roots of a living tooth, as you can clearly see in the image below.

The cavities of the teeth that were extracted and the implants installed in their place
The images show the remaining cavities of the teeth that were extracted and the implants that were installed. You can clearly compare the size of the widest implants (6.5 mm) with the size of the tooth roots in the following images.

Comparison of implant size with the wells after tooth extraction
It is the subcrestal implant installation that allows us to create the right eruption profile for these cases. This is very important from an orthopedic point of view, because one of the most difficult tasks for the specialist is to create a restoration with a combination of a 4 mm implant and a gingival thickness of 2 mm. The photo below is an example of such a complex restoration made by a dental technician.

Example of a restoration with a suboptimal eruption profile
If you make a restoration with a very large angle above the platform, the dentist may not accept the work. This is because plaque and food residues are bound to accumulate underneath.
If you make a smoother restoration, the aesthetics will suffer due to the high position of the implant/abutment connection.

Implant images and radiograph of an already placed restoration with a complex eruption profile
The image below shows a better solution with a deep implant placement and a smooth eruption profile.

Deep implant with a smooth eruption profile
As a periodontist, Dr. Marius Steigmann, for example, believes that the choice of implant depth is a purely prosthetic question. Because first of all patients come for their teeth. That is, they need a physiologic and beautiful restoration that is easy to care for. This is easier for both the technician and the prosthodontist if there is a sufficient amount of soft tissue above the impaction platform.
In a previous article in this series, we discussed how the long-term survival prospects of implants are determined by the amount of keratinized gingiva attached. It is the keratinized gingiva that stabilizes the entire soft tissue complex. Despite this, sufficient depth is still needed to develop a stable and healthy gingival cuff.

Gingival cuff around a deeply installed implant
It was Dr. Marius Steigmann who formulated the problem of choice as a perioprosthetic dilemma. That is, the dentist has to choose between two solutions, neither of which is ideal.
On the one hand, by deepening the platform we do not protect the soft tissue from inflammation. On the contrary, the titers of pathogenic bacteria are unusually high with a subcrestal implant installation.
On the other hand, a functional and aesthetic restoration must be created. This is often only possible with deep platform placement.
Finally, let’s look at the findings of two more studies. The first one was made in the USA with a large sample of >350 patients and a 10-year follow-up.

The researchers took X-rays and analyzed the condition of the surrounding tissues. These are their results and conclusions.
Results:
For Bone Level submersible implants, when the convex profile was combined with an angle >30° the prevalence of peri-implantitis was 37.8% with a statistically significant relationship between the teething angle and the teething profile.
Unfortunately, peri-implantitis is not an uncommon condition, especially at advanced gestation.

Example of surrounding tissue problems for a high penetration angle implant
Conclusions:
A teething profile angle greater than 30° is a serious indicator of peri-implantitis risk, and a convex profile poses an additional risk for submerged implants, but not for non-submerged (tissue level) implants.

Different types of abutment profiles and gingival formers
These results confirm that a wide and convex abutment profile above the implant platform provokes inflammation. These are the profiles that have to be used if the implant/abutment connection is high and the gingival thickness is insufficient (less than 3.5 mm).
It is also easy to explain why the angles and profile of the abutment do not matter in the case of tissue level implants. The entire soft tissue complex is already formed at the level of the milled implant neck and it does not matter what is on top of it.
The second study was made in South Korea where the sample was smaller, about 200 patients, and the observation period was 5 years.

The results confirm pretty much everything we parsed earlier.
Results:
A significant correlation was found between eruption angle and marginal bone loss. A statistically higher incidence of peri-implantitis was observed when the penetration angle was ≥ 30°, when the penetration profile was convex and in a mid-implant that was connected both mesially and distally to neighboring implants (for bone level implants). A similar correlation was not observed for tissue level implants. The implant-bronch ratio had no significant effect on the incidence of peri-implantitis.

Visualization of experimental data on bone tissue condition in case of concave and convex suprastructure application
Conclusions:
Implant restorations with excessive contours are a critical local factor influencing the development of peri-implantitis. An implant connected mesially and distally to neighboring implants has a higher risk of peri-implantitis.
Practitioners know that it is the middle implant of several implants that is at the highest risk. This study explains why that it is where the penetration profile has the greatest angles.

Multiple restorations, where the angle of penetration of the restoration and the degree of bone loss in the mid-implant area can be clearly seen
The last two studies that we analyzed show almost identical results, which is great because the reproducibility of an experiment is a sure sign that the published data and conclusions are correct.
How to use the tissue Level milled portion of the implant to your advantage
The last section of this article is devoted to the use of non-submerged tissue level implants with partial immersion of the milled part into the bone. By conception, the platform of these implants should be at the level of soft tissue or slightly lower with a properly formed gingival contour. The height of the milled part in Straumann implants and their analogs is 1.8-2 mm and it is this part that should be above the bone.

Implant placement and soft tissue positioning for non-submerged Tissue Level implants
What if the patient has a very thin gingiva ≤1.8 mm? There is a solution that has been successfully applied. Implants of this type in both thick and thin phenotypes are placed in such a way that the implant platform is not above the soft tissue level. Otherwise, a beautiful and functional restoration cannot be created.

Width of the milled part of the implant of the Tissue level type
For example, if the thickness of the gingival flap is 1 mm, then the implant should be placed so that a portion of the milled cervical enters the bone. Otherwise, we will have an exposed interface, and that is a problem.
Many colleagues reading this realize that in this case we will not get soft tissue integration on the rest of the milled part. The gingival cuff will still free the same 3.2 -3.6 mm for its formation by bone remodeling. This is normal; moreover, in case of such an implant placement we recommend widening the implant hole in the upper part at once. The neck of the tissue level implant has a conical shape, and in the case of a straight well, the cone-shaped part of the implant can press into the edges of the well and create a false sense of good torque. There will then be bone resorption around the neck of the implant, and problems with its stability.
The radiographs below show an example of good work. The patient has been seen for 17 years and the restoration is still doing well. The dentist made a recess with a ball bur during the installation phase to place the implant with a good primary torque.

Features of the subcrestal installation of non-submerged Tissue level implants
There is no need to change the intention of tissue level implants in thin phenotypes, the implant/abutment interface should always be almost at gingival level, or rather recessed 0.5-1 mm below the gingival contour. If the patient has a very thin gingiva, the implant should simply be installed a little lower. During the installation, make sure that the expanding conical part without roughness does not come into contact with the bone. For this purpose, it is necessary to expand in the upper part of the hole.
Of course, if the patient has a gingival flap thickness of 2 or even 3 mm, there is no need to deepen the seating of tissue level implants.
Let’s summarize the subcrestal implant installation and its effect on the soft tissue connection:
- Subcrestal implant installation does not preserve bone. Moreover, the loss of marginal bone is maximized in this case.
- Subcrestal installation does not improve the quality of soft tissue over the implant platform. However, it gives volume for the formation of the gingival cuff above the platform. In case of using a suprastructure with platform switching, it enables the bone loss around the implant body to be minimized. We remind you that we are not talking about the overall bone level, just the implant body is practically not exposed and remains fully integrated into the bone.
- The shape of the suprastructure is critical. It is recommended to use gingiva formers and abutments with a concave profile and an angle of no more than 30°.
We hope you found this article useful. In the next issue, we will summarize all five articles on soft tissue integration.