What are full-arch dental implants?
In this article, we will examine the characteristics of full-arch prosthetics for patients who lack teeth on one or both jaws. The most renowned methods are the patented ‘All-on-4®’ and ‘All-on-6®’ by Nobel Biocare, as well as ‘Pro Arch®’ and ‘Pro Arch TL®’ by Straumann. However, many practitioners implement similar restorations using components by various brands; the number of implants can range significantly, from a cost-effective prosthesis supported by two implants to one supported by six to ten implants. Typically, the treatment of complete edentulism includes the concurrent placement of a prosthesis and implants. If the patient has non-restorable teeth, an immediate implantation protocol is employed. This procedure is complex, requiring a high level of skill from the clinician and quality components for the restoration. We will discuss the criteria that dental implants, abutments, and even clinical screws must satisfy to enhance the prognosis of implant integration and the durability of the full-arch under the prosthesis’s intensive use. It is our belief that every dentist should incorporate these techniques into their practice, ensuring that when a patient searches for ‘full-arch dental implants near me,’ your office or clinic appears in the results.
What is a full-arch bridge on implants?
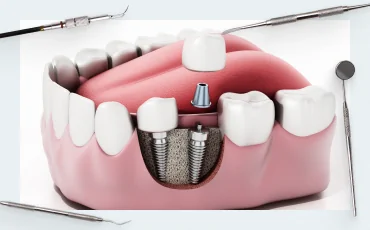
This procedure entails creating a single-piece prosthesis that replaces 10 to 14 teeth and is supported by a variable number of implants. The quantity of implants is contingent upon the patient’s bone tissue quality. Typically, the anterior regions retain a greater volume of bone, adequate for implant placement, whereas the posterior areas exhibit more significant bone loss. This pattern is attributed to the common sequence of tooth loss: molars first, followed by premolars, with anterior teeth enduring the longest. Consequently, the longer the duration since tooth loss, the more pronounced the reduction in the alveolar ridge’s height and width. Protocols for full-arch restorations, supported by either 4 or 6 implants, have been developed specifically for these scenarios. Straumann and Nobel Biocare methodologies share similarities in their overarching logic and surgical protocols, yet they possess distinct differences.
Pro arch® is a protocol applicable for immediate implantation post-extraction of irreparable teeth, as well as for fully edentulous patients who previously utilized a removable denture secured by gum adhesion. The Pro Arch protocol prescribes the placement of four implants: two in the anterior jaw region and two positioned towards the posterior region, often angled to avoid maxillary sinus wall perforation. This strategic placement circumvents bone insufficiency and negates the need for the more intricate sinus lift surgery.

Example of implant installation using Pro Arch and All-on-4 protocols
In the mandible, distal implants are typically placed at an angle. However, in the relatively uncommon instances where there is no bone deficiency in the distal region, the implants may be placed vertically. The ‘All-on-4’ protocol is fundamentally similar to the ‘Pro Arch®’ protocol, with the primary distinction being the specific implants recommended by the manufacturers. Straumann’s Roxolid series, featuring the SLActive surface, is designed for this protocol. The Roxolid alloy boasts the highest strength in its category, allowing for the creation of slender implants without risking fracture at the implant neck. The SLActive surface is purported by the manufacturer to expedite osseointegration, a claim supported by independent research, albeit the effect is modest. The manufacturer asserts that complete osseointegration occurs within 3-4 weeks, compared to the minimum 6 weeks required for titanium implants without such a coating. While these implants are of exceptional quality, their significant cost can be a considerable financial burden for patients.
Nonetheless, both methods share a notable limitation: it is not feasible to replace a full-arch of teeth with only four implants. At best, the prosthesis extends to the first molar, and in individuals with larger jaws, restoration with four implants may only reach the premolars. While the aesthetic outcome may be satisfactory, full masticatory function cannot be completely restored. Hence, both brands offer advanced protocols—’All-on-6®’ and ‘Pro Arch TL®’. These protocols are quite similar, but the prosthesis is supported by six implants instead of four, allowing for a more balanced distribution of load and the restoration of the entire dental arch, including the second molars.
Despite the similarities, Nobel Biocare’s ‘All-on-4/6’ protocols have the added benefit of enabling the use of Zygoma zygomatic implants. These can address severe bone loss in the posterior maxilla, obviating the need for sinus lifting and other bone augmentation procedures.

Zygomatic implants by Nobel
A key aspect of both protocols is the employment of multi-unit abutments, which facilitate a conditionally removable screw-retained prosthesis. While patients themselves cannot detach the prosthesis, it can be removed by a dentist during an appointment for preventive maintenance and hygiene procedures targeting the soft tissues beneath the implant. Despite a precise fit, microparticles of food may infiltrate beneath the prosthesis, leading to plaque accumulation and potentially triggering inflammation in the soft tissues. Consequently, it is advisable to perform preventive cleaning of the prosthesis and hygienic care of the underlying soft tissues at least annually.
It is important to recognize that distinct multi-unit abutments are utilized for straight versus angled implants.

Straight and angled multi-unit abutment by Uniqa Dental


Types of full-arch restorations that can be supported by 4, 6 or more implants
Numerous methods exist for fabricating dental restorations, ranging from self-supporting polymer structures to those reinforced by a metal bar, onto which a temporary and subsequently a permanent prosthesis is affixed.
Temporary prosthetics
While economically advantageous, retrofitting a patient’s existing plastic prosthesis for screw retention is not ideal. Acrylic and PMMA dentures, initially designed for gum suction retention, lack the necessary rigidity to withstand the forces of chewing when anchored to 4 or 6 implants. This limitation restricts patients to soft diets and can lead to discomfort. As such, this method is only viable as a short-term solution, typically for a few days or weeks, until a prosthesis specifically designed for full-arch support on implants is fabricated.
The preferred approach involves placing a temporary prosthesis on multi-unit abutments, followed by the installation of a permanent prosthesis after several months. Screw-retained prostheses are considered conditionally removable; they offer the patient a complete prosthesis experience indistinguishable from cement-retained prostheses. For the clinician, the advantage lies in the ease of removal for replacement or for preventive maintenance of the prosthesis and hygienic care of the soft tissues beneath it. full-arch prostheses can be constructed from various materials using different techniques.
Temporary dentures are commonly made of plastic, with PMMA being the optimal material, extending beyond mere temporary use. Clinical experiences reveal instances where patients retained a PMMA temporary prosthesis, intended for short-term use, for 2-3 years. Such prolonged use led to significant wear and discomfort, necessitating replacement.

Fixation of temporary prosthesis on multi-unit abutments
Permanent prosthetics
Permanent dentures can be either removable or conditionally removable with screw fixation. Removable dentures are typically supported by a bar. Bars can be made of:
- Metal. Common materials include titanium and cobalt-chrome, among other alloys. Traditionally, bars could be cast, but with the advent of CAD/CAM technologies, metal bars are now more frequently precision-milled using CNC machines.
- Zirconium dioxide is highly durable and possesses a natural white color, which is aesthetically advantageous for dental prosthetics.
IMPORTANT! The bar can:
- Replace abutments
- Be connected to abutments permanently or using locks, ball attachments, etc.
- Be attached to multi-units, in which case the bar itself becomes conditionally removable
Removable dentures supported by a bar
Systems for attaching a prosthesis to a bar:
- Locking Mechanisms: The prosthesis is secured onto a metal framework. Retentive elements, known as ‘males,’ are integrated into the framework. Corresponding ‘matrices’ are attached to these elements and engage with the ‘locks’ on the bar through a snapping mechanism. The bar itself is fixed and is not designed to be removable or conditionally removable. Locks are available in various designs and configurations.
.
Acrylic prosthesis attached with locks
.
- Ball Attachments: These refer to spherical joints used for securing the prosthesis to a bar.
- 3. Locator-Type Cylindrical Connections: This system includes both individual abutments with such connections and specialized interface designs for affixing the prosthesis to a bar.

Removable reinforced acrylic prosthesis fixed to a bar with locators
Design features of prostheses that are fixed to a bar
Dentures can be made in several ways:
- One-Piece Restorations: These are milled from zirconia and can undergo additional processing to achieve a more natural color that mimics the enamel of the patient’s natural teeth.
- Metal Framework: This can be veneered with:
- PMMA plastic
- Ceramics
- Zirconium
A combination of materials can also be used for the framework’s cladding.
How to make bars to secure dentures
- Casting Bars: Historically, casting was the predominant method for creating bars. To prepare for casting, one may utilize a castable abutment or UCLA titanium base, both of which are made of ash-free plastic. These components can be merged with wax to form a mold for the bar casting process.
- Milled Bars: When a bar serves as a substitute for abutments, meaning it is affixed directly to the implants, precision is paramount. Milling machines are preferred for their accuracy, as casting can introduce certain errors. However, the ‘UCLA titanium base’ remains a dependable choice for bar fabrication. It includes a metal segment with a platform interface that ensures a precise connection to the implant.
 And Ucla Titanium Base (Right - Titanium Interface + Ashless Plastic)")
Castable abutment (left – ashless plastic) and UCLA titanium base (right – titanium interface + ashless plastic)


Removable dentures that are attached without a bar to special abutments (Locator or ball attachments)
It is also a common practice for removable dentures to be supported by abutments without the use of a bar. A metal-reinforced full-arch prosthesis typically provides adequate strength. Specialized abutments equipped with ball attachments or locators are inserted into the implants, and the denture is secured to these as demonstrated in the illustration below. For a more comprehensive understanding of these types of abutments, please refer to the overdentures section on our website.

All-on-4 restoration supported by ball attachments
But all removable dentures have significant disadvantages:
- Fixation Instability: The primary drawback of prostheses attached to ball attachments and locators is their potential to dislodge unexpectedly during use. As a person alternates chewing between the right and left sides, the prosthesis may shift from the matrices (silicone liners) and detach from the clasps. With a bar-supported denture, dislodgement is less frequent due to more even load distribution.
- Flexibility and Discomfort: The matrices introduce a degree of flexibility during mastication, causing the entire prosthesis to press against the gums before returning to position. This can result in discomfort and potentially lead to inflammatory gum diseases.
- Material Durability: The materials used for removable connections require meticulous hygiene, tend to wear out more rapidly, and are less tolerant of high temperatures.
The optimal solution and current gold standard is screw fixation onto multi-unit abutments. A conditionally removable prosthesis secured on four implants offers greater stability, a snugger gum fit, and crucially, immobility. Additionally, the precision of CAD/CAM technology enhances the manufacturing accuracy of the prosthesis, ensuring an excellent passive fit.
Conditionally removable full-arch prosthetics (on multi-units)
Let’s start with the advantages of this type of fixation:
- The denture is secure, remains in place, and restores chewing function to a full extent, unlike removable dentures.
- The prosthesis can be detached in a dental clinic for thorough cleaning and professional hygiene procedures, which is not an option for cement-fixed dentures.
- The design ensures stability and a load on the joints that is as close to natural as possible.
- Typically, more robust materials such as zirconium, metal, or ceramics are used. These materials are more resilient and better restore chewing function compared to acrylic, which is commonly used for removable dentures.
- he prosthetics offer superior aesthetics, closely resembling natural teeth, except in rare instances where the screw shafts exit buccally.
- A variety of material combinations are available to create a strong, hypoallergenic, and long-lasting prosthesis.
Varieties of materials and technologies to manufacture prostheses for screw fixation on multi-unit abutments
- Zirconium Prosthesis Without Metal Frame Reinforcement: This is a one-piece prosthesis milled on a CNC machine. There are several manufacturing options available:
- The Classic Method: This involves gluing sleeves into the structure and attaching the prosthesis to multi-units with screws. The accompanying image illustrates an all-zirconium prosthesis with screw fixation on multi-units.

Screw-fixed prosthesis on multi-units with glued titanium sleeves
- In this method, sleeves are omitted, and the prosthesis is directly attached to multi-units, fixed solely with screws. Typically, conical Rosen screws or screws employing a similar principle for fastening and load distribution are utilized. The image depicts an all-zirconium prosthesis that is directly attached to multi-units using Rosen screws.


Prosthesis for fixation with tapered screws without sleeves
The ability to affix the prosthesis without sleeves enables the creation of thinner prostheses.
This is particularly crucial when the space between the abutment and the opposing tooth is
less than 7 millimeters.
- Reinforced dentures are also still common and functional. Several manufacturing options are possible:
- Zirconium prosthesis with metal reinforcement: to manufacture a metal frame for screw fixation, one can utilize a castable sleeve with the casting method or employ digital libraries for the CAD/CAM method
- Metal frame with ceramic lining
- Reinforcing frame with crowns (ceramic or zirconium)

Reinforced prostheses coated with zirconium dioxide
Options for cladding zirconium frames:
- Full zirconia frame with ceramic veneer: The entire bridge is milled from a block of zirconia, and ceramic is applied to veneer the crowns. This can be done around the entire perimeter or limited to the anterior teeth area for aesthetic purposes.

Zirconium dioxide prosthesis lined with ceramics
- Zirconium frame with ceramic crowns Pressed ceramic crowns are typically used on the front teeth to enhance aesthetics. For posterior teeth, which require more strength, zirconium remains material of choice.

Zirconium dioxide frame for partial ceramic coating in the aesthetic zone
- Zirconium frame with zirconium crowns: This option is similar to the previous one, except that the crowns are also made of zirconium dioxide, offering a uniform material throughout.

Zirconium frame with zirconium crowns
- Metal-ceramic restorations were once considered the gold standard, they are now gradually giving way to zirconium prostheses. Despite this shift, metal-ceramic restorations remain in use due to their excellent aesthetic results and cost-effectiveness compared to zirconium. Essentially, these restorations consist of a metal frame lined with ceramic. The frame can be installed using several methods:
- The frame serves as a replacement for the abutments and bar
- The frame is cemented onto the bar
- The frame is attached directly to the abutments
For metal-ceramic prostheses, the frame can either be cast or milled. A cast frame may utilize a castable abutment or a UCLA titanium base. For a milled frame, digital libraries with representations of implants and abutments are sufficient.

Cast metal frame for ceramic cladding
Metal-ceramic restorations offer a range of variations to accommodate the clinical situation, patient preferences, and financial considerations. For instance:
- Imitation of gums on parts of the frame, typically achieved by applying ceramics or acrylic
- Metal-ceramic crowns that are cemented onto the metal frame
Advantages and disadvantages of full-arch dental implants
Let’s start with the advantages and indications. Indications for full-arch restoration are:
- Complete edentulism: The absence of all teeth on one or both jaws
- Irreparable damaged or loose teeth
- Advanced periodontitis or periodontal disease: Especially when there are very few teeth remaining and the prognosis for treating these conditions is poor
- Moderate bone tissue atrophy in the lateral sections: This allows for the angled placement of implants.
- Narrow alveolar ridge: This condition may necessitate guided bone regeneration surgery.
The advantages of the full-arch protocol, with the simultaneous placement of implants and immediate fitting of a full-arch prosthesis, include:
- Patient Convenience: Patients can leave with new teeth on the day of surgery, resulting in a single postoperative period and reduced risk of complications.
- Bone Preservation: The need for surgeries to augment bone volume is eliminated by placing a minimal number of implants and using multi-unit abutments, thus avoiding sinus lifts. Osseointegration is more effective and quicker when implants are placed directly into the bone without the need for directed bone regeneration. Operations always carry risks, with sinus lift procedures posing a particularly high risk of complications.
- Ease of Adaptation: Patients can quickly and easily adapt to their new prosthesis.
- Professional Demand: Dentists skilled in restoring Full-arches supported by implants are in demand, as many patients are aware of techniques like All-on-4 and seek out specialists who offer these services.
However, there are contraindications and disadvantages to the technique of simultaneous implantation with immediate loading for dentition restoration. Let’s start with the contraindications:
- Uncontrolled diabetes mellitus with high and unstable blood sugar levels
- Alveolar ridge resorption that precludes implant placement even with the All-on-4 approach
- Severe central nervous system disorders
- Systemic connective tissue diseases
- Significant cardiovascular and endocrine diseases
Disadvantages of full-arch prosthetics with implant support according to the All-on-4 protocols include:
- Specialized Skills: Implant placement requires special skills and experience due to the high risk of maxillary sinus perforation or the placement of an implant with insufficient torque (less than 30 Ncm), which does not provide the necessary primary stability for immediate loading. Surgical templates can mitigate the risk of incorrect implant positioning by preventing deviations in angle, entry point, and drilling depth. These templates are created based on preparatory data, including the length and diameter of the implants, as well as their position in the patient’s jaws.
- Numerous Contraindications: Despite the convenience, there are significant contraindications to consider.
- Initial Structural Strength: The strength of the structure in the initial phase is lower compared to the protocol of fitting a prosthesis on already integrated implants.
- Cost Considerations: The requirement to create two prostheses, a temporary one followed by a permanent one, may be financially burdensome for the patient.
What implants and abutments can be used for full-arch protocols
Many manufacturers produce sets and individual types of implants tailored for full-arch techniques or specifically for All-on-4/6 protocols. While there is no prohibition against replicating the protocol using third-party components, companies that have patented their protocols assert that the best results are achieved using their own implants and superstructures. Fundamentally, the technique does not—and cannot—exhibit any significant differences from the standard protocol for dental implant installation since the healing and osseointegration processes adhere to the same principles.
As an illustration, consider the composition of the packages offered by Uniqa Dental for full-arch protocols in general, and specifically for All-on-4® and All-on-6®, which are also compatible with Pro Arch® technique-based protocols.
1. Implants with an aggressive thread profile are particularly crucial when placing implants in the socket of a newly extracted tooth. This implantation method ensures primary stability, provided by 3-4 mm of the implant tip that fits snugly within the bone tissue. The diameter and length of the implants are selected based on the clinical situation and are contingent upon the patient’s anatomical features and the condition of the bone tissue.

Implants for conical interface by Uniqa Dental

Uniqa Dental implant thread profile shape
2. Multi-unit abutments are selected based on the height of the soft tissue present above the bone at the time of implantation. Choosing the right multi-unit abutments is crucial for achieving optimal results in full-arch cases. A typical All-on-4 procedure typically involves two straight implants and two angled implants for the upper jaw. In contrast, the lower jaw may require either the same configuration or four straight implants. The types of multi-unit abutments suitable for these protocols are depicted in the illustration below.

Multi-unit abutments for screw fixation of prosthesis by Uniqa Dental
3. Healing caps for multi-unit abutments. The distinctive feature of these healing caps is that they are designed to be attached to a multi-unit abutment, which is installed into the implant immediately after implantation. Subsequently, the healing cap is affixed to the abutment.

Titanium healing cap for MUA by Uniqa Dental
This approach reduces the incidence of gingival collar trauma that typically occurs after the removal and reinsertion of the healing cap. In instances where a traditional gingival abutment is installed at the implant level, the collagen portion of the cuff may be partially damaged upon removal. However, with a multi-unit abutment, the removal of the healing cap impacts only the epithelial attachment. Although full-arch protocols necessitate the immediate placement of the prosthesis, healing abutments can still be utilized when some implants are placed following a delayed loading protocol. For instance, to enable the patient to leave with teeth on the day of surgery, a temporary prosthesis supported by four, or even two, implants is fabricated, and healing caps are installed on the implants in the masticatory area.
4. Sleeves for temporary dentures on multi-unit abutments. In the initial months post-implantation, patients are provided with a lightweight temporary prosthesis that exerts minimal stress on the implants. To secure these prostheses, specialized sleeves are employed. These sleeves are inserted into the prosthesis and are then ground down at the screw shaft exit points to the required height. Subsequently, the screw shafts are encapsulated with a composite material. Uniqa Dental’s digital libraries also include 3D models of sleeves for temporary dentures, enabling the precise modeling of future PMMA milled prostheses in CAD programs.

Sleeve for temporary dentures by Uniqa Dental
5. Sleeves for multi-unit abutments for permanent dentures various modifications. The first type has a 12 mm length and is ground at the screw shaft exits. The second type features a yellow coating and a 4 mm height, ideal for situations where the sleeve is near the prosthesis’s outer wall; the yellow hue minimizes the visibility of gray titanium through the ceramic layer of the prosthesis. Both sleeve types are compatible with CAD/CAM prosthesis development systems and are represented by digital images in the library. Uniqa Dental grants all clients access to a digital library containing images of all components that are CAD/CAM compatible.

Sleeves for permanent dentures on multi-unit abutments by Uniqa Dental
6. Scan abutments beneath multi-unit abutments play a crucial role in accurately conveying the position and angle of the implants. Initially, multi-unit abutments are positioned to support the prosthesis. Scanning caps are then attached to these abutments, followed by the specialist capturing images with an intraoral scanner. This process generates digital files that precisely map the location of implants and abutments, which can be overlaid onto pre-existing CBCT images. Consequently, this facilitates the creation of a highly accurate digital model. Direct imaging at the implant level is generally avoided when using multi-unit abutments, as aligning the abutments’ relative positions in the virtual model to ensure the structure fits correctly onto the implants is nearly impossible. Therefore, multi-unit abutments are first installed in a fixed position before the prosthesis is designed.

Multi-Unit Scan Body level D-type H6
7. Digital analogues: Digital analogues are used for implants with and without multi-unit abutments for placement in physical models of the jaw. To develop and fit the prosthesis accurately, a 3D-printed model of the patient’s jaw is utilized. Into this model, implant analogues are installed, replicating the precise location of the actual implant within the patient’s oral cavity. The illustration below demonstrates a single component that simulates an implant with a straight abutment installed.

Digital analog multi-unit abutment D-type
It is also feasible to employ a two-component system: an implant analogue and either an angled or straight multi-unit abutment. These components are installed in the interface, mirroring the exact position as their counterparts in the patient’s oral cavity. The illustration below depicts an implant analogue for CAD/CAM systems, featuring an interface for an internal hexagon.

Digital implant analog Conical Connection
As previously noted, the rapid production of dentures in digital dentistry relies heavily on digital representations of all components, including implants, abutments, sleeves, screws, and implant analogues. Uniqa Dental provides access to electronic libraries that house all these components in 3D file formats, compatible with CAM/CAD technologies.


Full-arch bridge on implants: operation sequence
While practical guidelines for doctors on the immediate implantation protocol are provided in other articles, this section will focus on the general structure to highlight the importance of each stage.
Preparation and planning of the operation
1. Be sure to obtain 3D models of the patient’s jaws. It is essential to obtain and merge digital models derived from cone beam computed tomography (CBCT) data with optical data captured using an intraoral scanner. Several robust software packages are available for processing data, from converting a series of CBCT images into a 3D file to modeling prostheses. Among the most renowned and user-friendly are Exocad, Shape 3D, and Dental Wings. Equally important is the photographic documentation that captures the condition of the soft tissues and any remaining teeth.

3D jaw model based on high definition CBCT
2. Next, the specialist must plan the implant locations and create a primary model of the dentition. It is crucial that the screw shaft exits are positioned on the interior side of the prosthesis, as depicted in the illustration provided. At this juncture, having precise digital images of all implants, screws, and abutments is vital for their accurate placement within the virtual jaw model. Digital images of these components can be obtained from the Uniqa Dental library, as previously mentioned.

Planning the placement of implants considering the exit points of the screw shafts
3. After selecting the appropriate implants and planning their positions, it is necessary to create a navigation template, also known as a surgical template. This template is essential for installing the implants precisely according to the virtual diagram and at the correct angles.

Navigation template for installing 6 implants
Prior to implant installation, a temporary prosthesis is crafted to ensure it can be fitted immediately afterwards. This enables the patient to leave with a new smile on the same day as the surgery. The development of a prosthesis is particularly challenging in cases of complete edentulism, where there are no opposing teeth to serve as a reference for a “mirror” prosthesis. Both arches must be constructed from the ground up, ensuring not only the alignment of the central incisors but also the harmonious function of the jaw joints, an accurate bite, and full restoration of the patient’s masticatory ability. CAD technology facilitates the use of dynamic occlusion data and, with a virtual articulator, allows for the prediction of necessary adjustments, such as in cases of temporomandibular joint dysfunction. The color shade and shape of the anterior teeth are customized to the patient’s preference. The pinnacle of prosthetic expertise is creating a prosthesis without artificial gums, although this is contingent on the patient’s soft tissue condition and may not always be feasible.
As noted, the temporary prosthesis may be shortened to rest on four implants while additional implants in the posterior regions undergo osseointegration. Implants in the masticatory areas are often placed concurrently with guided bone regeneration procedures. Patients are generally understanding when informed that an incomplete denture is a temporary measure, and they are willing to wait the necessary 4-6 months for full integration. Subsequently, a complete and permanent denture is provided, restoring 100% of chewing function.
4. The surgical (navigation) template and temporary prosthesis are examined and adjusted as needed on either a plaster or 3D-printed model of the jaw. Both models, with restorations in place, must be verified within an articulator for accuracy.

Dental articulator
Installation of implants and temporary prosthesis
The procedure varies depending on the initial clinical situation. For patients who have been edentulous for an extended period, the operation is relatively straightforward.
- Setting up a navigation template. To maintain gum volume, it is advised to perforate the soft tissue at the implantation sites rather than peeling back the gums. Mastery of this technique is recommended for consistently positive outcomes.
- The predetermined number of implants are placed using the navigation template.
- The template is removed following implant placement.
- The temporary prosthesis is affixed to multi-unit abutments, and the screw shafts are sealed with composite. The postoperative phase then commences, during which the patient undergoes regular check-ups to ensure complication-free healing.
- New data must be gathered using an intraoral scanner to create the permanent prosthesis. Post-implantation changes in soft tissue conditions can lead to inaccuracies in a prosthesis designed solely in a virtual environment, such as an off-center midline. The process involves several steps:
- The temporary prosthesis is removed, and images are captured without the prosthesis and scanning heads to evaluate the soft tissue condition. Although the illustration may depict the preparation for a partial denture, the underlying principles apply equally to full-arch dentures.

An example of recording the condition of the jaw with an intraoral scanner
- Scanning caps are placed on the multi-unit abutments, and a subsequent survey is conducted to determine the angles of inclination of the abutments and the central axis of the screw shafts.


Shooting with an intraoral scanner at the level of multi-unit abutments
- The collected data is then transformed into 3D files, which serve as the basis for modeling a permanent prosthesis. Various software packages, chosen based on the specialist’s preference, facilitate this process.

3D model of a full-arch restoration
- The procedures that follow mirror those previously outlined, including the verification of prostheses on a virtual articulator and making necessary corrections.
- Physical models of the jaws are crafted for testing and fitting purposes.
- The prosthesis is made using one of the previously described methods.
- Next, analogues of the implants are placed in the jaw model, and the dentures are affixed in the precise position they will occupy in the patient’s oral cavity, as illustrated below.

- The complete assembly is evaluated on a physical articulator. If all components are correctly aligned, the prosthesis is finalized for installation. The prosthetic gum portion is painted, and the crowns may undergo color adjustments with a ceramic layer.
- The fully finished prosthesis is fitted onto the patient, followed by periodic preventive check-ups and maintenance.
The process is more complex when the operation includes simultaneous tooth extraction.
- Teeth Extraction Using an Atraumatic Protocol: It is crucial to preserve the integrity of the soft tissues. This involves performing a circular incision of the gingival cuff with a 15c blade and carefully extracting the teeth to avoid damaging the bone, particularly the anterior wall of the alveolar socket.
- Navigation Template Installation and Preparation for Implants: The navigation template is set in place, and preparations are made for implant installation. The immediate implantation protocol post-tooth extraction requires the implant to be embedded into the cancellous bone by 3-4 mm, which typically ensures adequate primary stability.
- Bone Grafting Post-Template Removal: Once the navigation template is removed, the gap between the implant and the socket wall, composed of cortical bone, is filled with a bone graft. This graft material can be harvested by drilling into the patient’s own bone. If the quantity of autogenous bone chips is insufficient, xenogeneic (animal-origin) bone material is added. In cases where the patient has a thin biotype, it is necessary to place a subepithelial connective tissue graft to prevent significant gum recession, which is crucial even when using a prosthesis with artificial gums.
 Installation Process")
SCTG (Subepithelial Connective Tissue Graft) Installation Process
The abutments and temporary prosthesis are installed following the same procedure as outlined previously.
Subsequent to the procedure, the patient requires regular monitoring during the initial days and weeks. A regimen of antibiotics and analgesics is prescribed to facilitate the healing of the soft tissues. After a period of 4-6 months, a permanent prosthesis is fitted.
We hope that this article has been informative for those seeking to expand their knowledge on the full-arch immediate-load prosthetic protocol. Until next publications.