Implantation for Beginners. Part One: How to Choose Implants, Instruments, Preparation and Planning
Implantation for Beginners. Part One: How to Choose Implants, Instruments, Preparation and Planning
How thread shape, implant body, and coil arrangement affect primary implant stability
Simplicity of surgical protocol – why it is especially important early in your career
What should a surgical kit be like?
How important is the size range when choosing an implant system?
In this article, we will analyze the most important points of choosing an implant system and briefly touch upon the criteria for successful implantation. We already have an article An Introduction to Implantology with a description of the process of working with a patient from the initial examination and photo to the placement of the restoration, and it is very popular. This article does not repeat the previous one, except for some points that cannot be ignored. Here we delve into the subtleties and nuances. We will learn to understand, based on the shape and characteristics, which implant to choose for a specific clinical case. And of course, we will touch upon the superstructure (abutment and restoration).

Why there are no ideal implants for all clinical cases, and what to do if you want to find a universal option
At the time of this writing, there are over 2,000 implant systems approved and cleared for use. Not all of them are available in the United States, but the number is still impressive.
They differ:
- By shape: conical with different convergence angles, cylindrical, etc.
- By type of surface treatment: mechanical treatment, acid etching, and their combinations
- By materials: titanium alloys (Grade 4, 5, 23), zirconium, and rather rare options from bioglass and hydroxyapatite
- With aggressive or non-aggressive threads, with a polished or unpolished neck, may also have microthreads.
However, at the start of a career, it is not necessary to understand all this variety. In most cases, titanium implants with a modified surface are used; the shape is most often conical to one degree or another.
It is more important to know for which bone type certain implants are best suited. Therefore, we have formulated a list of criteria that will facilitate the choice for a specific clinical situation.
These criteria were created based on a multitude of errors that led to restoration failures and implant losses. The issue here is not only the choice of implants but also errors associated with implant placement, the method of retaining the restoration, and load distribution. Therefore, we will consider the issue comprehensively.
For example, this was once an esthetic, functional restoration and was in the patient’s mouth. However, after some time, it ended up in another doctor’s tray.

Signs of inflammation and loss of integration with the bone on the implants: granulation on the body of the implants; the restoration was relatively easily removed along with the implants YouTube / Dr. Kamil Khabiev / Dental Guru Academy
All implants are covered with granulation, which indicates an inflammatory process that has affected all implants. The patient will have to go through a fairly long period of rehabilitation, associated with pain and discomfort.
Another lost restoration; here, the cause of the inflammatory process was cement that came out from under the crown and provoked an inflammatory process and, as a result, the loss of the implant.

Lost restoration due to uncleaned cement residues at the border of the crown and implant
And another example, when the implant was lost before the restoration was completed.

Crack in the implant during placement YouTube / Dr. Kamil Khabiev / Dental Guru Academy
The reason is that the surgeon did not widen the bed enough, perhaps made a mistake in determining the bone density. As a result, the implant was placed with too much torque and did not hold up.
But enough about the sad stuff; look at an example of a successful choice and distribution of implants. The restoration lasted 14 years. And even despite the fact that there are huge cantilevers on the lower jaw, the bone tissue is in an acceptable condition. The upper jaw consists of three bridges, and this is the optimal solution today. Why restoration of a full row of teeth on 10 implants is good, we wrote in detail in the article about planning implant-supported restorations.

An imperfect, but working restoration that lasted 14 years: placed in 2006, and the photo was taken in 2020 YouTube / Dr. Kamil Khabiev / Dental Guru Academy
During the entire period of use, a tightening screw broke in one of the lower jaw implants, which was the reason for contacting the dentist. The screw was successfully replaced, and the restoration was put in place.
Let’s finally move on to the criteria for choosing implants:
Ability to use with any bone density. This is the most common classification of 4 bone types, from D1 to D4. This classification determines the quantitative and qualitative ratio of cortical and trabecular (spongy) bone in a certain area; see the illustration below.
 + Dense Fine-Mesh Trabecular Bone; D2 Optimal Thickness Of Cortical Bone (1.5-2Mm) + Dense Spongy Bone; D3 Cortical Layer About (1-1.3Mm) + Large-Mesh Spongy Bone Of Medium Density; D4 Very Thin Cortical Layer (Less Than 1Mm) + Loose Spongy Bone. Youtube / Dr. Kamil Khabiev / Dental Guru Academy")
Four types of bone by density: D1 very thick cortical layer (2-3mm sometimes more) + dense fine-mesh trabecular bone; D2 optimal thickness of cortical bone (1.5-2mm) + dense spongy bone; D3 cortical layer about (1-1.3mm) + large-mesh spongy bone of medium density; D4 very thin cortical layer (less than 1mm) + loose spongy bone. YouTube / Dr. Kamil Khabiev / Dental Guru Academy
Depending on the bone type, implants with different types of threads are needed; the softer the bone, the wider and more aggressive the thread should be. The implant should cut deeply into the spongy bone, and the larger the bone contact area, the better. Conversely, it will be very difficult to place an implant with an aggressive thread in dense bone, and if you do it by force, the wide turns of the aggressive thread will crush the trabeculae and injure the bone, which can lead to necrosis or the formation of a layer of fibrous tissue instead of direct integration of bone tissue. This is so-called fibrointegration, and the implant will have to be removed.
However, the problem is that the bone type can be determined very approximately from CT scans. And everything becomes clear only when drilling begins. The table below contains a description that will help the surgeon determine the bone type at the beginning of the preparation of the implant site.
| Bone type | Description | Tactile analogue | Picture while drilling |
| D1 | Hard dense cortical bone with almost no trabecular bone | Oak, plywood | White shavings without blood |
| D2 | Porous cortical + dense trabecular | Pine, birch | White shavings with blood |
| D3 | Thin porous cortical + porous trabecular | chipboard | Red shavings |
| D4 | Almost no cortical + porous trabecular | Polystyrene | There are practically no shavings; the bone is crushed under the action of the bur. |
And the next illustration shows approximately the distribution of bone types in patients’ jaws. The upper jaw bone is always softer, but it has a better blood supply, which is good for the healing process.

Approximate localization of bone types of the upper and lower jaws of an average patient with edentulism YouTube / Dr. Kamil Khabiev / Dental Guru Academy
Accordingly, implants with a non-aggressive thread profile are better suited for the lower jaw. On the contrary, implants with an aggressive profile and wide thread blades are better suited for the upper jaw.
Now the question is, is it possible to find implants that can be placed in both dense and loose bone and in both cases achieve sufficient primary stability?
And yes, it is possible. The left slide shows a case study on implants with non-aggressive threads and narrow blades, which were successfully placed with good primary stability in both the lower and upper jaws.
; Conical Implant With Very Aggressive Thread And Wide Blades (Right); Combined Variant In The Center At The Bottom The Thread Profile Is Aggressive, But As It Moves Towards The Top The Profile Evens Out Youtube / Dr. Kamil Khabiev / Dental Guru Academy")
Implant variants with different thread types: non-aggressive profile with smooth blades along the entire length (left); conical implant with very aggressive thread and wide blades (right); combined variant in the center at the bottom the thread profile is aggressive, but as it moves towards the top the profile evens out YouTube / Dr. Kamil Khabiev / Dental Guru Academy
The right slide shows successfully placed implants with aggressive threads with wide and narrow blades. Moreover, they were also successfully placed on the upper and lower jaws.
The most interesting is the third type of implant, which is shown in the center of the illustration. A combined thread profile is used here. The tip of the implant has a conical shape with sharp blades that cut into the bone and are securely retained even in soft bone or in the socket after tooth extraction (the case of immediate implantation). However, even in conditions of working with D1-D2 bone, the sharp thread at the end facilitates the placement of the implant.
Each subsequent turn is wider and thicker than the previous one; thus, the bone is gradually compressed, compacted, and the total area of contact between titanium and bone increases.

Visualization of the combined thread of Uniqa Dental implants from a sharp and aggressive tip to a smooth and wide thread closer to the neck of the implant
Also, note the wide inter-thread zone, which promotes angiogenesis even in dense bone types where vascularization and blood supply are poorly developed.

Shape of the thread blades and inter-thread space on Uniqa Dental implants
In general, the main requirement for a universal implant is sufficient primary stability in all types of bone.
And all the implant variants that claim to be universal have something in common. This is a combined conical-cylindrical implant design, that is, the implant body has a clearly defined conical shape, and if you look at the thread blades, they go almost without taper, that is, cylindrical, see the illustration below.

Combined design of implant shape and thread
This shape allows implants without aggressive threads to be securely retained in the cortical bone layer of types D1, D2 due to the expansion in the upper part. The same conical shape of the implant body with aggressive threads with wide blades also helps to hold on in the soft bone type D3, D4, due to the compaction of the trabeculae when the conical body of the implant is immersed in the osteotomy.
However, a universal solution is not the same as an ideal one, and what works in 80% of cases may not be suitable at all in the remaining 20%.
Therefore, do not forget the formula: loose bone – aggressive thread; dense bone – non-aggressive thread with a low profile. And there is nothing wrong with using different implant systems on the patient’s upper and lower jaw.

An example of using implants of different shapes and threads on the lower and upper jaws of a patient YouTube / Dr. Kamil Khabiev / Dental Guru Academy
How to determine primary implant stability – why it is so important for the success of the restoration
If the implant is motionless immediately after placement and can even withstand the mechanical load from chewing movements, this is an excellent indicator.
The word “primary” is used because the healing and osseointegration processes have not yet begun, which means that the stability of the implant is achieved only due to the frictional force of the body between the implant and the bone tissue.
After some time, secondary stability is achieved, which is determined by biological factors. Namely, osteocytes grow to the titanium surface and complete osseointegration occurs.
The ability to withstand loads with primary and secondary stability of the implant is almost the same; however, approximately in the middle of the healing period from 2 to 5 weeks, a dangerous period of subsidence in the overall stability of the implant occurs, when, due to bone remodeling, the primary stability weakens, and the secondary has still gained maximum values. Below is a graph that clearly shows this process; the black arrow indicates that secondary stability reaches 50% approximately at the 5th week after implant placement and then grows. This is important for determining the period of early implant loading.

Implant stability: the relationship between primary and secondary stability over time Implantarium/Rauf Aliyev
However, now we are only interested in primary stability, which largely depends on the torque during implant placement.

Torque at which primary implant stability is acquired YouTube / Dr. Kamil Khabiev / Dental Guru Academy
Let’s make it clear right away: the torque during implant placement is only an indirect and not always reliable indicator. However, it is easy to measure, and if the torque during implant placement was insignificant, then there can be no talk of good primary stability. Errors can occur in cases where, at first glance, the torque is within normal limits, but in fact the implant does not withstand the applied load and shifts or rotates.
Therefore, in one-stage implantation protocols, especially with immediate loading, it is necessary to check the primary stability using a more accurate method. Most often, this is a resonance frequency analyzer, which gives the value of the implant stability quotient (ISQ). And if this parameter is 70 or more, then prosthetics can be done. However, immediate loading on the implant is the responsibility of experienced implantologists, so we will not dwell on it in detail, but we will figure out how to determine whether the implantation was successful based on the torque value, although not very accurately.
The gold standard is a torque value of 50 Ncm. It is believed that a torque of about 50 Ncm provides excellent primary stability and does not cause excessive trauma to bone tissue. But in reality, the torque does not always fall within the optimal value, so below is a table indicating possible options for action.
| Placement torque, Ncm | Possible actions | Prognosis |
| 0-10 | Replacement of the implant with replacement with a larger diameter, which will be placed with a larger torque; in extreme cases, it can be preserved by placing a cover screw and suturing the soft tissues | Poor (if the implant is not replaced) |
| 10-30 | Just placing a cover screw and suturing it tightly | Good |
| 30-40 | Placement of a healing cap is possible | Great |
| 40-50 | Any option is possible: placement of a temporary or permanent abutment + temporary prosthesis, as well as placement of a healing cap or cover screw | Excellent, but if immediate loading is expected, it is necessary to check the primary stability using the resonance frequency method |
| More than 60 | The implant must be removed, the osteotomy expanded, and a new implant placed with a torque of no more than 50 Ncm. | Poor (if the implant is not replaced) |
How thread shape, implant body, and coil arrangement affect primary implant stability
In addition to the blade width, thread angle, and profile, the double thread on the implant body increases primary stability. In addition, such implants are quicker and easier to insert even into a very dense bone.

The principle of double threading using Uniqa Dental implant as an example
In addition to double threads, there are often small notches on the implant neck, and even quad-threads of four independent turns are found there. Such notches on the implant neck improve contact in the cortical layer and even compensate for the decrease in friction between the bone and the body of the implant with a reverse cone.
In general, the shape of the implant neck is also an important criterion for choosing a universal implant. For example, implants from Uniqa Dental have a reverse cone in the neck area, which provides a number of advantages both in the long term and at the stage of implant placement.

The principle of contact between bone structures and the implant neck with a reverse cone: first, the implant body presses and pushes apart the cortical bone layer, which has some elasticity even in type D1, and then the cortical bone closes around the implant neck; the pressure of the bone layer is sufficient to ensure mechanical stability, but it is not excessive and does not cause bone tissue resorption
Let’s look into this in more detail:
- The reverse cone reduces stress in the cortical layer. This reduces the degree of bone resorption around the implant neck in the first 12 months after implant placement. A logical question arises: what about the reduction in primary stability, since many manufacturers emphasize that a conical implant provides primary stability precisely due to tight contact at the level of the cortical layer? Yes, indeed, purely mechanical contact of the implant without a reverse cone in the cortical bone is better. However, if we have a D1-D2 bone, then the retention will be quite rigid even with a reverse cone, and the primary stability will remain high. If the bone is loose D3-D4, the mechanical contact is provided by the spongy bone; the cortical layer is too weak to have a noticeable effect on the primary stability. There may be a slight reduction in primary stability with reverse taper implants, and not in every clinical case, but this is offset by the other advantages of the reverse taper in the long term.
- The smaller diameter of the transition between the implant and the abutment minimizes micro-movements of the entire structure. This allows to preserve a larger volume of marginal bone, which is important in the long term.
- With this implant shape and a properly selected abutment, it is easier to ensure platform switching, i.e., we get more space for the soft tissue attachment. And this also allows to preserve the bone around the implant, because it has long been known that if the body is not given enough space to form a gingival cuff, it will free up this space by dissolving part of the soft tissue.
- If the reverse cone is combined with a conical abutment interface, the retention is more stable without the risk of loosening and the so-called pumping effect, when biological fluids are pumped into the implant. This is especially important for screw-retained prostheses.
Simplicity of surgical protocol – why it is especially important early in your career
Everything is logical here, the fewer features and nuances that need to be taken into account, the lower the risk of errors. To better understand this, let’s turn to history. Once upon a time, the surgical protocol looked like this. Agree, even for perception, the table is quite difficult.

An example of one of the early versions of the surgical protocol for dental implant placement YouTube / Dr. Kamil Khabiev / Dental Guru Academy
There is an article with videos dedicated to this on our website – Dental implant placement protocols by Uniqa Dental. You can look and see how simple and logical this protocol is. However, this is normal; the protocols for implant placement from most manufacturers have become simpler than they were at the dawn of dental implantology. The following illustration shows one of the protocol options for an implant 10 mm long and 4 mm in diameter. As you can see, everything is simple and clear.

It is correct to select an implant system with a simple placement protocol, but simplifying it yourself and deviating from the protocol recommended by the manufacturer is not, at least at the beginning of your career.
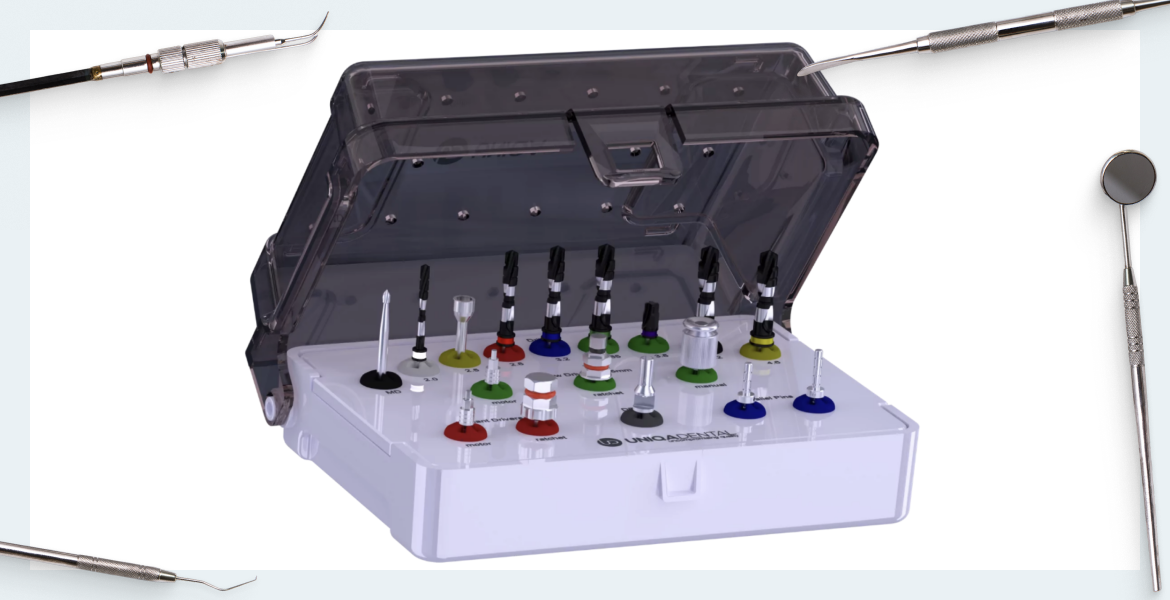
What should a surgical kit be like?
Firstly, it should be convenient and compact. At the initial stages, there should be nothing extra on the table. In addition to a set like the one in the photo below, you may need a titanium cup for mixing the osteoplastic material, a torque wrench, and a depth gauge.

One of the options of a basic surgical kit for implant placement
It is better to place implants at the initial stages using a machine (physiodispenser) and to tighten it to the final position using a torque wrench.
How important is the size range when choosing an implant system?
Although implants of 8 to 11.5 mm in length are sufficient for most clinical cases, it is better to choose a system that has both ultra-short implants (about 6 mm) and long ones (16 mm and more). It is not always possible to find such a combination from one manufacturer, so doctors receive implants, abutments, healing caps, and other components from several manufacturers. And this is absolutely normal, because there is no ideal implant; there is an ideal implant for a specific clinical situation.
It is better to purchase the necessary components from several manufacturers than to cut a long implant to the required size, as in the x-ray below.

Unacceptable action – placement of a cut implant YouTube / Dr. Kamil Khabiev / Dental Guru Academy
This is absolutely incorrect and should not be done by a surgeon who values their license.
Another criterion for an optimal implant system is interface compatibility. It is better when the implant/abutment connection interface is standard and compatible with other manufacturers. When the same patient has different bone types in different areas of the jaw, this is normal. The doctor can easily choose implants with aggressive threads for areas where the bone is D3-D4 and options with smooth threads with low blades for hard areas D1-D2. And these can be implants of different brands, and the entire superstructure can be the same, from one of these brands or even from a third one. Standardization is a wonderful phenomenon in dentistry.
For example, multi-unit abutments by Uniqa Dental are compatible with implants made by more than 20 other manufacturers.
Compatibility of the superstructure is more important than it may seem at first glance. In clinical practice, you will often have patients come to you with already placed implants that have served for 5-10 years or more. A typical case: time has passed, the patient has lost several more teeth, or the teeth have decayed, and it is necessary to remove the remains and make a new restoration. You will not remove previously placed implants. The new prosthesis is planned taking into account the existing and new implants. And if the interface of the old implants is a standard internal hexagon or an 11° cone, then it is easy to select new implants with the same interface and use new abutments with the same interface.
Such abutments will be placed both in new and previously placed implants. And if the new restoration is screw-retained, then a digital protocol is simply necessary for high accuracy and good fit. The placement of implants and the shape of the restoration are modeled in a digital environment on a virtual 3D model of the patient’s jaws.
If the team – surgeon, prosthodontist, dental technician – is experienced and has worked together for a long time, then most often the prosthesis will not require fittings and adjustments and will immediately fit as it should. Although this does not always happen, and with total work on prosthetics of a full row of teeth, several stages of testing are still necessary. It is important to prevent internal overstrain. Otherwise, the overload through the bridge and abutments will be transferred to the implants. Constant one-sided load on the implant leads to the destruction of bone tissue around the implant.
This concludes the first part of our article. In the following parts, we will look at the choice of abutments, types of retention of prostheses, and how temporary restorations can be made in some simple clinical cases without leaving the patient’s chair and without going to the laboratory.
Stay tuned for the next publication.