Soft tissue implant integration (part 2)
In this article we will look at why bone resorption occurs around implants, and what can be done to reduce bone loss or avoid it altogether. To do this, we need to take a closer look at the physiology of soft tissue formation around implants.
The main differences between implants
In this context, there are only two classes of implants depending on how deeply they are planted relative to the bone ridge and soft gum tissue. There are many shapes, cylindrical, conical, aggressively and smoothly threaded, but these are all important for osseointegration. If you look from the point of view of gingival formation and healing, all that matters is whether or not the edge of the implant sinks into the soft tissue. See the illustration below:
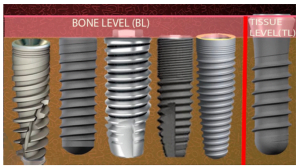
All implants where the border of the suprastructure is immersed in the gum belong to the BONE LEVEL class (immersive).
Those in which the border between the abutment and the implant is at or above the gum are called TISSUE LEVEL.
How the process of soft tissue integration with the implant surface proceeds
Let’s figure out what happens in the healing process and why the body “lowers the level” of the bone around immersion implants. The task of soft tissues is to create a barrier between the sterile environment of bone tissue and the non-sterile environment of the oral cavity. A living tooth or implant cuts through this soft tissue barrier. So, around the implant something like a sealed cuff needs to be formed.
Previously, insufficient attention was paid to this point, and even now it is not always the case. It is considered normal and has even become a part of reference books that about 1.0-1.2 mm of bone tissue is lost after some time after implant engraftment. The main thing is to take this point into account for a successful long-term dental restoration. It works, most implants are placed so that the implant/abutment line is below the gum level, and such prostheses work for decades without any problems.
However, we want to talk about why local resorption occurs and what can be done to reduceor prevent it from happening. As an alternative, consider the use of an implant with an interface placed on top of the gums.
Let’s figure out what happens when using the classic dental implant design. See the illustration below, taken from a well-known article.
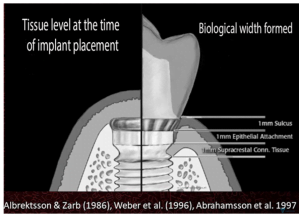
During the study, it was found that in a year the patient loses up to 1.5 mm of bone height. The level drops to the level of the first turn. Furthermore, the bone loss slows down and often stops. However, most often there is a loss of another 0.1-0.2 mm per year over the next few years. There is also a gum recession (decrease) that can leave the neck of the implant exposed. For a long time, experts did not pay enough attention to the causes of bone resorption and simply took it into account when calculating the length of the implant.
However, research has identified several several reasons for bone resorption. The first is that such local resorption occurs due to the body trying to form an impermeable cuff from soft tissues below the level of the crown-implant connection.
During the implantation process,the abutment is removed and installed several times injuring soft tissue each time.
First, a temporary abutment, also known as a gingiva shaper, is installed. After a couple of months, he’s filming to take a picture. After this procedure is set back. It is then removed againto try it on, and set again. Finally, the healing abutment is removed and a permanent restorat-ion with crown or bridge is installed.
Each time soft tissue is injured and healed again. After these interventions, the body tries to form a cuff of soft tissue below the line of separation between the implant and the crown, whi-ch “erodes” part of the bone crest.
This dependence was established by Professor Abrahamson in a classic experiment. There were two groups of patients in the experiment:
One group was on the standard route with six to eight interventions were performed. First, a gingiva shaper was put in place, four months later the casts were removed, fitting (several discharges and installations) and installation of a permanent prosthesis.
The second group of patients received a permanent abutment immediately, and soft tissue after the implantation was no longer injured. The results of single-digit bone resorption in the second group of patients were a whole millimeter less (within 0.2-0.5 mm).
It transpires that the best results are obtained with minimal intervention in soft tissues. This effect is obtained with the use of non-breast implants.
Professor Schroeder was actively involved in the development of this dental implantdesign. Professor Branemark is is considered to be the author of the design of submersible implants.
In terms of soft tissue integration, this implant design is almost perfect.
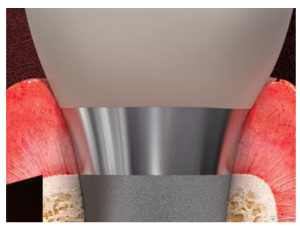
Of course, it is not suitable for all cases. For example, in the cosmetic area, especially when restoring the upper teeth, BONE LEVEL implants are better suited. However, from the point of view of forming the gingival cuff and preserving the bone volume, they show the best results.
Why were no such studies carried out before 1997?
The fact is that the classic design of the submersible implant works perfectly. Even considering the partial resorption of the alveolar ridge, the implants last 10-15 years or more.
In addition, the creator of the modern design of root implants, Professor Branemark, was more concerned with the issues of osteointegration, that is how the implant will fix in the bone as it withstands axial and lateral loads. I got great resultsbecause Professor Branemark’s idea still works.
The design has been improved and specialized variants have appeared and several kinds of carvings have also appeared. Even the surface of the platform began to handle differently. At the dawn of the root implant era, the surface was milled (smooth), but it is now clear that the best results show rough surfaces.
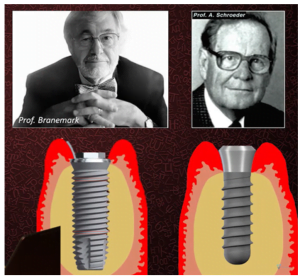
Professor Schröder, in contrast to Branemark, is a practicing dentist. He paid more attention to soft tissue integration, and so the TISSUE LEVEL design for transgingival implants was born.
What effect does surface roughness have on the integration of different tissues
Let’s return to the features of the TISSUE LEVEL non-immersion implants. As you can see from the illustration below, the top of the dental implant looks smooth, almost polished. It is actually milled, but really quite smooth. It is this part that is in contact with the soft tissues. The gray rough part of the implant is sandblasted. This is important for a secure primary fixation of the implant in the bone.
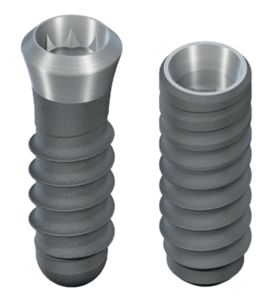
This smooth area is directly in contact with soft tissue. On earlier models of this type of implant, the height of this part was 2.8 mm. That can be found today, but the general trend is to reduce the height to 1.8 mm.
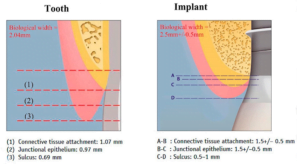
The figure of 2.8 mm was based on the representations typical for the late 1970s when the normal biological width of the gingival cuff was thought to be about 2 mm for a living tooth, and about 2.5 or slightly more for a root implant, see the illustration below. The height of the neck of the implant was taken to be 2.8 mm, so that there was a place for the formation of the whole complex of soft-tissue attachment in which the connective tissue attachment, epithelial attachment and sulcus are included. See the illustration below:
Let’s take a closer look at the healing process and the formation of the gingival cuff. The photo below shows a freshly inserted implant, where you can see the bone as well as the oral epithelium layer in the section. Both the superficial part and the basal membrane of the epithelium can be seen.
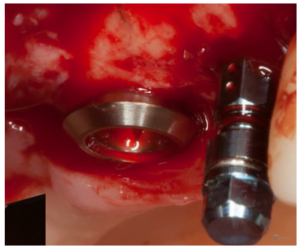
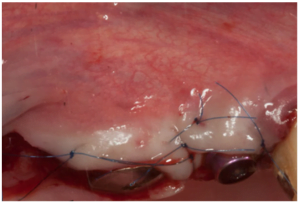
After suturing, the oral epithelium migrates inward. This process begins almost immediately after the operation. This is because the body tries to close the wound and protect the internal structures from the unsterile environment of the oral cavity. In fact these are emergency measures. The epithelium almost immediately attaches to the surface of the implant from the top to the depths as if it were surrounded by thin film foreign body, which is a dental implant.
At the same time, granulation tissue forms in the depths at the border of the bone and the implant penetrating it. It fills the gap between the bone and the implant. Later it turns into connective tissue, from which collagen fibers form and connective tissue attachment of soft tissues to the implant is formed.
Interestingly, this is only how the process of granulation tissue transformation begins and the first fibroblasts are formed and fibrin fibers are formed, the apical growth of epithelium stops.
In fact, we observe several parallel processes. At first, the epithelium was growing from top to bottom, and after the formation of the connective tissue part of the cuff, the epithelium proliferates from bottom to top. That is, the epithelial part of the gingival cuff rises and grows. It is the connective tissue part of the cuff that determines the height and direction of epithelium development. In general, it is a kind of “conductor” of epithelium overgrowth, and a healthy reaction to soft tissues to penetration.
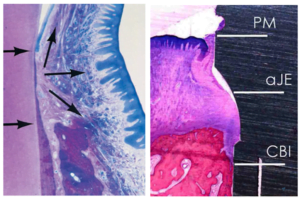
Three weeks later we see the connective tissue connection has already formed and the epithelium has already attached to the implant surface.
The epithelium is attached to the implant surface by hemidesmosomes (special structures that connect epithelial cells to each other and to adjacent tissues, including the surface of a living tooth or implant metal).
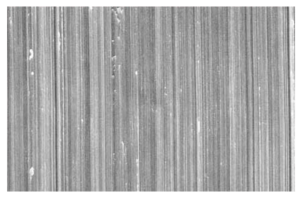
The epithelium “attaches” better to the smooth surface. More precisely, the milled part of the implant is not completely smooth, see the microscope photo. You can see small grooves on the image, which contribute to the formation of more hemidesmosomes and rapid fouling of the implant surface with epithelium. There is also attachment to the rough surface, but the number and quality of hemidesmosomes is lower. This explains the design of the dental implant with a milled neck.
To evaluate all of the above in combination, here are the results of another study. This study was done by pupils and followers of Professor Schroeder in 2000.
This study uses an already outdated definition of the gingival cuff – biological width. It is essentially a stable tissue complex that is very similar to that of living teeth.
The study was conducted on dogs that were given TISSUE LEVEL implants and observed for quite a long time. Histological studies were done after 3 months, 6 months and 15 months. See the illustration below. Over time, we see epithelial overgrowth and reduction of the gingival sulcus and thickening and reduction of the attachment height at the connective tissue level.
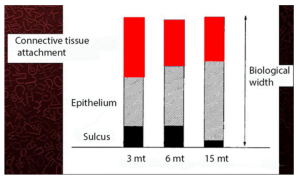
Researchers also found that soft tissue integration around the dental implant is formed in the same principlesas for living teeth. However, all the results show that on implants the gingival cuff is always slightly higher than on living teeth in both dogs and people. The difference is insignificant andis in the range of 0.5-0.7 mm.
This difference is a very important factor in understanding the processes of soft tissue integration. The increase in the height of the cuff is explained by the fact that the quality of the surface of the living tooth is more favourable for the attachment of the epithelium. It transpires that to achieve the same good barrier effect around the implant, you need to create a higher gingival cuff.
The structure of the junction at the level of connective tissue was investigated in another study.
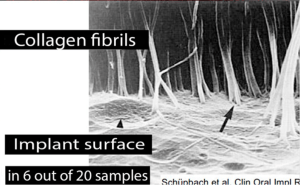
Collagen fibers were found to be mostly located along the implant surface, especially in the places of contact with the smooth areas of the implant neck, which was known before. However, it was also discovered that in some cases there are thin collagen fibrils directed perpendicularly to the implant surface, see the illustration below:
Research into this phenomenon is ongoing. An understanding how exactly such fibers are formed will help to improve the quality of implant engraftment and the quality of life of patients. So far, it is reliably known those perpendicular collagen fibrils:
- formed only on rough surfaces; and that
- Under ideal conditions were formed only in 6 out of 20 samples.
Why this is the case is unknown, but if substances can be found that can stimulate and control the development of such fibers, it will be a breakthrough in the field of dental implantology.
However, you may have noticed some contradiction on the one hand a roughened surface is important for the formation of the gingival cuff and on the other hand a smooth milled surface.
So, for connective tissue connection, a rough surface is better suited, and for epithelial a smooth surface.
An experiment was conducted comparing the development of a soft-tissue attachment for a classic implant with a milled neck, and a fully flared.
See the illustration below:
Even a 0.1 mm bone gain was detected on a rough implant compared to a classical one. Over the course of time on a line from 3 to 12 months there is a growth and strengthening of the part of the cuff from connective tissue from 0.9 to 1.1 mm, which is a little more than in a classical implant, where the height of the connective tissue connection remains unchanged 1.0 mm.
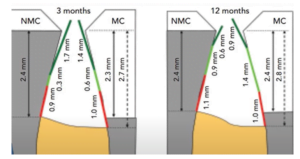
At the same time, it can be seen that the epithelial part of the gingival cuff is smaller on the instance with a rough surface of 0.9 mm – against 1.4 mm on a smooth implant.
This is the reason why the height of the milled part of dental implants in the TISSUE LEVEL design has decreased from 2.8 to 1.8 mm after it became known that for the attachment of connective tissue better suited the rough surface.
How interface layout affects soft tissue attachment architecture
Let’s summarize. Implant integration is complex, and both osteointegration and soft tissue integration are important. Soft tissues directly affect the condition of the bone. The location of the attachment interface directly affects soft-tissue integration. When the implant line is low, there is not enough room to develop the gingival cuff. The situation is aggravated by repeated injury of soft tissues.
The soft tissue cuff, and more specifically the part that consists of connective tissue, also “makes room” for itself. Enzymes and proteins are released, which trigger the process of bone resorption. As a result, a hole is formed around the dental implant, increasing the total length of the implant neck. This is already enough to form a healthy gingival cuff.
These findings are supported by another study, see figure below. It compared alveolar ridge bone loss using implants with different interface line heights.
From the subcostal setting, where the connection line is below the bone level, to the non-particle setting, where the interface line is above the soft tissue level. Of course there were a few intermediate options.
These are the results the researchers obtained:
A comparison of biological width (linear vertical dimension of connective tissue and epithelial attachment) among different implant types (A-F) showed that non-implanted implants with a rough/smooth border in the alveolar ridge area had the lowest gingival ridge height of all options, six months after placement.
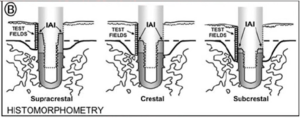
The same dependence is confirmed by another study where the same type of implant was used, but in three installation variants:
- Supracrestal – interface above the bone level;
- Epicresis – the interface is exactly at the bone level;
- Subcrestal – implant/abutment connection line below bone level.
The study was conducted on animals and the histological analysis also showed that the least bone loss was observed with supracrestal implant placement.
The concept of switching implant platform: features and limitations
Like many scientific discoveries, the positive effect of platform switching was discovered by accident. The concept of switching platforms is to use an abutment smaller than the root implant.
This phenomenon appeared in the late 1980s, when implants with a diameter of 6 or more millimeters were used for single-moment implantation. After all, a single-moment implant with immediate loading is often performed immediately after the removal of the diseased tooth. That means there are voids in the jaws from the roots of the teeth. To get good primary stability, you need to have the dental implant well cut into the bone across the entire diameter. This is possible only if the diameter of the implant is larger than the cavities that are left of the roots.
Many manufacturers began to produce larger-diameter dental implants, but most straight and angular abutments continued to be produced under the previously common 3.2 to 5 mm range.
There was a deficit of abutments for wide implants, which was solved by installing 5 mm abutments in 6 mm implants.
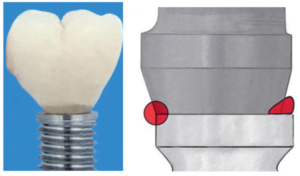
The result was a step on the interface line, see the illustration below. The first photo shows a crown on a smaller abutment with a distinct step. In the next picture you can see the difference in size at the interface – it’s a left-colored circle and the platform switching side where you can see the step.
The measure is largely forced, but it has shown itself on the unexpected side. The bone loss in the application of prosthetics with switching platforms was less than in the classical.
The horizontal step gave more space for the formation of the gingival cuff. See the illustration below for the connective tissue part.
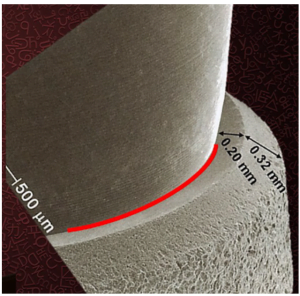
In the next picture, we see a step under a large magnification. It is noteworthy that there is a groove (highlighted in red), which is also very well suited for filling with granulation.
Notice also the dimensions of the step. The total width in this case is 0.52 mm. This is also an important indicator. Now you can find many articles and studies that show the benefits of switching platforms, and those that show that switching platforms does not matter significantly.
In fact, the devil is in the detail. It is not just the the presence of a ledge that is important, so too is its width. If the step is less than 0.4 mm, then this is insufficient for the connective tissue to form an adequate “bridgehead” for its development.
Notice also in the picture that the protruding part of the implant has a rough surface, which is good for attaching connective tissue. The abutment fixed in the dental implant has a smooth surface, which is more “like” the epithelial part of the gingival cuff.
Practical conclusions and clinical guidelines
Let’s summarize our article:
- The gingival cuff around the implant is formed taking into account the position of the implant-abutment junction line.
- The connective tissue attachment is always apical to the implant-abutment connection line. If there is not enough room for connective tissue formation, the body will “wash out” some of the bone to make room for the formation of the gingival cuff of the desired height.
- Non-immersion TISSUE LEVEL implants create the best conditions for the formation of the gingival cuff. Although they cannot be applied to all clinical cases.
- To minimize bone loss in work with submersible implants (BONE LEVEL), the concept of “one abutment at all times” should be striven for. Reducing the degree of injury to soft tissues has a beneficial effect on the formation of the gingival cuff.
- Prevent compression in the cortical part of the alveolar crest during implant bed preparation. Be sure to use cortical cutters that expand the top of the hole. This is important so that there is an annular gap between the implant and the bone. It is this gap that will fill the granulation, which will be converted into a connecting. If this is not done, the body will still form this gap, but due to necrotic processes. This is very dangerous and threatens the beginning of periimplantitis.
- The positive effect of switching platforms is achievable if the width of the “step” is 0.4 mm or more.
We hope the material in this article was useful for you. Until the following publications.

