Errors and Complications During Prosthetics on Implants. How to Prevent and Correct Them
Part 1 - Clinical Guide for Dental Practitioners
Contents
In this article, we will use examples to analyze when problems with restorations most often occur, from screw breakage to implant rejection, and how to avoid them. Moreover, we will focus not on how to fix a problem that has already happened, but on how to prevent it.
Before diving into common errors and complications, it’s important to understand the fundamental differences between screw-retained and cemented implant restorations, as this choice affects many aspects of treatment planning.
At what stages do errors most often occur?
Unfortunately, there is no single stage of treatment where mistakes are impossible, as evidenced by the list below. Next, we will look at the most difficult stages in more detail.
Planning the prosthetic process
For successful implant treatment, it’s essential to follow proper dental implant surgery protocols. However, even with proper protocols, several challenges may arise:
- Number of implants: This can be problematic not only when too few implants are used, but also when too many are installed without sufficient bone tissue space between them.
- Distribution and position of implants: We will analyze this point in particular detail.
- Incorrect type of structure: For example, choosing a beam, bridge, or cantilever incorrectly can lead to the need to redo the prosthesis. This means implants may be installed in the wrong positions, causing overloads and parts of the prosthesis to “hang” without support.
- Installation of implants without considering the location of antagonist and neighboring teeth.
- Poor planning of the gum line or gingival dentures.
Errors during prosthetics
- Connecting dentures to natural teeth: This should never be done.
- Unsuitable connection of the implant to the abutment: For example, using a planar instead of a conical connection.
- Overloading the implant and superstructure: This can lead to crown chips, as well as fractures of screws, abutments, and even implants.
- Incorrect type of prosthesis fixation: Using cement instead of screws, or vice versa.
- Problems with the release of cement from under the crown.
- Platform switching and double platform switching: The absence of these can prevent the formation of a full-fledged soft tissue connection and an optimal emergence profile.
- Abutment material and the reaction of soft tissues to it.
- incorrect shape of abutments: This prevents the formation of an optimal emergence profile.
- Errors in manufacturing crowns for implants: Similar problems occur when installing a crown on a natural tooth, but the issues can range from speech problems to jaw joint issues.
- Poor or inadequate disinfection of abutments: This can lead to inflammatory processes, sometimes resulting in the loss of implants.
- Errors at the stage of taking impressions: Both physical and digital.
Complications after prosthetics
As a rule, complications are inevitable if mistakes were made in the previous stages. Here is a list of the most common problems:
- Implant fracture
- Abutment fracture
- Fracture and loosening of screws
- Hygiene problems caused by a poor emergence profile and other prosthesis shortcomings, as well as patient behavior, which can ruin even excellent work
- Problems with conditionally removable dentures
Features of implantation planning
A clear and deep understanding of the clinical situation is the key to success. It is very important to maintain this understanding at all stages of treatment. Often, the patient passes through the hands of specialized professionals. If there is no mutual understanding between the surgeon, dental technician, and prosthodontist, then in complex cases, problems and complications are inevitable.
IMPORTANT TO REMEMBER! The prosthodontist is responsible for the result, that is, for successfully completed prosthetics and a satisfied patient. They must understand what the prosthesis will be like, how the load should be distributed, and how to ensure a tight fit of the gums. The prosthodontist informs the surgeon about the optimal positions for implant placement.
It’s beneficial when the surgeon and the prosthodontist are the same person, but this is not always ideal. Achieving the highest level of expertise in multiple areas is challenging, so it is better to have a team of specialized professionals who are true masters of their craft. We will definitely have an article dedicated to treatment planning.
The photo below shows examples of how to do this. Most likely, the surgeon installed the implants as best they could and relieved themselves of responsibility—the implants are in place, they have integrated, and no claims will be accepted. The dental technician and prosthodontist then had to manage the situation as best they could.
Of course, it is the dentist’s duty to help the patient, but it is very difficult to correct such situations. Most of these clinical cases end in lawsuits from the patient, and the law is on their side. Therefore, it is extremely important to trust the implant surgeon and remember that it is the prosthodontist who determines where and at what angle the implants should be installed.
In the examples above, implants could not be installed immediately; it was necessary to perform an operation to build up bone tissue to equalize the height and volume of the alveolar ridge. In any case, negotiation is essential because it is not always possible to install an implant where the prosthodontist wants. For example, if there is an almond-shaped hole in the area of the fourth tooth, the implant needs to be moved either to the area of the canine or the fifth tooth. The prosthodontist should be aware of this so they can adjust the design of the prosthesis accordingly.
You may have to abandon the full arch and create several bridges, which might require installing one or two more implants. It is better to change the operation plan in advance than to correct the situation after the fact.
Optimal number of implants
The optimal number of implants is also determined by the prosthodontist. Unfortunately, in practice, there are extreme cases, both with an excessive accumulation of implants and with designs supported by only 2-3 implants and large cantilever sections. Here are some examples of excess implants.
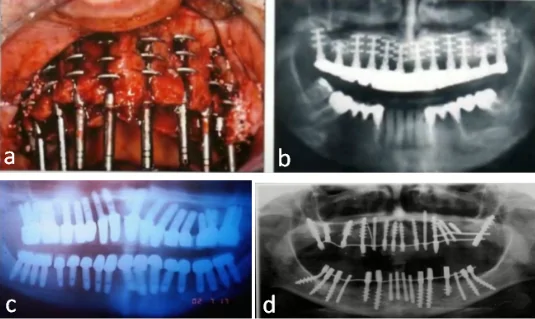
Extremely unsuccessful designs with an excessive number of implants. YouTube / Dr. Kamil Khabiev / Dental Guru Academy
It might seem that the more implants, the better, but this is not true at all. The patient in image C is practically sentenced to chronic osteomyelitis and even necrosis because there is very little bone tissue between the implants to be properly supplied with nutrients. This situation can still be saved if you unscrew the implants one at a time. However, there is a clear lack of understanding of bone tissue biology.
Another situation involves an insufficient number of implants and/or their incorrect distribution, which causes overloads and tensions. This, in turn, leads to:
- Failure of screws, abutments and even the implants themselves
- Cracks and breakage of the prosthesis
- Bone resorption around the implant and subsequent loss of implants
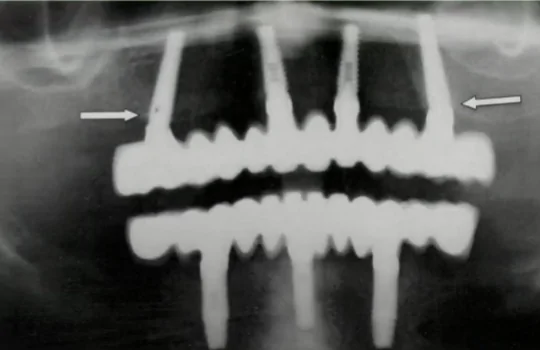
Non-optimal placement of implants in the upper jaw, and an insufficient number of implants in the lower jaw, due to which the most loaded areas of the implants “hang in the air”. YouTube / Dr. Kamil Khabiev / Dental Guru Academy
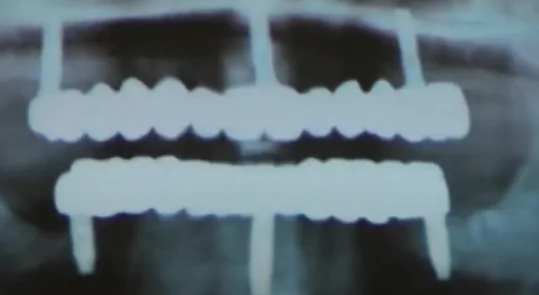
The distribution of implants is close to optimal, but only three implants are installed on the lower and upper jaws, which is associated with a high risk of overload. YouTube / Dr. Kamil Khabiev / Dental Guru Academy
What you see in the picture above is not entirely an error—this is the minimum number of implants on which a permanent structure can be installed. Trefoil technology is currently being tested, which involves installing a full-arch prosthesis on three implants. However, even with ideal positioning of all three implants, the counterbalance to the tipping force is limited. Specifically, all three implants resist the tipping force only in the distal direction, but if the force is directed in the buccal or lingual direction, then only one of the three implants resists it. Such loads appear regularly.
If there are four implants and they are well positioned, the result will be a trapezoid with six counteraction axes, not three as in the case of the trefoil protocol. No matter how the force vector is directed, there will be two implants to resist it, not one. From the perspective of a practicing physician, it is better to offer a discount and install four implants for the patient, rather than three, if price is the determining factor in the choice.
Practice shows that there are successful restorations supported by three, two, and even one implant. The latter is an exception on the verge of common sense but sometimes allows us to solve the patient’s problem, as seen in the picture below.
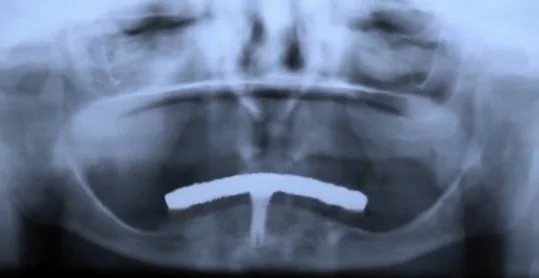
Removable prosthesis on a beam supported by one implant. YouTube / Dr. Kamil Khabiev / Dental Guru Academy
The X-ray shows a significant deficiency of bone tissue in the area of the chewing teeth. To solve the aesthetic problem, restoration was performed using one implant. This is a removable denture on a beam. Of course, you can’t put a significant load on it, but the prosthesis solves aesthetic and phonetic (speech) problems. However, even if the patient eats fairly soft food, the risks of a screw or abutment fracture are quite high. Therefore, this solution is not suitable for the long term.
Advantages and disadvantages of the All-on-4 (All-on-6) protocol
All-on-4 and All-on-6 prosthetics are well-known and proven protocols, and theoretically, everything looks good. Four implants provide a correct and stable trapezoid, and six also support the chewing area. However, some specialists come up with extremely unsuccessful options. See the photo below, which shows how far the operation plan can be from the actual result.
As you can see from the picture above, there is no trapezoid; the implants are in a chaotic order. It is impossible to create a restoration with a positive prognosis for them. Of course, a perfect trapezoid like in a textbook is extremely rare, but you need to strive for the optimal location. The photo below is also not an ideal option, but it is not catastrophic.
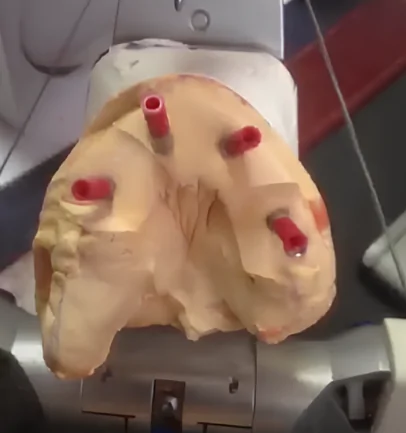
The placement of implants for an all-on-4 prosthesis is not ideal, but acceptable. YouTube / Dr. Kamil Khabiev / Dental Guru Academy
Advantages of the All-on-4 Protocol:
- Speed: The patient can receive implants and a temporary prosthesis within 1 day.
- Less surgical intervention: Only four implants are installed, rather than eight or ten.
- Good functional and aesthetic result.
- It is cheaper for the patient than a complete restoration of the dentition with ten implants.
The disadvantages include:
- A sufficient volume and good density (D2) of bone tissue are needed for a good result. Otherwise, it is necessary to perform guided bone regeneration, and in this case, it is better to make a prosthesis supported by a larger number of implants.
- Load limitations: The prosthesis has a cantilever design, and the most loaded area of the molars and premolars “hangs in the air.”
- Incomplete dentition restoration: As a rule, the prosthesis ends at six teeth, meaning that chewing function is not fully restored.
- The prosthesis covers soft tissues, as it includes an imitation of gums. Over time, the volume of natural soft tissues decreases, and food debris accumulates under the prosthesis.
How to correctly distribute implants on the upper and lower jaws
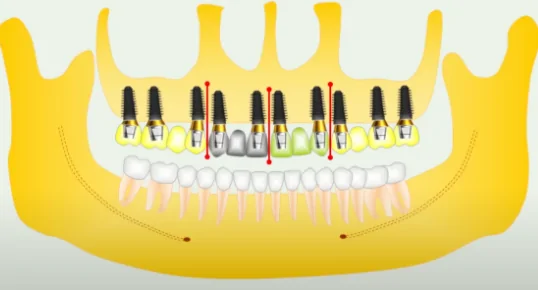
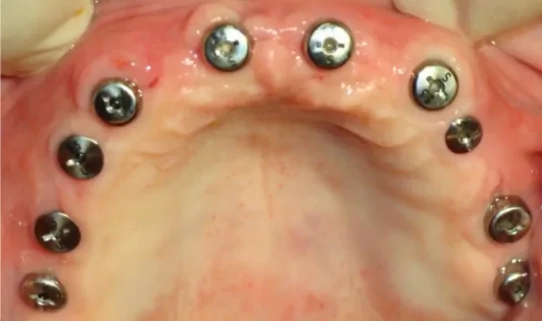
The best results are achieved with dentition restorations supported by 8-10 implants. With this many implants, it is better to make the prosthesis in the form of several bridges that are not connected to each other, as shown in the illustration below.
This scheme involves restoration using four separate bridges.
Let’s take a closer look at the advantages of this scheme:
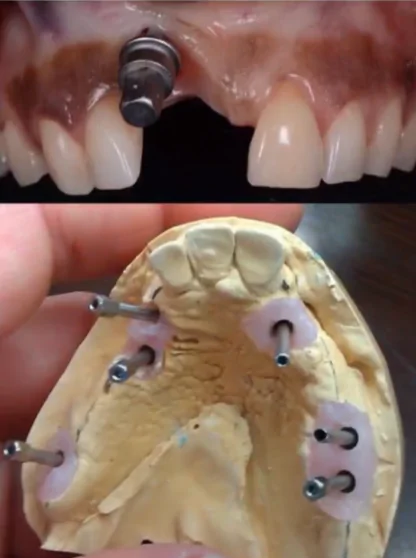
- The implants are distributed evenly and parallel to the dentition, except in the area of the front teeth, where the implants are at a slight angle. This allows for easy impression-taking without the risk of deformation and displacement when removing the tray.

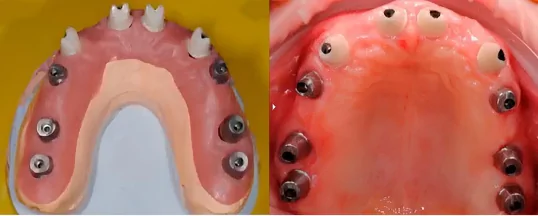
Transfer checks to get the correct picture without the risk of misaligned transfers. YouTube / Dr. Kamil Khabiev / Dental Guru Academy
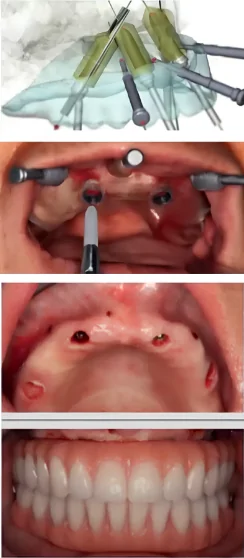
Let us remind you that for such extended casts, it is necessary to use transfer checks and connect (splint) the transfers to avoid displacement and rotation of the transfer in the cast, which can result in deformation. They are made from a polymer composite, but not fluid, as sufficient strength is needed.

Connecting transfer checks in the patient’s mouth. YouTube / Dr. Kamil Khabiev / Dental Guru Academy
If the digital method of taking an impression is used, this arrangement is also convenient, and the risk of distortion is minimal.
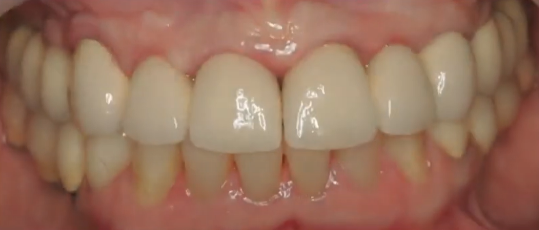
- Using different abutments for different areas is another advantage of the split bridge technique. This case also shows how good the aesthetic result can be if zirconium abutments are used in the area of the front teeth.
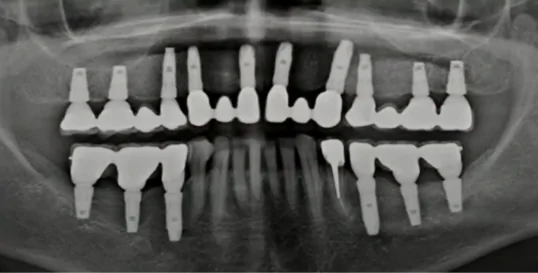
- There is no need to perform a sinus lift. The scheme of 14 teeth on 10 implants allows you to bypass the problem of the maxillary sinuses, as shown in the illustration below. To do this, you need to move the implants from the area of the sixth teeth to the area of the fifth.
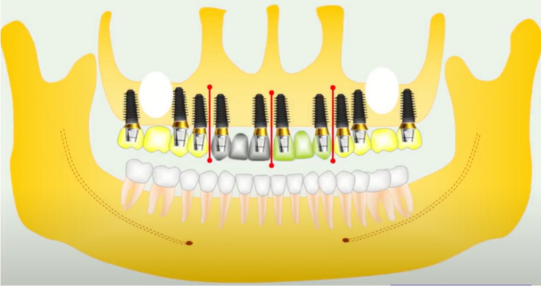
Scheme of 10 implants and restoration of 14 teeth, which avoids sinus lift. YouTube / Dr. Kamil Khabiev / Dental Guru Academy
On the lower jaw, we install a smaller number of abutments, for example, 8, and prosthetize the same 14 teeth. This is due to the fact that there is less space for installing implants, and the crowns themselves are usually smaller. One option is shown in the illustration below. This placement of implants in the incisor area is recommended if the patient has bone deficiency in this area.
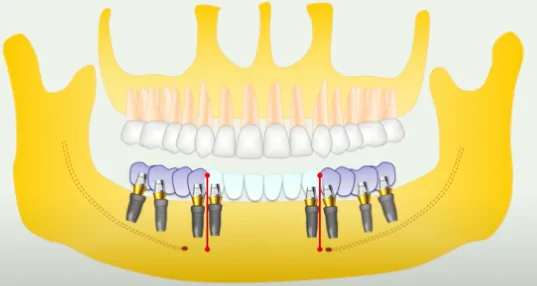
Optimal placement of implants in the lower jaw for a protocol of 8 implants 14 teeth. YouTube / Dr. Kamil Khabiev / Dental Guru Academy
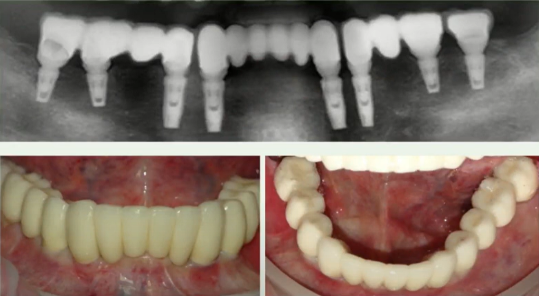
X-ray and pictures of restoration of 14 teeth supported by 8 implants. YouTube / Dr. Kamil Khabiev / Dental Guru Academy
However, if the patient’s jaw is wide enough and the incisors are large, it is also recommended to install 10 implants in the lower jaw, especially when it comes to the immediate load protocol.
In this example, we see that the abutments are quite long, but the patient’s wide trapezoidal jaw made it possible to implement this option.
Problematic orthopedic structures
Restorations in the form of two half-arches supported by three implants
This results in an unstable structure with a risk of swinging. If the patient has bruxism, breakage of the prosthesis is almost inevitable.
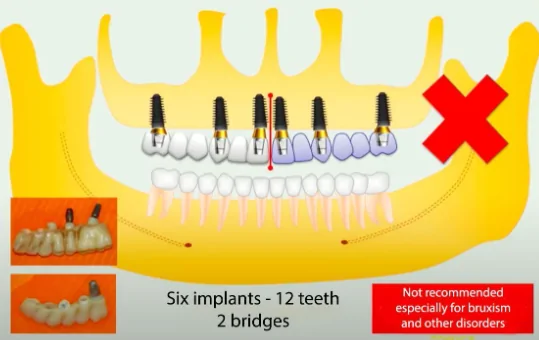
Not recommended prosthetic option with two bridges. YouTube / Dr. Kamil Khabiev / Dental Guru Academy
The center of rotation is the implant in the canine area. Chewing forces, acting like a lever, begin to overturn and break out the implant in the incisor area. The abutment is also likely to break, especially if it is zirconium, as shown in the photo added to the illustration.
Use of cantilever prostheses
The following example cannot be called a mistake; it works quite well but is not optimal. There are 8 implants installed on the lower jaw, but they are placed strictly evenly without considering the specialization of the teeth. Initially, it was planned to install a full arch supported by 8 implants. For a deeper understanding of how implant placement affects long-term success, you may want to read more about differences between implant shapes and their impact on placement strategy.
Another situation involves an insufficient number of implants and/or their incorrect distribution, which causes overloads and tensions. This, in turn, leads to:
- Failure of screws, abutments and even the implants themselves
- Cracks and breakage of the prosthesis
- Bone resorption around the implant and subsequent loss of implants
The success of implant treatment depends not only on the number of implants but also on their proper specifications. Understanding how to choose the right implant length is crucial for achieving long-term stability and preventing these complications.
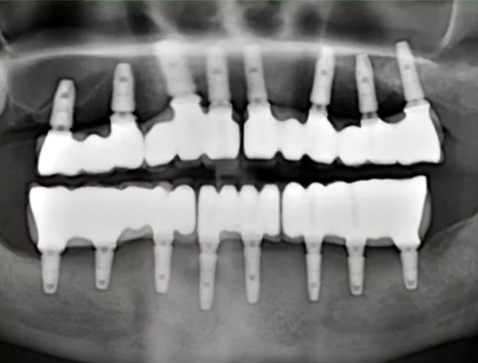
Sub-optimal restoration of the lower jaw with cantilevers due to which some parts “hang in the air”. YouTube / Dr. Kamil Khabiev / Dental Guru Academy
However, the dental technician was unable to produce a one-piece denture with an acceptable passive fit because some of the implants had a buccal slope. Therefore, it was decided to make a prosthesis from several parts. Since the implants had already been installed, it was necessary to make a prosthesis with partially “hanging” teeth.
In this case, this is not critical, since the chewing area is perfectly fixed and, in general, the restoration is successful both aesthetically and functionally. Moreover, all parts of the restoration are installed on multi-units, which means they can be easily removed for cleaning and hygienic treatment of soft tissues. However, a slightly different arrangement of implants would eliminate the need to make cantilever structures.
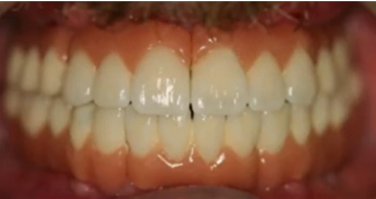
Appearance of the restoration – visually it is quite successful. YouTube / Dr. Kamil Khabiev / Dental Guru Academy
With the upper jaw in this case, not everything is smooth either. The bridges are made in the form of half-arches, as we mentioned earlier. However, the patient does not have bruxism, and the bite is quite favorable. Most importantly, there are four implants on each side, and the load distribution will prevent any screw or abutment from breaking.
We provided this example to emphasize the importance of clear planning for the operation. Yes, the experts found a solution, but if everything had been planned in advance, they would not have had to heroically overcome difficulties.
Unnoticed lack of space in height relative to the antagonist tooth
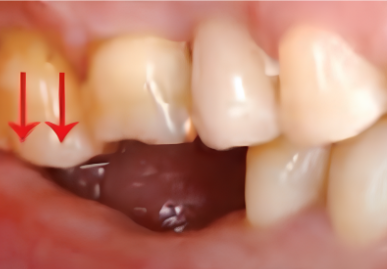
Lack of space between the lower jaw where implants need to be installed and the antagonist tooth. YouTube / Dr. Kamil Khabiev / Dental Guru Academy
Unfortunately, this is a fairly common mistake, especially with small restorations. The doctor examines the lower part of the patient’s mouth and immediately decides to place two implants. After three months, when the patient returns to have a gum former installed, it is discovered that the mouth does not close with the former in place. Only then does the surgeon examine the upper jaw and discover that the upper tooth is resting on the healing cap. The surgeon then places the shortest healing cap flush with the gum and sends the patient to the prosthodontist.
The prosthodontist sees that the upper seventh tooth, as shown in the picture below, has lengthened and rests on the healing cap. There is no room left for the abutment and crown. Consequently, the healthy antagonist tooth must be depulped, ground down, and crowned. Not every patient will agree to this, and it could lead to a scandal, with the patient demanding a refund, compensation, redoing, or threatening to sue.
Such mistakes are entirely the fault of the doctors; this is a foolish and unacceptable error, yet it happens more often than it should. Therefore, it is essential to always take photographs of both jaws, including the bite, and to discuss and develop a treatment plan together with the prosthodontist.
In another case, three implants were successfully installed, and even bone grafting was done, but there was still little space relative to the upper teeth. To compensate for the defect, a prosthesis that moves in waves was created, which is not the best option from an orthopedic point of view. While the deficiency here is not as critical as in the first picture, the problem with the upper teeth should have been addressed before installing the implants.
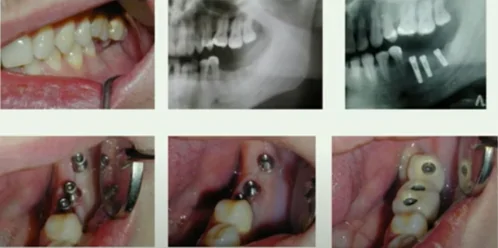
Screw-retained restoration supported by three implants when there is a lack of space to the teeth. YouTube / Dr. Kamil Khabiev / Dental Guru Academy
In this case, the problem with displaced and drooping teeth could be solved in several ways:
- Orthodontically
- Light grinding if dentoalveolar lengthening is minor
- Compromise option: Simultaneously grinding down the cusps of the upper teeth and reducing the lower jaw bone to install implants lower. This is not the best option, but it is still better than depulpation and grinding of a living tooth. It is also better than the option in the pictures above with a very strangely shaped prosthesis.
Another case with the same problem: The surgeon performed a vertical augmentation and installed two implants, but there was no room left even for a healing cap.
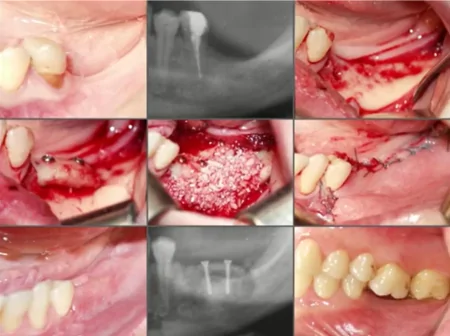
Unsuccessful installation of implants with GBR without considering the distance to the upper antagonist teeth. YouTube / Dr. Kamil Khabiev / Dental Guru Academy
In this case, we had to grind down and “kill” the upper teeth, as shown in the pictures below. The color indicates that the 6th tooth was already dead, so it’s not as problematic.
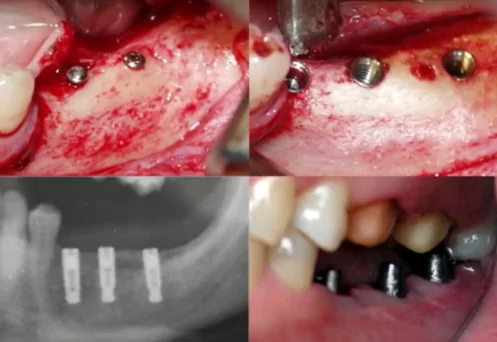
Reducing the height of the upper antagonist teeth – depulpation and grinding followed by the production of crowns. YouTube / Dr. Kamil Khabiev / Dental Guru Academy
Similar problems can occur in the upper jaw. The example shows how this issue was addressed. A prosthesis with an ultra-low profile was made for the upper teeth, and onlay crowns were created for the lower teeth.
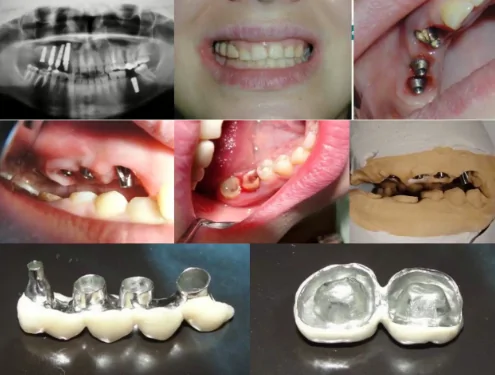
Restoration when there is a lack of space between the implants in the upper jaw and the lower antagonist teeth. YouTube / Dr. Kamil Khabiev / Dental Guru Academy
This is a very questionable decision; more precisely, such a prosthesis will work for some time. However, even if such linings do not burst from the load, the patient will definitely lose their lower teeth after a relatively short period. Surgeons often do not deal with bites and may not notice the problem, so we remind you once again that only competent planning and coordination with a prosthodontist will avoid such issues.
Incorrect distance between implants
We have already mentioned this above. Implants that are too close may not integrate properly. Even if they do integrate, the bone tissue is quickly resorbed due to impaired nutrition.
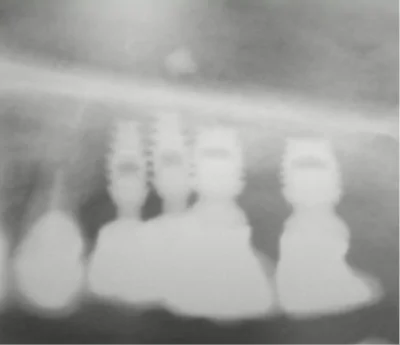
Implants installed unacceptably close will guarantee problems in the future. YouTube / Dr. Kamil Khabiev / Dental Guru Academy
Sometimes, implants installed in this way are pulled out even when an impression is taken, not to mention supporting a full-fledged restoration.
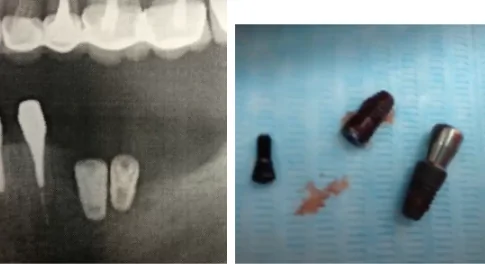
The implants failed to undergo osseointegration and came out of the bone during the first load. YouTube / Dr. Kamil Khabiev / Dental Guru Academy
But even if the implants take root after such a placement (it would be better if they did not), this leads to:
- Difficulties with taking impressions (even digital)
- Difficulty installing abutments
- Difficulties with the manufacture and fitting of the prosthesis
This can be clearly seen in the example below. In general, you could lose your license for such work, but that’s not the point now.
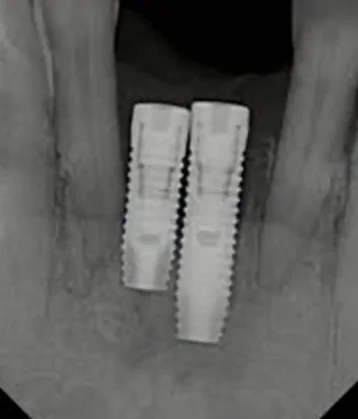
Unacceptably close installation of a pair of implants. YouTube / Dr. Kamil Khabiev / Dental Guru Academy
Think about how to install abutments here and which ones to use, considering that there is a planar, not a conical, implant/abutment connection. To save the situation, you need to remove one of the abutments, and you will be very lucky if the second one remains and you don’t have to remove both and perform bone grafting before installing a new implant.
The logical solution for this case is a cantilever prosthesis. This is not a loaded area, and such a solution will be quite durable and functional.
Too much distance between implants is not much better.

The distance between the upper jaw implants is too large. YouTube / Dr. Kamil Khabiev / Dental Guru Academy
Here is your list of difficulties:
- Difficulties in making a sufficiently strong and extended prosthesis
- High probability of ceramic chips (PFM) and prosthesis fractures (zirconium)
Almost the only solution in such situations is prosthetics on massive metal frames, as shown in the picture below. However, such structures are usually removable and do not restore chewing function 100%.
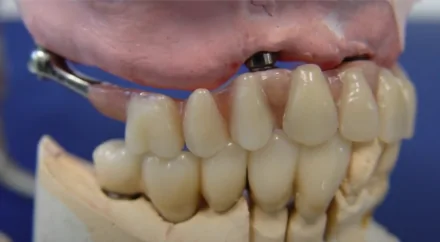
Metal-plastic prosthesis to solve the problem of large distances between supporting implants. YouTube / Dr. Kamil Khabiev / Dental Guru Academy
The illustration below shows generally accepted and practice-tested recommendations for the minimum distance between implants.
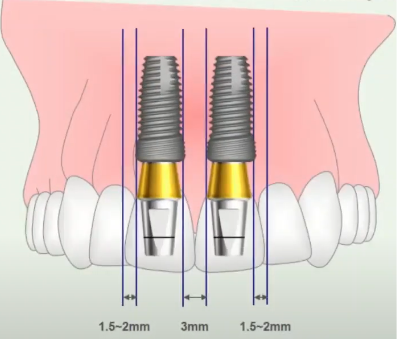
Recommended minimum distance between dental implants. YouTube / Dr. Kamil Khabiev / Dental Guru Academy
There are no specific recommendations regarding the maximum distance, but as practitioners say, you need to be guided not only by the textbook but also by common sense.
In addition to the minimum distance between the implants, it is important to take into account the angle of inclination of the implants. Otherwise, the surgeon can maintain the minimum distances between the necks of the implants but install the implants with an inclination towards each other, as indicated by the red lines in the figure below.
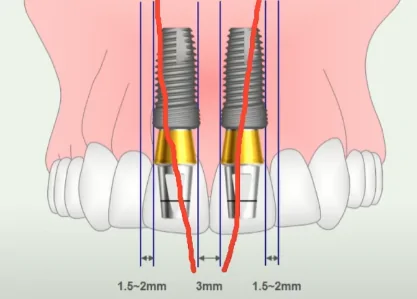
Potentially incorrect angle of installation of implants tilted towards each other. YouTube / Dr. Kamil Khabiev / Dental Guru Academy
Think about how to make an impression and install transfers with this position of the implants. There will also be problems with the abutments. Therefore, the use of parallelism pins is a mandatory step for closely spaced implants.
If such a situation has already occurred, and the mutual inclination is not critical and the abutments with the crown fit normally, then you will have to make impressions and dentures one at a time. First, take a transfer and impression of one tooth, then the second, and the dental technician will make crowns using two impressions.
Unobvious disadvantages of screw retention
Despite the fact that in almost every article we wrote about the advantages of screw retention on multi-units, it also has disadvantages. Let’s continue to analyze the case described above; in the photo below, you can see how the screw shafts emerge.
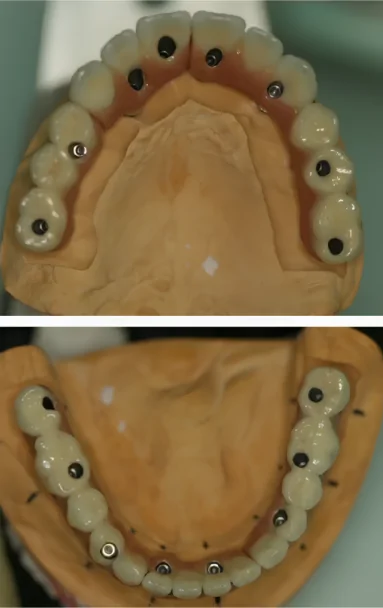
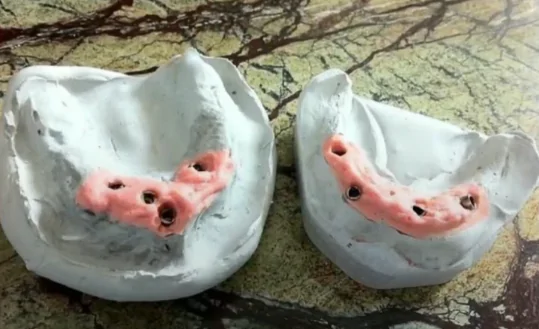
Fitting the prosthesis on the model – screw retention on the MUA. YouTube / Dr. Kamil Khabiev / Dental Guru Academy
On many implants, the screw shafts extend onto the functional cusps. The screw shafts are covered with a composite, which quickly wears off and disrupts the chewing function. In this case, these are the 14th, 25th, and 44th teeth, and in the area of the 34th tooth, there is no cusp at all. Yes, we know that this cusp is not functional—the buccal cusp on the lower jaw is functional—but nevertheless, the emergence of the screw shafts onto the functional cusps is highly undesirable.
So, in addition to the problem when the screw shafts reach the front surface of the incisors, there is also this issue. Of course, this is not critical, but the patient should visit more often to have the composite plugs restored. However, we all know that patients often “disappear” after prosthetics and only reappear when serious problems occur.
This once again proves how important planning the operation is. Look again at the X-ray; you can see that the placement of the implants is not very good. The reason was that the surgeon placed the implants where it was convenient for them, not for the prosthodontist.
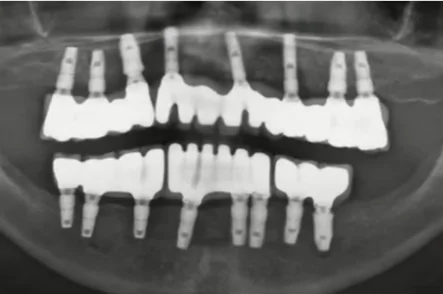
Satisfactory, but not optimal placement of implants in completely edentulous restoration. YouTube / Dr. Kamil Khabiev / Dental Guru Academy
Yes, it cannot be said that the surgeon intentionally did something wrong. This is a really complex case with one-step implantation immediately after tooth extraction, making it difficult to install implants in the right places. In some areas, the interradicular septum was broken during removal, and the implant had to be displaced. In other areas, there were different problems, and the surgeon tried to install implants where the bone was preserved as much as possible.
Surgeons with extensive experience know how to correctly install implants directly into the socket and achieve good stability. Here, the surgeon was probably a little hesitant to place implants directly into the sockets of the extracted teeth.
This is not everything we wanted to discuss, but there is a lot of material, so we decided to divide this article into two parts. In the next part, we will look at the following questions:
- Recommendations for installation and analysis of clinical cases.
- How to determine the optimal implant depth.
- Optimal ratio of coronal to intraosseous parts.
- Is it necessary to connect the implant to a natural tooth?
- How to remove excess cement and the advantages of screw retention.
- Planar connection of the implant to the abutment.
- How to avoid damaging a thread, hex or screw.
- How important is disinfection of abutments?
- What to do if an implant fracture occurs.
- In what cases is screw fixation to the implant used (without MUA).
- Double platform switching.
- Why clinical planning is not enough for the success of prosthetics.
We are waiting for you in the second part of the article.

